So there have been some questions and concerns regarding the Emerald Launcher on a Mac Computer. Many of the questions usually revolve around not being able to Launch it, not being able to Test the color, or not being able to write the color to the Emerald Board.
I will attempt to write out a clear and concise tutorial on how to do this. This is only for a Mac Computer, not a PC. I dont know how to use a PC as I have completely gone over to the Dark Side and only own Apple Products.
Lets get started:
Its a bit daunting to know that you have just invested a rather large sum of money on a toy and are completely lost on how to use it to its fullest potential. I hope to be able to help you achieve a small amount of proficiency with your new Emerald board. In order to accomplish this I will be focusing only on the Emerald board aspect of your new saber.
The first thing that needs to happen is to make sure that you have uploaded the correct version of the Launcher. According to the Ultrasabers website, the newest Launcher should be accessible through this link:
http://www.saberforum.com/index.php?topic=23236.45Find the first post created by Deep and download the Launcher to your desktop or to your hard drive.
Once download is complete locate the Launcher and double click to start the application.
With the Emerald driver you have a wide range of options and customizations that can be achieved for your blade color.
I only want my saber to have one color. Achievable
I want my saber to pulse between two colors Achievable
I want Flash on Clash (FoC) Achievable
Once the Launcher is open its easier if you get accustomed to the Launcher format before trying to make changes to your saber. Of course if your anything like me you will launch it and start manipulating things and figuring this out by trial and error (which is ultimately more frustrating).
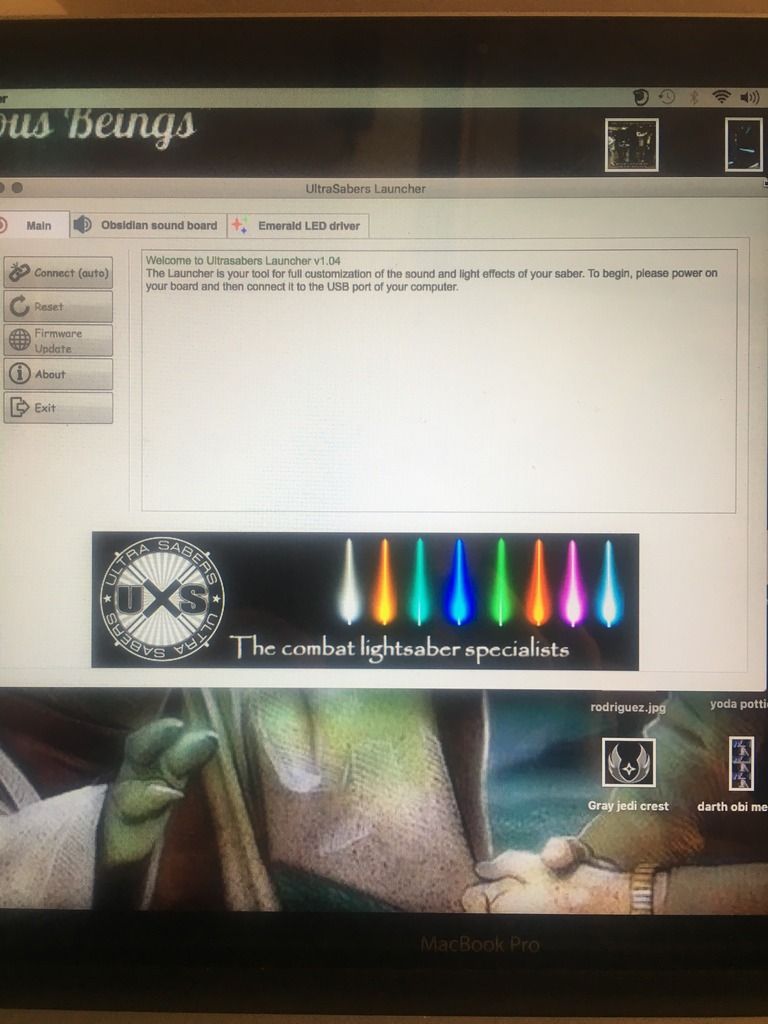
The top of the Launcher has three tabs:
Main Obsidian sound Emerald LED Driver
The Main tab is your welcome screen and gives you the most important piece of advice to getting started.
The Launcher is your tool for full customization of the sound and light effects of your saber. To begin, please
power on your board and
then connect it to the USB port of your computer.
It also gives you a log of what changes you have made to your saber and whether the changes were successful.
The Left Column has several self-explanatory buttons:
Connect: which should occur automatically when you initially plug in your Emerald Board, however if it does not then just push connect.
Reset: which allows you to reset your settings.
Firmware Update: Updates the Board software.
About: Lists the responsible parties that created the Launcher
Exit: Exits Launcher
We will ignore the second tab, Obsidian Sound, at this time since the focus of this is the Emerald Launcher.
At this time, if you are going to change your saber as you are reading then
POWER UP your saber and
THEN connect it to the USB port. (You should have purchased the cord that attaches your saber to the USB port, if not you need a mini USB cord for this). You will have to remove your saber battery pack and Emerald/Obsidian boards to access the ports. Remove the pommel and gently tap the end of the saber with the palm of your hand. Many new saber owners get scared about this step as they dont want to break anything. You need to get the boards out far enough that you can actually access the ports for whatever board you have equipped.

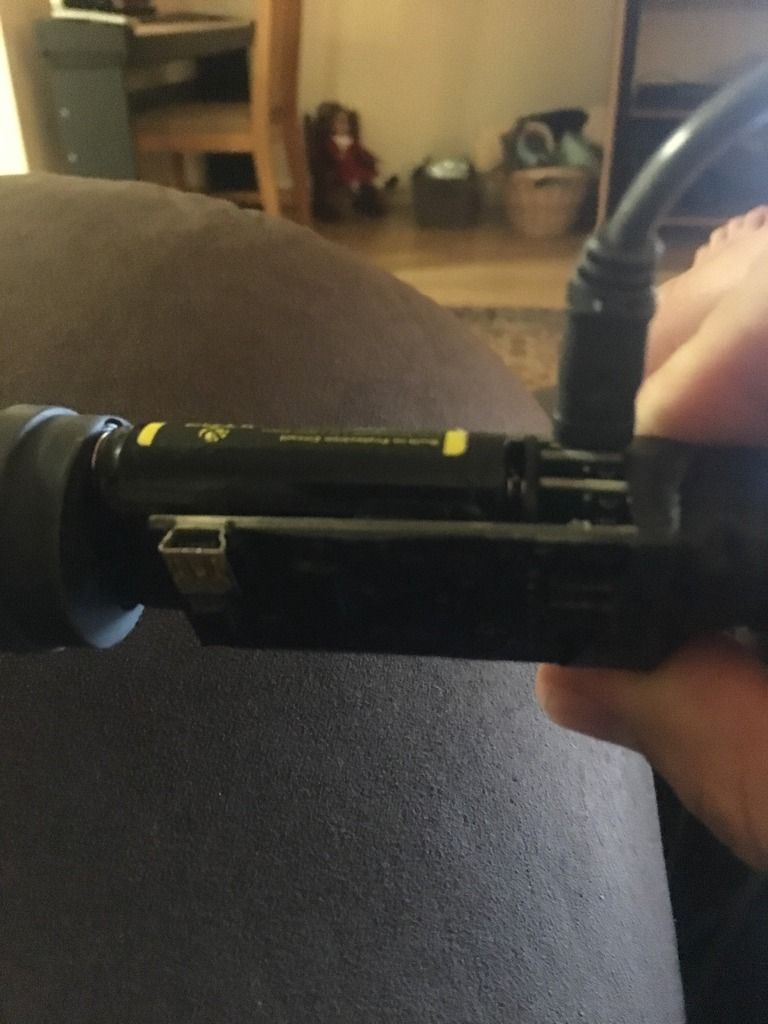
If you have Obsidian and Emerald you need to make sure that you plug in to the correct board. You will not be able to change sounds if you are plugged into the Emerald board and you will not be able to change your blade color if you are plugged into the Obsidian board.
Go to the Emerald LED Driver tab. This is where the remainder of this topic will focus.
When looking at the Launcher you will see two color bars: The top bar is the bar that allows you to change the main color of your saber and also allows you to pulse between two different colors.
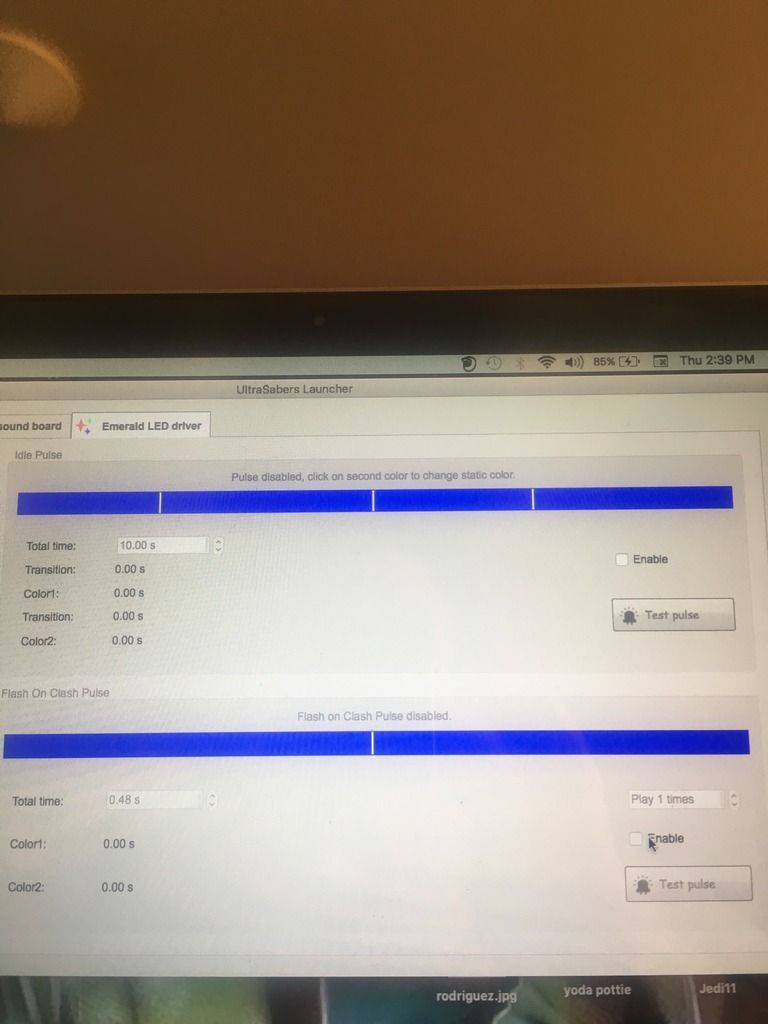
If you want only one color for your saber and nothing else make sure that the Enable option is not checked. The top bar will change to one color. Move your cursor over to the far right side of the bar so that the arrow turns into a finger pointing at the bar. Click on that section of the color bar so that you can access the area which allows you to change the saber color.
You now have access to the four different color spectrum bars of your Emerald board, it will show LED 1(red), LED 2(green), LED3(blue), and LED4(white or amber based on the board you got, but it shows up in yellow on screen), it doesnt matter if its a RGBW or RGBA. Adjust the color bars by moving the individual cursors between 0% and 100%. This is called the advanced color spectrum. If you want to see a full color palate push the easy button and the full color palate will replace the advanced color spectrum. Pick the color of your choice and then (if your saber is attached) push Test, your saber should light up with your color choice. If you are satisfied then push the OK. To complete the saber color change, look at the left column and push Write to Board. This will now save the setting to your saber.
If you are not satisfied with only one color then its time to activate the Enable button. This will change the top bar to two colors and you now have access to allow your saber to pulse between two colors. The top bar is now divided into 4 sections by three dividers. The Dividers are there to adjust how long you want each color to be active and how long the transition will take between color changes. Section one is to dictate transition time. Section two allows you to change your first blade color. Section three is another transition section. Section four allows you to change the second blade color. You will need to spend time here trying to figure out what setting you prefer for the transition time between colors. Once you are satisfied, push the test pulse button and see how your hard work has paid off. Satisfied! Push Write to Board and your saber now will pulse between two colors.
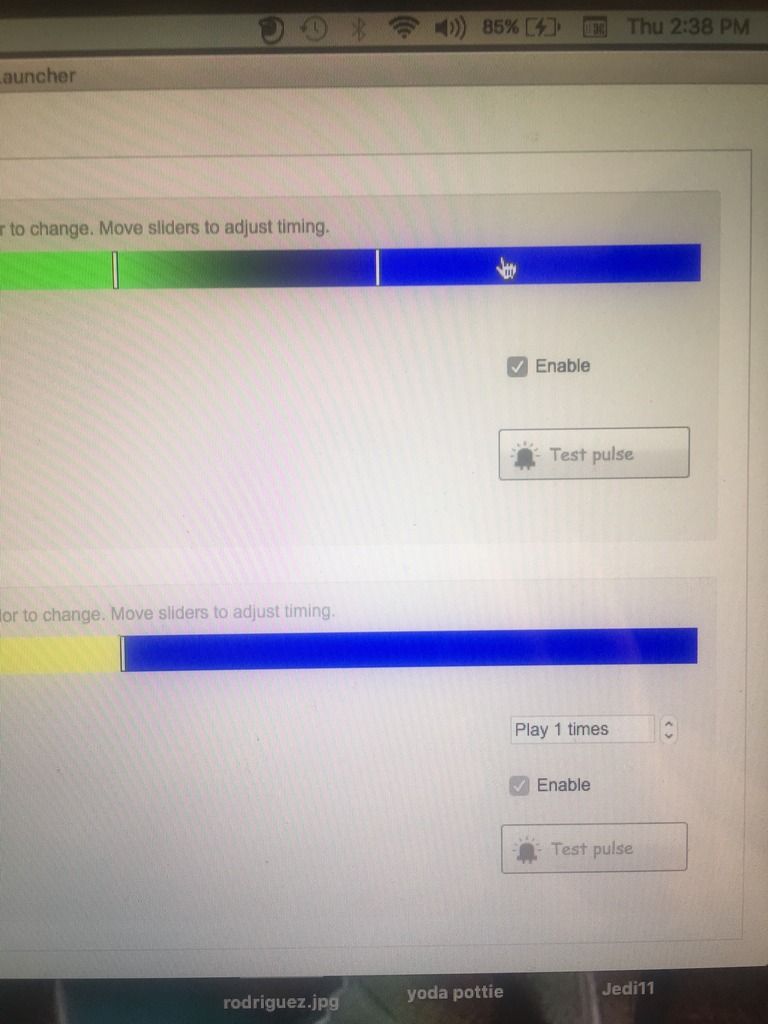
Now you want FoC enabled on your saber. The bottom color bar needs to be enabled to activate your FoC. Make sure Enable has been checked and you have enabled FoC. There is one slider to adjust how long you want the FoC to last on each color. There is also a option to play ? times this is for when the FoC is deactivated by pushing your activation switch on your saber not the program. Once again you need to experiment with the colors and settings for the color. Just be aware that the second color of the FoC is your second saber color, so if you change that color on the FoC bar you will automatically change your second saber color on the top color bar. Test your pulse once you are satisfied with the results and then write to board

If you want to create several different color profiles do so and then save them to your hard drive. This way you can always load one of your presets instead of creating a new one every time you want something new. Once you are completely satisfied with all of your changes go back to the Main Tab and disconnect your saber. All of your settings should have been saved to your board and the saber is now ready to be used with your new color.
Hope this helps and if you have any questions feel free to ask.
MTFBWY
KDP


