Click here for lightsabers
  • Home
  • Help
  • Login
  • Register
Pages: 1 2 [3] 4 5 6   Go Down
Author Topic: THE Battery Setup for Stunt stabers!  (Read 39071 times)
RevanReborn
Technomancer of the Graflex Order
Knight Commander
*

Force Alignment: -1086
Posts: 1121


« Reply #30 on: May 30, 2016, 12:11:48 PM »

Sorry to revive an older thread, but (1) do these packs have a constant output?  I read that the type I'm interested in uses 'Panasonic' batteries, so (2) what does that mean? 
(They're Li-ions.)  The type I'm interested it has LED status lights, so I'm looking to drill a square window in the hilt about 1" x 1" so I can see them.  (3) What size bit should I use?  Again, sorry for reviving an older thread, and for my very scattered questions.

No worries dragon two, that's the whole point of the forum Smiley

1) constant current... As opposed to intermittent lol?  Hmmm, now that wouldn't make for a very good power source would it lol? Wink.  That's probably some distinction I don't know about cause I'm new to the theory of these small electronics, but  Yep, your all good on that one.

2) Panasonic batteries just refers to a specific brand/ type of Li ion- pretty much all of the bank's I've seen that use cells use 18650's, so I'm sure you'd be fine using any brand of 18650, but when it comes to batteries some of the cheapy ones are just crap- really terrible peroformance and really exaggerated stats, so i'd stick with a reputable brand personally, you get what you pay for for sure- easy piece of mind would be to google Panasonic 18650 info/ specs, take a quick look at their stats (guessing 3.7V, 3400mA) and then you could just make sure whatever batteries you scoop have the same as those, Panasonic might put out a little higher current than more generic brands (2400-3000mA'ish) but otherwise the same - I seriously doubt it's referring to any kind of wired pack (multiple 18650's heat shrunk together) because just too bulky to fit in bank for one, and also redundant- your protection circuit is already in the bank- who knows though, maybe panasonics 18650's are a diff shape/ dimension than most?  Might be worth it to pay the extra for those either way, you know they'd be aweome quality batteries.

3) to make the window it all depends what you want- a square window, any shape with right angles really, would be more labour intensive than circular, unless you know someone who can mill it for you, since you're gonna have to start with a circular hole- but totally doable though, with a bunch of little files, a dremel and some burrs, grinding stones, etc.- the best way to go about it isn't to start with a particular bit size, but by actually drawing out the exact window on the hilt (or tape it off or whatever but just mark off the exact area you want removed), then start trying bits until you've found the absolute biggest bit that will fit, the biggest bit you can use to drill out as much of the middle of your square as you can without exceeding that area/ going outside the lines of your drawn window.  So you'll end up with, say, a 3/4" hole removed from the middle of your 1" square, then you use the files and dremel to achieve the rest of the shape/ remove the rest from the corners.  cutting disks on the dremel are an easier way to get the right angles involved in square shapes, but you need a gigantic amount of space in your cutout area to allow you to get the disk down in there and cut... 1" oughta be doable actually, I bet that's right about what the diameter of most small heavy duty cut off wheels are, you might be able to sink a fresh one right through the hilt body completely to form each of the four sides... Won't that be a little big though?  I'd draw it out and see how it looks on the body first.

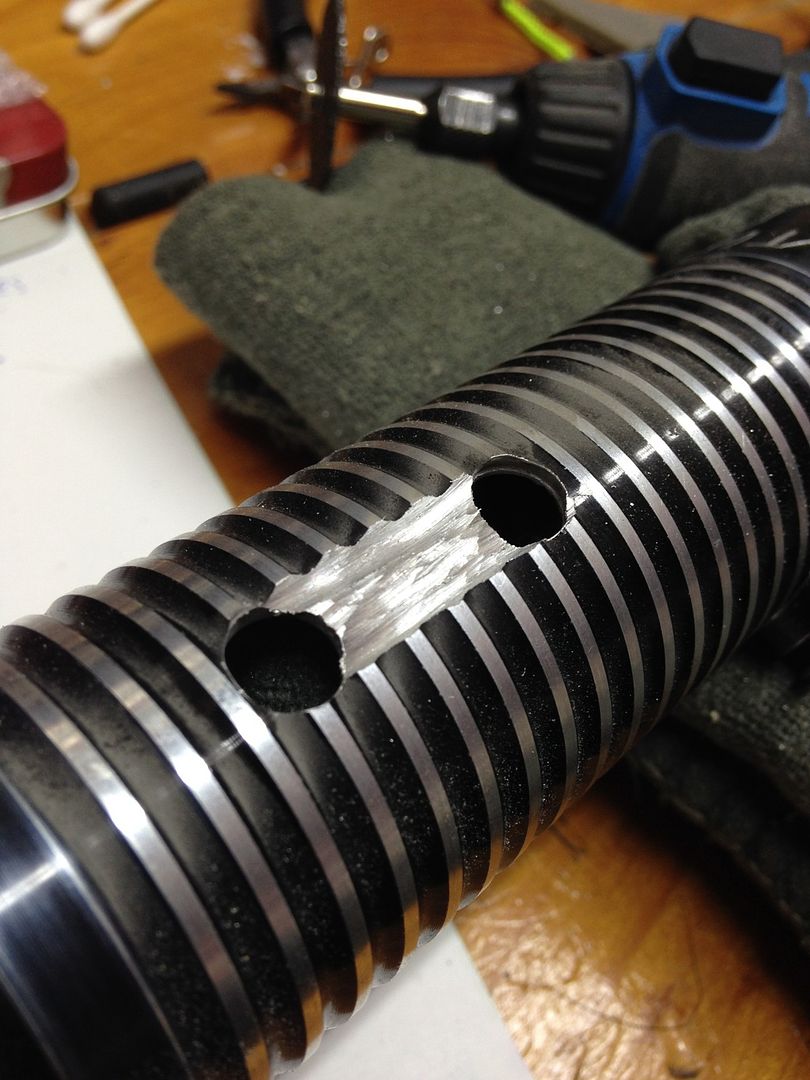
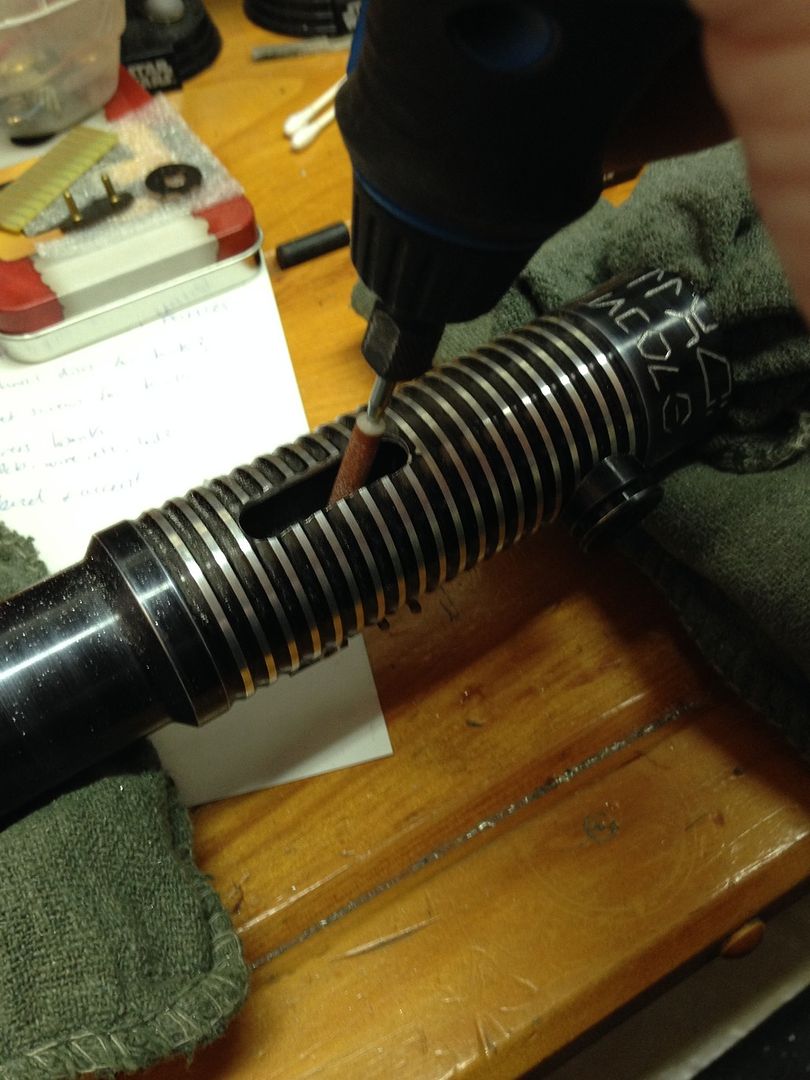
The status lights are likely 5mm diodes- 5mm's wil fit through a 13/64" hole (tiny), so even a small hole will completely show your led's- to put it in perspective, my bank is rectangular, with the biggest side being slightly less than 1", so a 1" window would actually show the entire bank.  I always kinda prefer the look of elongated windows with curved lines, so I started with two 1/4" drilled holes and removed the rest of the shape like I described above:


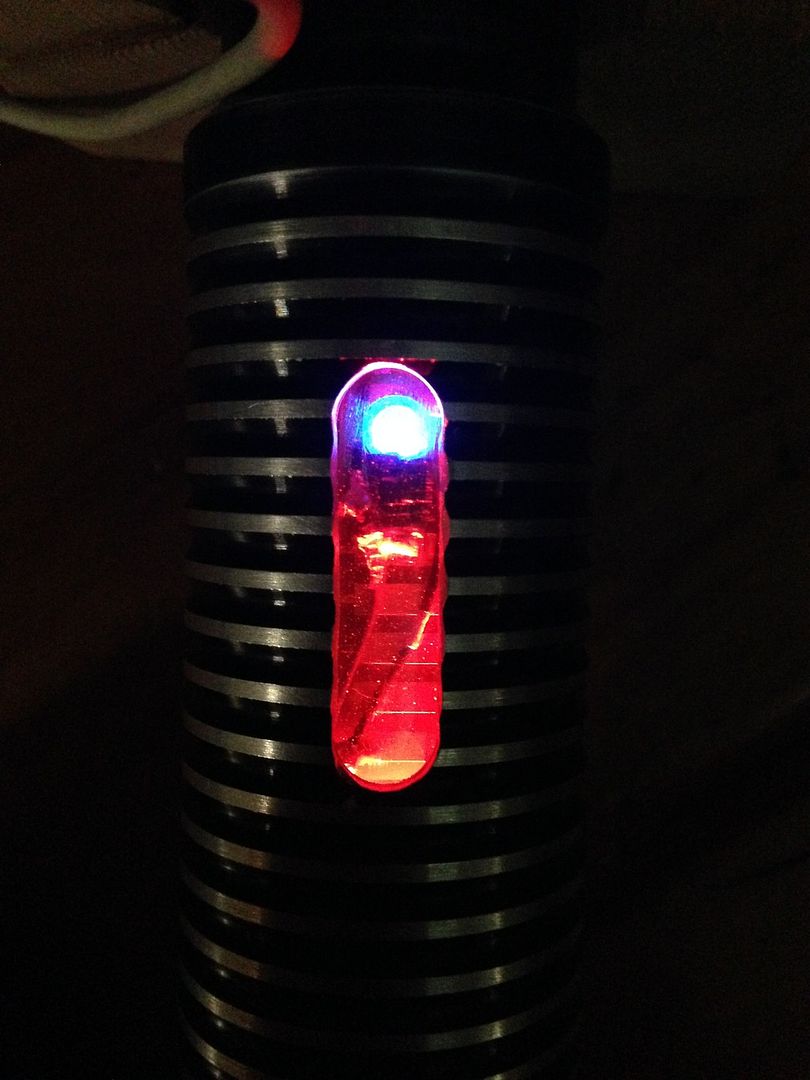
Surprising how big even a small cutout looks on these hilts- this one's 1/4" by almost 1", and I still had enough viewing area to dress my bank all up like an exposed circuit board and illuminate it.

Hope that helps- if you're looking to do this you might might wanna take a quick look through my current build log, "my main dueling saber...etc." Should be just on second page somewhere- there's some stuff you might find helpful in there, cause you'll be getting into a lot of the same stuff- like making an adapter to go from the bank to your wiring etc.  Hope that helps, MTFBWY Smiley

Logged

Dragon Two
Knight Lance Corporal
*

Force Alignment: 5
Posts: 49


Keep me neutral - Accepting LS or DS points


« Reply #31 on: May 30, 2016, 04:21:16 PM »

I've actually been following your build, but I haven't posted in the thread (yet).  Could you PM me the link to the power bank you used?  I looked for it, but couldn't find that particular one.  Thanks for the help!
Logged

Failure is a concept created by human minds as an excuse for not trying at all.

There can be no light without shadow.
There can be no shadow without light.

Owner of:
Exactly 0 Ultra Sabers

phantompencil
Knight Aspirant
*

Force Alignment: -9
Posts: 14


« Reply #32 on: May 31, 2016, 04:57:22 AM »

Amperage is just the maximum the pack's able to put out. If your LED's only asking for 1A, the pack'll only put out the 1A. Just worry about the 5v for your resistor/driver calculations.

That said, keep an eye on reviews, since lots of off-brands like to fluff up their mAh ratings.

Just to update on this.  I picked up the 5V, 2.1A output power bank and tried it on my tri-cree fire orange stunt.  If left on, the hilt gets pretty warm.  Not blazingly hot, but if it was my cell phone, I'd be worried. 

I don't get any of the heat problem with the Aukey power bank.  Same brightness for both of them. 
Logged

iLoki
Force Sensitive
*

Force Alignment: -4
Posts: 4


« Reply #33 on: May 31, 2016, 05:43:20 PM »

I am planning on making this modification to my Sentinel v4 here before too long..

I did a little poking around inside the saber (mostly trying to figure out the proper way to pull the electronics out so that I have a decent amount of room to actually work on the wiring).

I am not seeing any simple way to pull the electronics out -- I have the standard guarded switch, which I understand is just press fit into the hilt.

I have two questions, I suppose:

1.) If I remove the switch, the LED module and battery casing should slide out from the emitter, correct?

2.) Is it necessary/recommended to remove the electronics before wiring up the new connection?
Logged

RevanReborn
Technomancer of the Graflex Order
Knight Commander
*

Force Alignment: -1086
Posts: 1121


« Reply #34 on: June 01, 2016, 11:16:57 AM »

I am planning on making this modification to my Sentinel v4 here before too long..

I did a little poking around inside the saber...

Well, there's your first problem- sentinels don't like to be poked around in, they prefer a gentle caress, and even then they'll usually make you take them out to dinner first and have long boring conversations about where you see yourself in ten years, hahaha!  No no ok seriously- the simple answer to your questions: yes and no.

1) yeah, pulling out the switch and then snipping the wires allows you to slide your internals right out.

2) nah, really no need to take your electronics out if that's all you're doing Smiley.  Swapping the battery pack for the bank is insanely easy- if you can get your pack out far enough where you can reach the two wires coming out of it  then you're all set- just cut them (ONE WIRE AT A TIME IF BATTERIES ARE STILL IN IT) and solder the bank in and slide that back in and you're good to go.  Good luck- MTFBWY. 
Logged

iLoki
Force Sensitive
*

Force Alignment: -4
Posts: 4


« Reply #35 on: June 02, 2016, 12:19:43 AM »

Thanks for the info Smiley

just getting started on it now. Point for you! Smiley
Logged

Ackevor
Knight Aspirant
*

Force Alignment: 8
Posts: 12


"You must unlearn what you have learned."


« Reply #36 on: June 11, 2016, 03:14:54 PM »

Well I was hoping to replace my battery pack in my emerald saber with obsidian sound but 5v isnt enough. The LED wont power on with anything less than 6v :-(. I order a DC-DC step up and will see if I can rig it to work with the power bank. I know it has a 3.7V cell and is stepped up to 5, I am hoping I can step that further to 7.5v. Although the capacity would then be reduced significantly, likely by half.
Logged

RevanReborn
Technomancer of the Graflex Order
Knight Commander
*

Force Alignment: -1086
Posts: 1121


« Reply #37 on: June 11, 2016, 04:38:21 PM »

Very interesting Ackevor!!  I'm very much looking forward to following this- bringing these power bank set ups into the land of sound boards etc. would be wicked Smiley
Logged

Lord Canterbury
Dark Knight of The Scorpion Order
Knight Commander
*

Force Alignment: -1313
Posts: 1972


Fish Fingers & Custard


« Reply #38 on: June 12, 2016, 01:18:05 PM »

Well I was hoping to replace my battery pack in my emerald saber with obsidian sound but 5v isnt enough. The LED wont power on with anything less than 6v :-(. I order a DC-DC step up and will see if I can rig it to work with the power bank. I know it has a 3.7V cell and is stepped up to 5, I am hoping I can step that further to 7.5v. Although the capacity would then be reduced significantly, likely by half.

DC step ups . . . have you been hacking my iOS history?  Wink

That's something I'm looking into.  May not be an easy solution though.  Step up in Voltage will result in current loss. 

It's going to take some experimentation with various setups and using a multimeter to read the outputs to get it right, but I'll post it when i get there.
Logged

Winning? Is that what you think it's about? I'm not trying to win. I'm not doing this because I want to beat someone, or because I hate someone, or because I want to blame someone. It's not because it's fun. God knows it's not because it's easy. It's not even because it works, because it hardly ever does. I do what I do because it's right! Because it's decent! And above all, it's kind! It's just that. Just kind.


~ The 12th Doctor in "The Doctor Falls"

RevanReborn
Technomancer of the Graflex Order
Knight Commander
*

Force Alignment: -1086
Posts: 1121


« Reply #39 on: June 12, 2016, 01:22:35 PM »

Whoa!  I'm TOTALLY looking forward to seeing this!!
Logged

Kouri
Knight Commander
*

Force Alignment: 328
Posts: 579


Artisan


« Reply #40 on: June 16, 2016, 03:20:07 PM »

If it's an Emerald setup, I'd say to skip the USB bank and just grab a 2x 18500 stick pack for the increased runtime. Only about 10cm (4")  long and should fit into any v4 or full-MHS hilt. 2X 18650s are also available, if you've got > 13cm (5") of hilt available. A drop in replacement for the 2x14500 US hilts usually come with, as long as you can come up with a mounting solution.
Logged

Master Medwyn
Resident Master
Knight Commander
*****

Force Alignment: 788
Posts: 1302


Silver Blade of the Distant Earth Knighthood


WWW
« Reply #41 on: June 16, 2016, 04:18:25 PM »

I already got the battery bank arrived and the USB connectors, the pyrography set will do as a soldering iron, now just waiting for the solder to arrive.
Pretty excited on this one, will come back once I've done the first conversion.
Logged


RevanReborn
Technomancer of the Graflex Order
Knight Commander
*

Force Alignment: -1086
Posts: 1121


« Reply #42 on: June 16, 2016, 04:31:45 PM »

Nice!!  That's awesome Smiley.  good luck man, can't wait to see it. What saber you doing it on?
Logged

Master Medwyn
Resident Master
Knight Commander
*****

Force Alignment: 788
Posts: 1302


Silver Blade of the Distant Earth Knighthood


WWW
« Reply #43 on: June 16, 2016, 04:40:11 PM »

Thanks Revan, there's my Dominix v4 LE which I do first and if that goes well, the Aeon v4 and Prophecy will follow.
Hopefully they'll all go fine Smiley
Logged


RevanReborn
Technomancer of the Graflex Order
Knight Commander
*

Force Alignment: -1086
Posts: 1121


« Reply #44 on: June 16, 2016, 04:57:31 PM »

Yeah it's super easy so long as it's on a stunt saber, you'll be surprised Smiley.  Just use the pic CJ has up of the pins of the USB end- so can see which is pos and neg, and it's a simple/ straight swap, like just a matter of cutting the end off a USB cable and hooking your wire to that to plug in to bank. Point for good luck.
Logged

Pages: 1 2 [3] 4 5 6   Go Up
Send this topic | Print
Jump to: