Click here for lightsabers
  • Home
  • Help
  • Login
  • Register
Pages: [1] 2   Go Down
Author Topic: (I'm a noob) How hard is it to modify a saber by adding guards? (No More Heroes)  (Read 7258 times)
Sir Henry Cooldown
Force Sensitive
*

Force Alignment: 0
Posts: 7


Beam Katana Enthusiast


« on: October 01, 2016, 06:19:40 AM »

Hello, I am a noob who came here with a passion for Henry Cooldown's lightsaber off of No More Heroes. I was wondering if I were to get a Flamberge SE, how hard would it be to add an additional two guards perpendicular to the already existing guards? (Think of Kylo Ren's with 4 instead of 2; I know its impractical but its visually appealing to me). I have no experience with lightsabers whatsoever so I was wondering about the easiest possible way to do this.

Here are some reference pics:

http://vignette1.wikia.nocookie.net/nomoreheroes/images/0/03/Henry.jpg/revision/latest?cb=20160301020514

http://vignette4.wikia.nocookie.net/nomoreheroes/images/4/4e/Nmh-henry.jpg/revision/latest?cb=20100304124110

http://images2.wikia.nocookie.net/suda51/images/7/70/TradingCardNo147.png

http://vignette4.wikia.nocookie.net/suda51/images/d/dd/CrossSword.png/revision/latest?cb=20090913095309

http://s306.photobucket.com/user/MMZero5/media/nmhcrosssaber.png.html
Logged

Corwyn VonBeck
Knight Commander
*

Force Alignment: -340
Posts: 1071


Grey Knight


« Reply #1 on: October 01, 2016, 04:20:19 PM »

Ok, first impression here I'm thinking regular lightsaber, with a PVC pipe addon at the emitter and creative use of mirrors to light the 4 cross blades while allowing the main blade to show well. Beats trying to use 5 LED modules and having 20 seconds battery life. Headed out for the day right now but will think it over and flesh it out some more when I get back.

RevanReborn probably has some pretty cool ideas for this as well.
Logged

Sir Henry Cooldown
Force Sensitive
*

Force Alignment: 0
Posts: 7


Beam Katana Enthusiast


« Reply #2 on: October 02, 2016, 05:55:26 AM »

Thank you so much for replying! That does sound good so far, and you were saying to contact revan reborn?
Logged

Corwyn VonBeck
Knight Commander
*

Force Alignment: -340
Posts: 1071


Grey Knight


« Reply #3 on: October 02, 2016, 11:02:18 PM »

I actually figured he would have stopped by himself by now... I'm currently working with him on a project of mine and his ability to see ways through things is awesome.

I'm looking at something like: this and: This
If you insert 4 mirrors at 45 degrees taking up about half of the lower opening for the side blades, I think you would get sufficient light flow to all 5 blades. might be a little tricky to get the mirrors set in there right and solid enough for dueling, but I think it can be done. May be better going with a 1.25" piece rather than one inch, as ID may not quite be enough to slip a blade in.
Logged

RevanReborn
Technomancer of the Graflex Order
Knight Commander
*

Force Alignment: -1086
Posts: 1121


« Reply #4 on: October 03, 2016, 12:25:41 PM »

Holy smokes that's a crazy/ wicked saber! 

Hmmm.... another epic project (we've had a couple real cool ideas put forward lately- ie. fusion rifle) but another real doozie in terms of what's involved i think...

Not saying at all it's not doable, only that it'd take some real creativity, time/ effort etc compared to average project.

Call me crazy, but I don't think the biggest challenge will be lighting it.  There's options when comes to that, could always use clusters of small 5mm leds or some 10mm one ups on custom heat sinks for side blades, less work for batteries, can be crammed into much smaller spaces than modules. 

But I think the crux of this will be getting another two quillions/ guard blades mounted in on the same plane as the original two... not a lot of room for that if doing 1" or 7/8" blades on a 1.5" hilt.  I think icicle blades would be the way to go- something like this:

http://www.saberforum.com/index.php?topic=26780.msg398943#msg398943

Because the outer diameter of 'blade' really depends on how much you trim it length wise.  If you cut them down slightly shorter/ closer to tip and sand a bit I'm sure you could get them down to 5/8" at where they go into blade holder, that would make fitting all 4 in one row/ one ring/ one height on hilt etc way easier. 

Agree you might wanna go pvc up at emitter.  If you want you can always put sink tube over the pvc so it has the look/ feel of real metal.  I've done that before I can show you if interested.  Be way easier to cut/ drill something like that in.  I'm still trying to picture how small you'd need to get those blades to fit in a ring like that... say your blades are 5/8", you'd prob want 3/4" holes for side emitters AT LEAST, cause that'd only give you enough room to have 1/16" thick walls for what u use (emitters), anything thicker walled than that and you'd need smaller than 5/8" od blades... could four 3/4" holes even fit in a ring around a hilt sized tube?  I forget the math but I'm sure it's simple- if the diameter of the circle is 1.5", pretty sure you could google what's the circumference of a 1.5 circle- (just did lol, 4.71") if the answer is greater than 4 x 3/4", 3", then it fits.  So there'd be 1 3/4" to spare, which means the spaces between your emitters would be a bit less than 0.5"... dang that actually leaves enough room lol, I'm shocked. 

So yeah if you used something like 3/4" to make crossguard emitters they'd theoretically fit in a hilt like that, and you could use 5/8" side blades which you might be able to find if you look super hard- lemme know I can point you in direction of people who at least knew where some were at one time, though I don't think they actually have them anymore but maybe can steer you- or go the icicle route. 

I'll ask kouri what his first impressions are- he's like legit world class when comes to pvc builds no joke. 
Logged

Sir Henry Cooldown
Force Sensitive
*

Force Alignment: 0
Posts: 7


Beam Katana Enthusiast


« Reply #5 on: October 04, 2016, 03:30:21 AM »

Thanks Corwyna and RevanReborn... I'm ashamed to say but to be honest, i'm 19 but i've never done any handiwork like this before; the measurements and concepts of tools and what to do is completely alien to me. (It doesn't help that I suck at math). But I am willing to try testing this on a cheap hasbro lightsaber I have at home before getting one; what is the first specific step I should do exactly? I apologize. If all else fails, I might be able to ask my dad for help with your instructions... or do you guys know a place where I can request to get it made? I didn't realize it would be this hard. Lips sealed Embarrassed Undecided I apologize for my incompetence.
Logged

Corwyn VonBeck
Knight Commander
*

Force Alignment: -340
Posts: 1071


Grey Knight


« Reply #6 on: October 04, 2016, 03:49:14 AM »

No worries Sir Henry, we all lack knowledge in areas, and that is the great thing about these forums. What you dont know, someone else will. If I get chance, I may scrounge up the 6 way pvc and some mirrors and see what kind of prototype I can throw together on  that part.
Logged

Sir Henry Cooldown
Force Sensitive
*

Force Alignment: 0
Posts: 7


Beam Katana Enthusiast


« Reply #7 on: October 04, 2016, 04:11:13 AM »

Mr. Corwyn, you sir, have all my respect. I don't know how I can re-pay you for your kindness.  If there is anything you recommend I should do just let me know.  Grin  Smiley
Logged

RevanReborn
Technomancer of the Graflex Order
Knight Commander
*

Force Alignment: -1086
Posts: 1121


« Reply #8 on: October 04, 2016, 03:46:17 PM »

What up Sir Henry Smiley

Love your forum name btw!

Oh dude, don't even sweat it haha!!  Like Corwyn said- that's the beauty of the forum.  There's a whole slew of talent and expertise here, and everyone's super helpful.  All u need is an interest... maybe some patience determination lol and this place will enable you to learn more than you could imagine.  I only started out learning the ins and outs of Sabers and small electronics and building stuff recently, and I can't even believe the stuff I can do now all things considered.  The forums and online communities involved in this stuff have a lot to offer. 

Ok, so I'm gonna elaborate a bit on what I said up there to show you what I meant about having lots of options to light it up with leds.  And this will be a nice little intro to typical saber leds in general so this will help you get started. 

All the stuff about the size was to figure out if the idea of having the 4 side blades was even feasible- if the blades could fit all in a ring around hilt without having to be so small it doesn't look right etc.  Turns out your all good there lol Smiley.  You can fit 5/8" side emitters, which is tiny, but I can say from experience it actually looks perfect for crossguards... and that size is out there on the crossguard scene lol, and you just might know a guy with his ear to that lol, who can tell you where to find a lot of handy stuff like custom little parts etc that will help you overcome the challenges of fitting all the necessary stuff in such tight quarters.  It's very doable with leds, both in the sense of fitting a bunch in to light all those blades, and also powering them all with reasonable battery life. 

Here's what I mean:
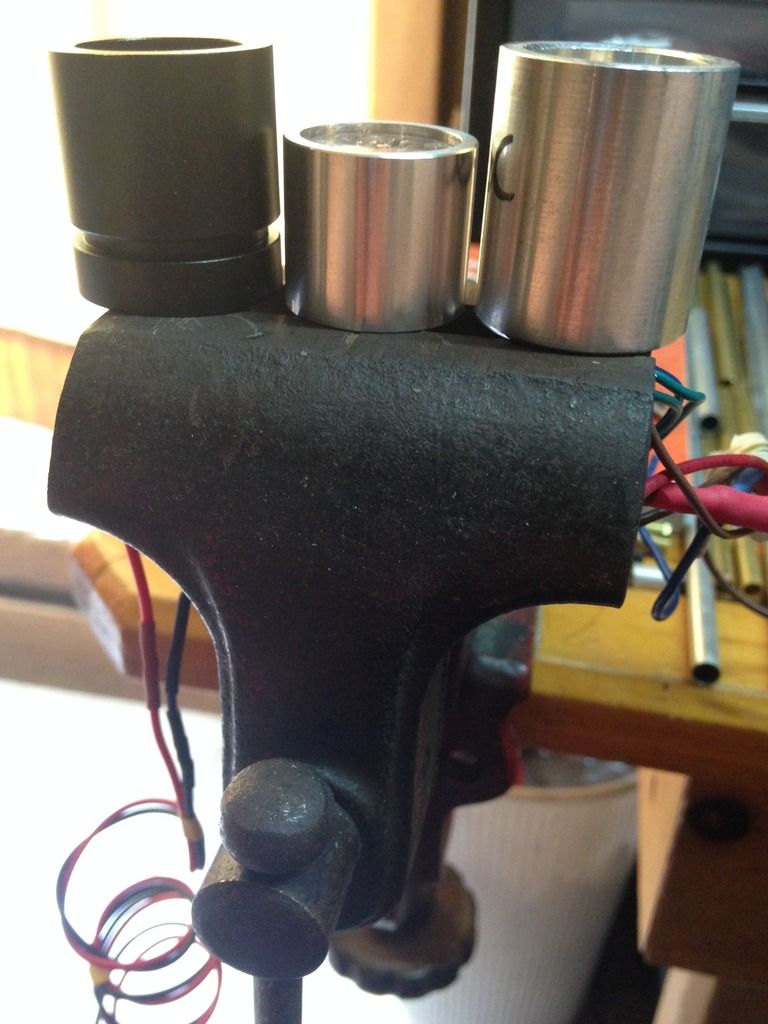
Here are just a few of the typical led modules from various Sabers.  You'll notice they don't all look identical, there's slight differences in size and appearance, but the basic design and principles are the same.


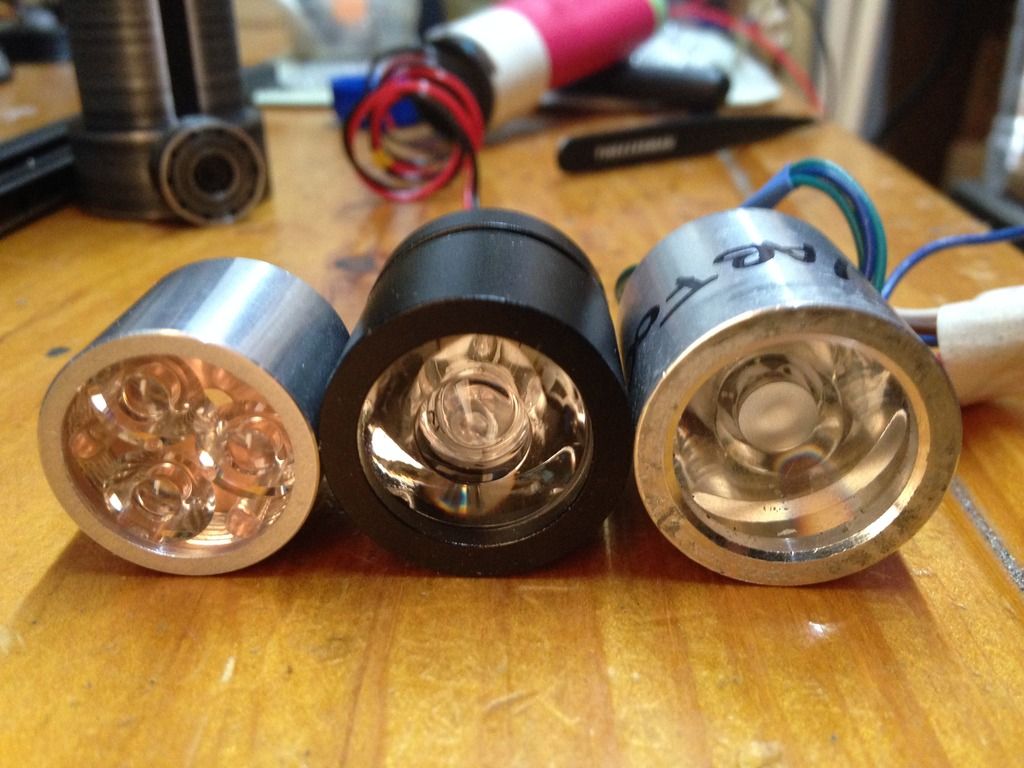
So these are what actually kick out the light to illuminate your blade(s).  These led modules all have same basic components.  The outside bit you see is the module.  It's got a sleeve/ jacket which is basically just a protective casing that also holds all the parts inside together and helps dissipate the heat generated by the led.  At the very bottom there's a metal slug, a heat sink, which goes up inside the outer jacket.  The led star gets secured right to that slug/ heat sink with star shaped thermal tape, thermal epoxy, thermal grease etc.  This led star is what your leds come on when you purchase them.  It is itslef a type of heat sink, which transfers heat from the diodes to the slug/ heat sink of the module and in turn the outer sleeve, which then dissipates the heat further to the hilt body. 

Those diodes I mentioned are super tiny, and they are what actually produce the light.  You usually see these come on stars in 1up, 3up, or 4up configurations, which just means there's either one diode mounted on the led star, three diodes, or four.  In theory, the more diodes mounted on a star, the more potential they have to run brighter/ hotter/ more current draw etc... but it's not really cut and dry like that.  A lot more to all that but no need to worry about it for now.  For now this is simply an Intro to leds and modules Smiley.  Finally, sitting ontop of the led star, is a lens, or 'optic', which focuses the light from the diode(s) into a concentrated little beam, perfect for shooting out into a blade.  This lens is what you see when you look down into the top of led module, and they are tailor made for 1,3,4 up led stars naturally, so you'll spot that when u look at the top/ open side of led module- can see if one or three up inside. 

So here  we're opening up a module and finding all those standard parts I mentioned-
Here's a custom deep red module.


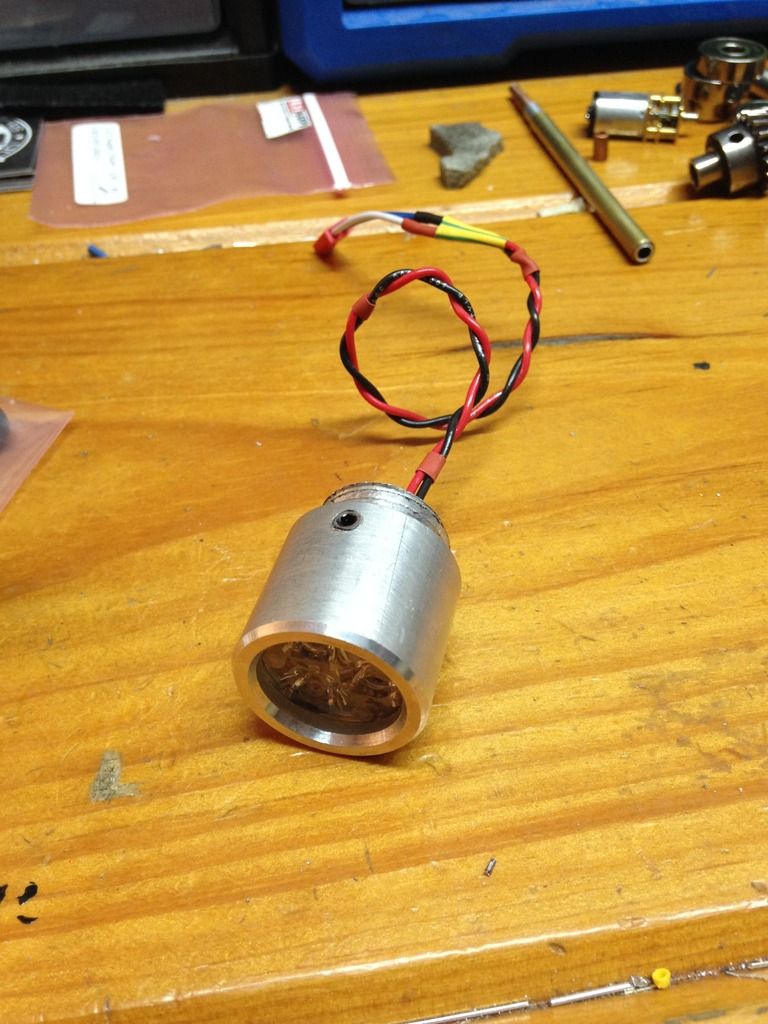
This particular module, unlike most which thread together, simply slides together and is held with a set screw.  Whoever made it must have been particularly clever lol Wink

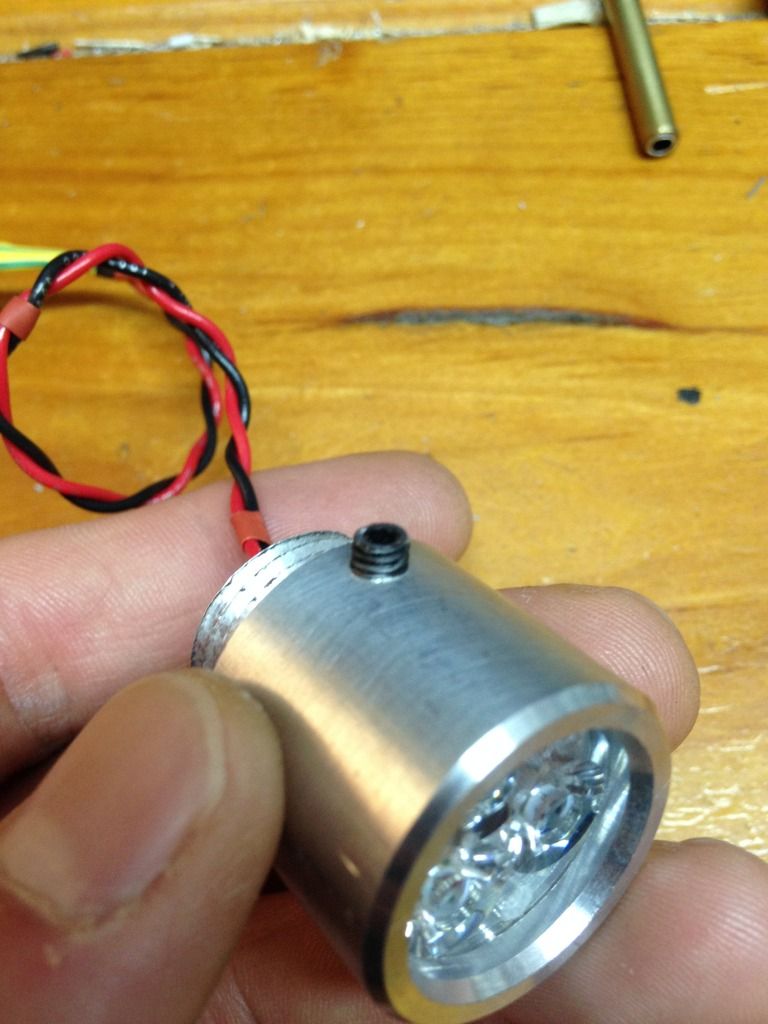
So we're loosening the screw and opening... note- you can see from the lens that there is a 3 up led star inside this one right off the bat. 

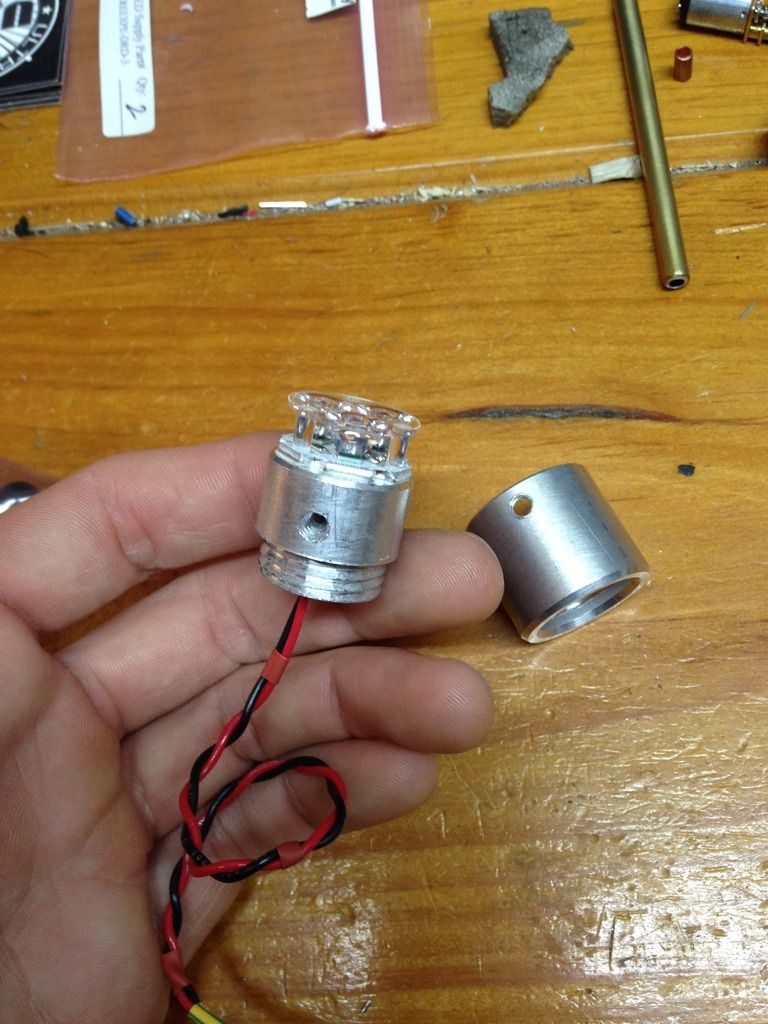
With the outer sleeve removed we can now see all the parts of the led module.  That big metal bottom piece is the slug/ heat sink.  Sitting on top of that, you can see the little white (in this case) led star.  Between the slug and led star is a piece of thermal tape cut to the shape of the star, holding the two together tight and helping with heat transfer.  And then sitting on top of the led star is the lens/ optic.  In that pic if you look at it for a while u can really get a sense of how everything in the module works to suck the heat away from the diodes on the star, down to the big slug and then out to the sleeve and hilt body. 

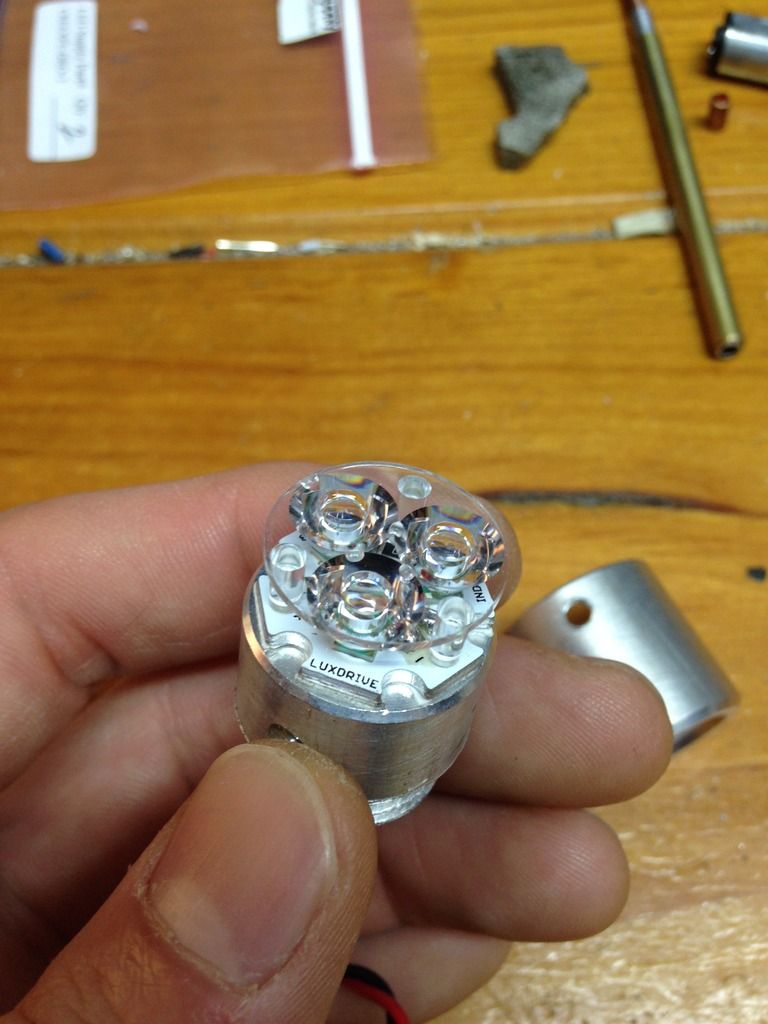
The lens specifically for 3up led stars.

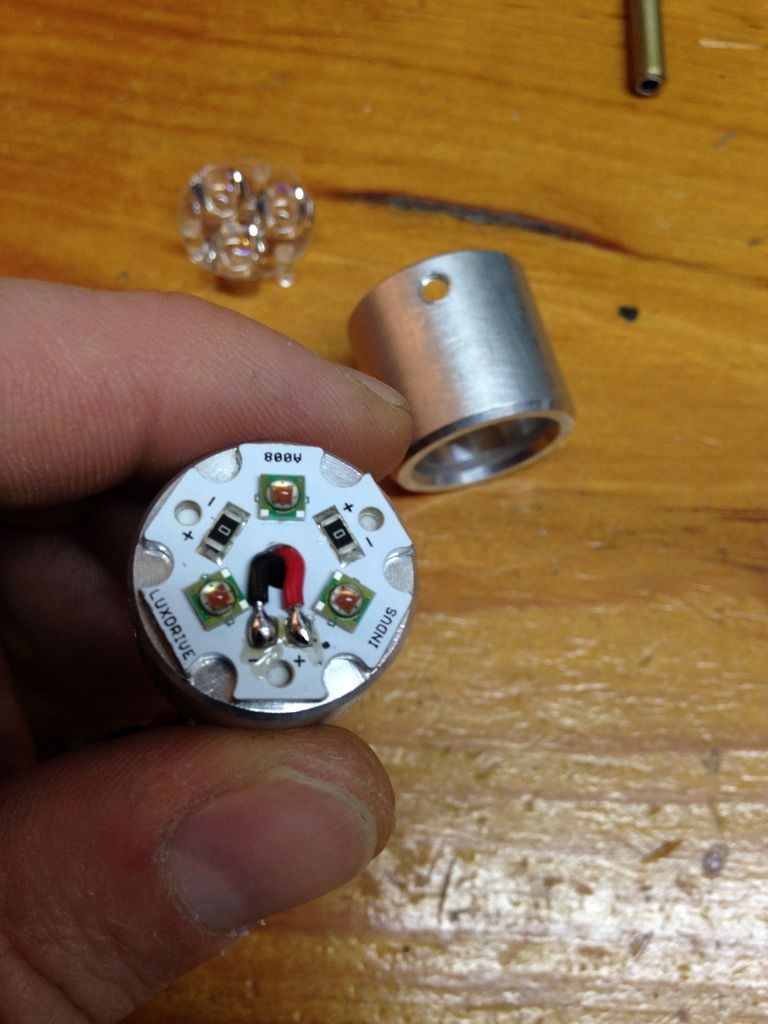
And the money shot lol.  3 up deep red led star (3 light emitting diodes). 

Here's where I'm going with all this, aside from being useful stuff to help start your research in general.

 So this is what lights up your saber right?  But look how tiny those actual diodes are!!  They're the size of a pencil lead for cry'n out loud lol!  It's only the module that takes up so much space... and that's only because normal modules are actually designed to take up all the space inside a hilt.  This is convenient/ practical for securing in hilt, good for heat transfer and all that.  But you can find modules of all diff sizes if you look hard enough, and more importantly- the module isn't the important part- the diodes are all that really matters when it comes down to it. They're what make the light. 

In a tight space you can skip the outer sleeve part of module all together and just pop a tiny one diode led on a heat sink.  If you wanted you could sand a lens down to fit, but I honestly doubt you'd even need one.  For your side blades, since they're stubby/ short, the diode can probably light them up just fine on its own.  And in fact you probably wouldn't want a normal/ full sized led module running at full power in a side emitter because it'd turn those small blades way brighter than your main and look weird.  If nothing else it'd be a waste- wouldn't need all that lighting power to light a short blade so why have your battery supply it?

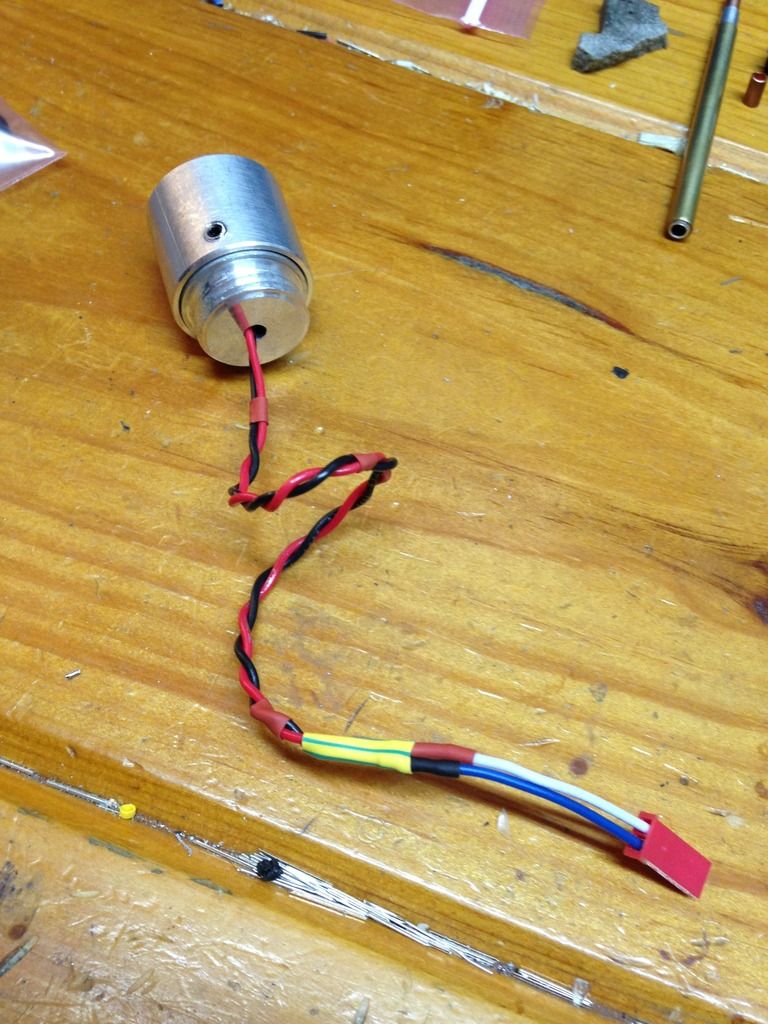
So to bring this all home- remember all the size figuring above?  Turns out you could fit 5/8" side blades in a ring of four on an average width hilt.  Well, lol, here's a custom 5/8" heat sink, with a one up led (this is a warm red rebel).  This could easily fit in your side emitters.  These aren't commonly available but I can point you to the guy who makes them.  He also could hook you up with the small one up leds, I bought mine as a set- pricey, but for completely custom parts well worth it. 
 
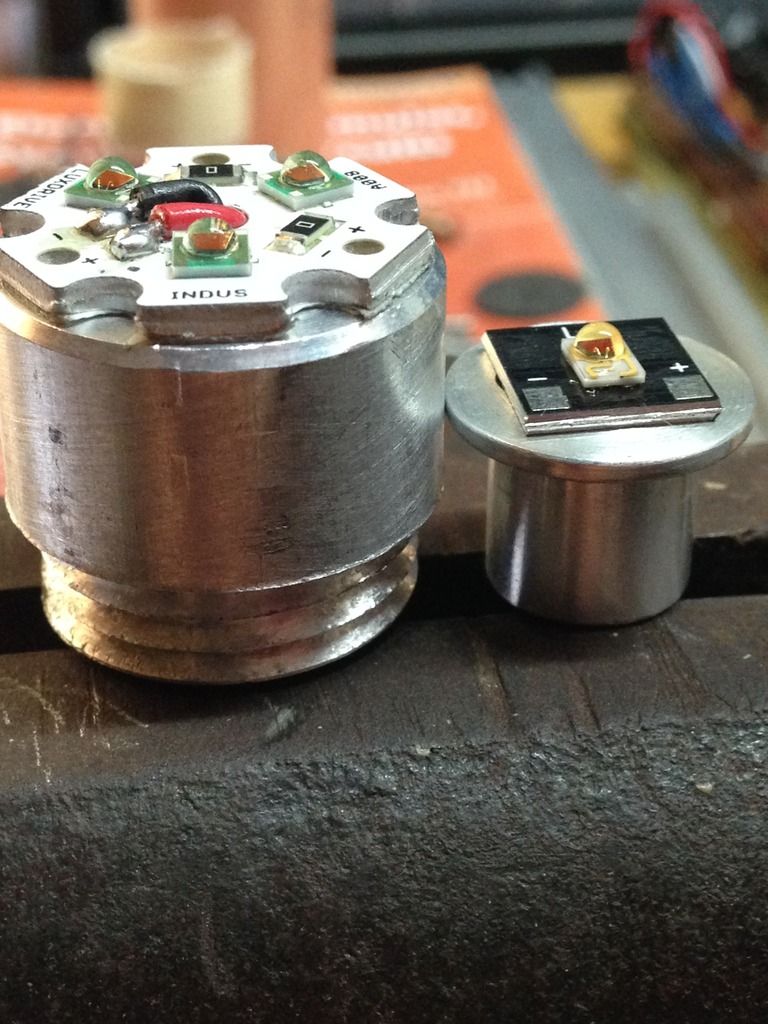
See how tiny it is compared to main led module?!  BUT notice how the diode itslef is the same size as the diodes on the other star?  We've only shrunk the package that all this stuff comes in here is my point- shrinking down the size of the module doesn't have any bearing on the light power you've got in place.  You can choose to run an led low or high power, which will factor into battery life, but again this has nothing to do with size of led/ modules you install.  So with something like this right here, you can get the same exact type and power of illumination in the crossguards as in your main.  These heat sinks fit right inside the side emitter 'barrel' and allow you to sit an led on them.  So you could still have a normal sized led module sitting in the normal place to power your main blade, then pop 4 of these little guys in the crossguards and slap leds on them- bam, five bladed saber- easy peasy Smiley

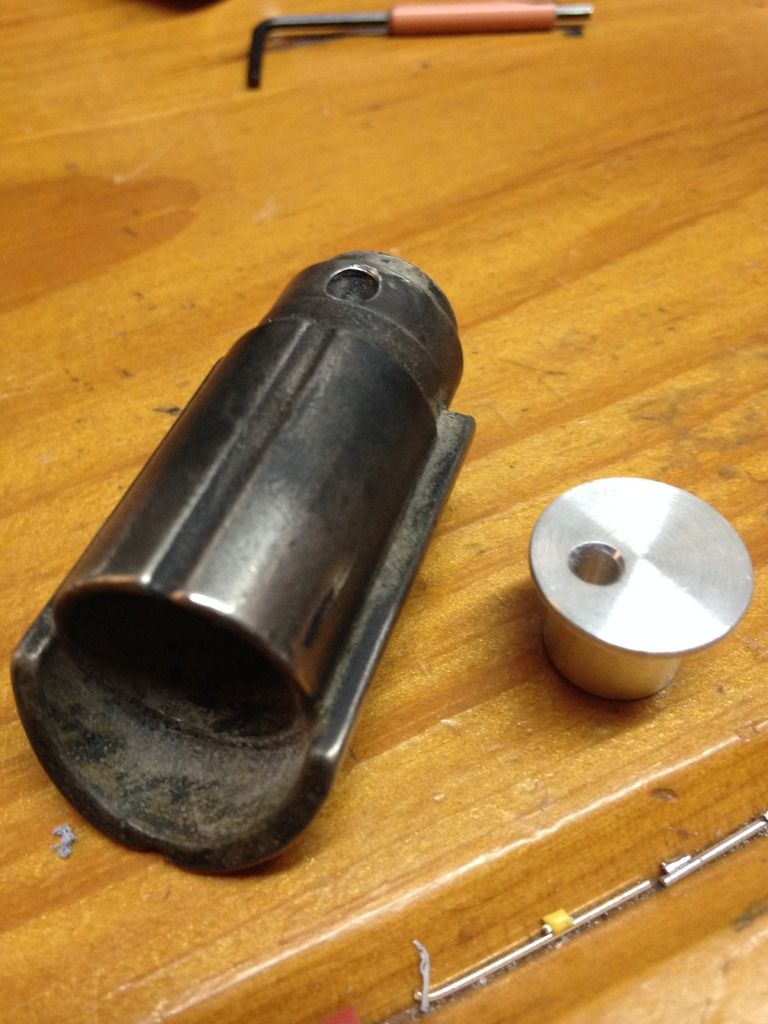
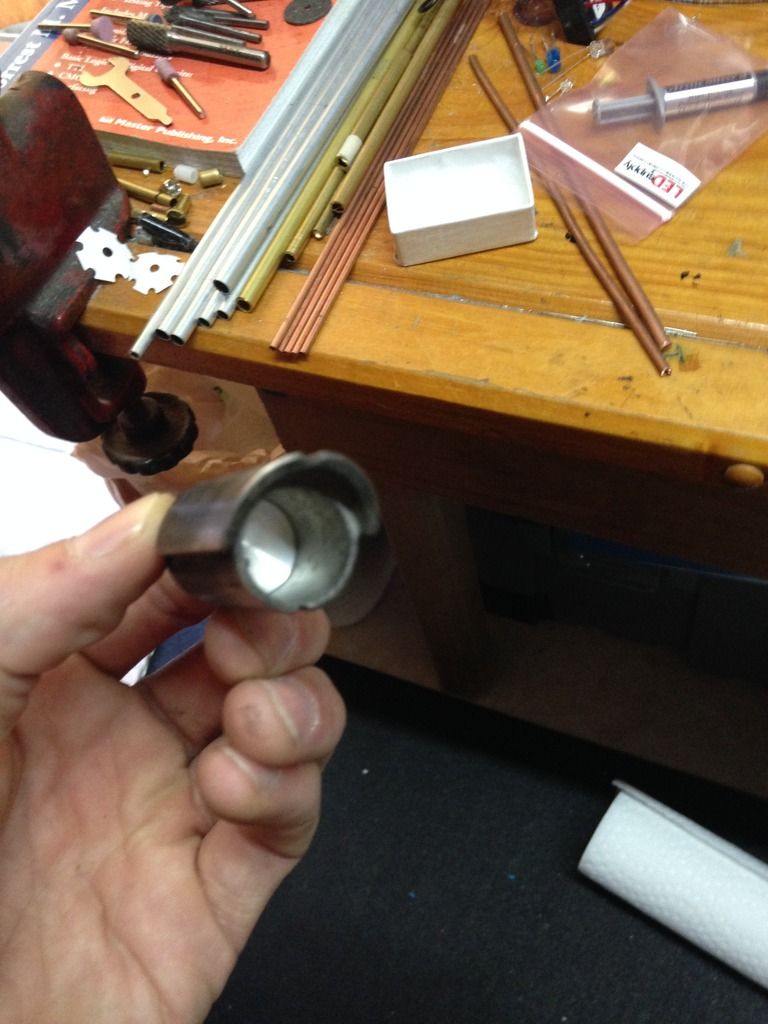
Here's a 5/8" side emitter with that heat sink, which would allow you to pop a tiny led like that in, and at same time, keep everything out of the way of where your main/ full sized module and blade would have to sit.  It would be as simple as popping 4 of these in, plus one main module, and running all the wires down from there.  Can get tricky sneaking wires around stuff inside hilt- but I've learned a thing or two about that as well Smiley


IMO honestly, this would be WAY easier than trying to rig up mirrors that can actually light all those blades, let alone ones that can do that AND stay aligned/ in tact when struck.  Nothing against Corwyn at all- trust me I know he has awesome ideas, I'm literally working with them right now lol!  Just think there's no need to get too elaborate on the lighting front- there's so many easy/ straight forward options when comes to that. And in terms of power consumption/ battery life, you can choose how much you want them to drain by how you set them up.  But that's a bit advanced for now. 

IMO, the hard part won't be lighting it at all- with all the right parts sitting in front of me (costly parts, admittedly) I could have this thing wired for 4 quillions and a main blade in 20 mins lol.. the hard part will be actually creating / then cutting in/ then permanently securing them to hilt so they're sturdy... to me that sounds like cold sweat and lost sleep haha!  But everything is possible- just matter of working out the ideas.  I actually have a pretty good idea of how to make really nice side emitters... it's the mounting them to hilt part that's got me thinking ATM- that and the thought of trying to cut 3/4" holes into the side of a hilt is beyond terrifying lol.  Lemme think about this some more... I'll get back to you.

Hope that helps Smiley.  Look forward to watching this!  Lemme know if want more info on any of this stuff.  Good luck, MTFBWY.


Logged

Sir Henry Cooldown
Force Sensitive
*

Force Alignment: 0
Posts: 7


Beam Katana Enthusiast


« Reply #9 on: October 05, 2016, 03:44:15 AM »

I can't thank you enough RevanReborn! You have all my respect as well!!!  Grin Grin  You explained it so clearly that now everything makes sense. I honestly thought I was asking too much for step-by-step instruction but thankfully you gave it. Smiley Everything  seems more straightforward and I now have a concept of how to do this but the getting the materials part may be a problem for me. I can probably afford it, but the problem is that I don't have a credit card for online payments (cause my mom doesn't want me to have one yet ( I live at my parents house still cause I commute to college).) So on that note, I was wondering if there is any way possible that I could get some of these materials locally?  Undecided  Thanks again for everything you've done! Take me up as your padawan sir Cheesy jk 
Logged

RevanReborn
Technomancer of the Graflex Order
Knight Commander
*

Force Alignment: -1086
Posts: 1121


« Reply #10 on: October 05, 2016, 01:31:31 PM »

Don't feel bad on the no credit card thing Henry my man Smiley.  I'm 32 and I don't no have one either haha! 

And it's def doable to find a great deal of the stuff for this locally.  Actually, the electronics are the only thing you'd really need to order when it comes down to it.  If you go full pvc/ "found" parts (just means using materials you find around you like hardware store etc) you can get tons of great stuff for the body.  You'd be amazed what you can do with pieces of pipe/ sink tube etc:
This was my first real mod- made some overlapping shrouds using brass sink tube, and then a thicker pvc pipe, but with a "skin" of brass sink tube to give the look/ feel of real metal hilt. 


Sorry to bombard your thread with pics like this, but here you can see a pvc and sink tube mod up close.  Great thing about this stuff- the price- sink tubes are a few bucks a piece Smiley, pipe will range depending on material but all cheap for amount you'd need.  Also since using overlapping pipe, you can make stellar grooves, even inlays like that ancient sith symbol.  TheSe type materials would be great for making your side emitters as well.  If you look at the one in pic, it's basically just two overlapping pipes cut on angle with line engraved. 

The guy who does the heat sinks is out of Germany if I remember right, he prefers to just use Paypal, which is totally free if just using to pay for stuff like credit card (fees if you're seller) and just goes right from your bank.  If I remember right they were pricey, but that was with leds, the heat sinks themselves were cheaper.  I'll pm you with the details of that stuff.  You can probably grab the leds yourself much cheaper.  Plus, there are sure to be other 5/8" heat sinks out there, and really they can be made easy enough- just a proper size metal (copper/ aluminum) base. 

You could do a hybrid of US body and pvc as well - use an ultra saber as base, and use pvc section to mount side emitters.  Would you want all the blades on at once or staggered ignition? 

Logged

Sir Henry Cooldown
Force Sensitive
*

Force Alignment: 0
Posts: 7


Beam Katana Enthusiast


« Reply #11 on: October 06, 2016, 03:32:54 AM »

Thanks! and I don't mind the pics; I actually need them  Grin I wanted to do all blades on at once. https://www.youtube.com/watch?v=izyOPEuYa6k (1:36 for blade activation)  So look for them in hardware stores, but can I find diodes locally too? Where could I find those?
Logged

RevanReborn
Technomancer of the Graflex Order
Knight Commander
*

Force Alignment: -1086
Posts: 1121


« Reply #12 on: October 06, 2016, 03:37:01 PM »

the pipe and sink tube you can find at hardware stores or anywhere like that locally for sure. 
 
O, i forgot to say this before!  i think if you were wanting to do this idea you'd be better off going with a non cross guard hilt.  It would be WAY easier to add 4 of the same side emitters on one straight tube than to try and mess with the US cross guards.  I don't think you could cut into those properly theres way too much in the way in there etc.  but a normal saber gives you way better shape/ space to work with. 

the led's i don't think you'll be able to find locally, but everywhere i get mine from uses paypal anyway.  It takes a bit of annoying emails to set up, and so many business days for everything to process, but its super easy to sign up for and totally free.  Not credit card just way to pay online through your account.  Led's are not all that expensive. 

hmmm.. you know, to be honest this build could get pretty intense- you cool with this being a long term project? like something you slowly progress on over time?  You'll find though fun to do, this type thing is certainly challenging and takes practice if you want to do the work yourself... but its super rewarding and SO much fun Smiley.  very much worth it! 

I can show you places to order led's, but you might not even need to worry about that for a while.  If it were me id just build the body first, with certain sizes in mind, and then worry about filling it after.  take some time checking out pipes and stuff at the stores and see what feels comfortable, get an idea of sizes you'd like to end up with or just see if anything speaks to you lol.  anything with an inner diameter (inside space) in the 1" area roughly would be easy enough to fill with saber stuff, and if you want to use a US as base and add the mods, prob best to just grab a hilt first so you can take it with you around to places to help find the right sized pipes etc?  Like i said though, i think a big thing is, if you were gonna try to add this to an US, i don't think you want to start with a cross guard.  maybe even just go full pipe/ pvc and just use US internals?
Logged

Corwyn VonBeck
Knight Commander
*

Force Alignment: -340
Posts: 1071


Grey Knight


« Reply #13 on: October 06, 2016, 04:57:02 PM »

Ok Revan, how about this?

3/4" 6 way fitting

The pieces have an ID of 1.05" making it as near perfect for a blade fitting as we can probably get.

Standard saber, use a section of 3/4" pipe in the 6-way to slip into the saber in place of the blade.

Neat little custom LED setup housed within the center of the 6-way. (4 1ups for the sides, then main LED for the full size blade)

a little paint / filler / etc to blend the PVC with the saber.

Job done?

Logged

Sir Henry Cooldown
Force Sensitive
*

Force Alignment: 0
Posts: 7


Beam Katana Enthusiast


« Reply #14 on: October 07, 2016, 02:03:19 AM »

Yes, I was actually going to try modifying a normal pipe without guards; it makes sense in how it would be easier. In all honesty, I know for a fact I won't be able to work on this for a while cause of school and work but as soon as summer comes around and I get back from ROTC field training then I will fully start. 😁 For now I will look around hardware stores for possible materials and probably buy a violet flamberge for Henry cosplay (also as motivation to make the 4 guards), and use the hilt of the flambeege (minus the guards) to get an idea of a hilt diameter for this project. Does that sound good?  Grin Cheesy
Logged

Pages: [1] 2   Go Up
Send this topic | Print
Jump to: