Click here for lightsabers
  • Home
  • Help
  • Login
  • Register
Pages: 1 ... 4 5 [6] 7 8 9   Go Down
Author Topic: Ethan's Saber :)  (Read 24975 times)
RevanReborn
Technomancer of the Graflex Order
Knight Commander
*

Force Alignment: -1086
Posts: 1121


« Reply #75 on: March 25, 2017, 08:10:32 PM »

Thanks everyone!

Haha, D7 im just borrowing it! Wink That's an AWESOME piece (clock), thanks for the pic, very cool. 

Yup LR lol, I had been procrastinating on all that type stuff- had to make a dent in the to do list lol.  Arlo's all tuckered out now, sleeping like a log lol, so I'm gonna get back at this thing. 
Logged

Jediseth
Knight Commander
*

Force Alignment: 828
Posts: 1551


"If I told you, you wouldn't like it." Han Solo


« Reply #76 on: March 26, 2017, 04:06:07 AM »

I must ask where did you find a gear for that blade plug? It's awesome by the way.
Logged

Guardian : GB, FOC Red, V4, 11-15                        Reaper: V4, BR, 4-17
Chosen One CE : Emerald, V4, 12-15
Consular: Emerald V4, 1-16
Manticore: BR, FOC Orange, QD, V4, 11-16
Monarch: Emerald, V4, 2016 Autumn Raffle -1st
Arbiter: V4, SD, Silver FOC, QD, 3-17
Archon V2.1, Diamond, 4-17

Seano
Knight Templar
*

Force Alignment: -229
Posts: 343


« Reply #77 on: March 26, 2017, 05:10:28 AM »

Great work so far, but I have to say, this what I see when I look at the wiring.......


 Grin
Logged

Ramse Moade the Grey

Current Sabres - Graflex SE in GB & Obsidian V3, Shock in TRI BR (QD's) & Obsidian V3, Customised Dorinian with Diamond Controller, Dark Catalyst in Adegan Silver with Arctic Blue FOC and Obsidian V3 (Customisation WIP)

Ginsu117
Knight Templar
*

Force Alignment: -67
Posts: 304


(Jacen) The End Justify the Means


« Reply #78 on: March 26, 2017, 08:53:58 PM »

Hey Rev, sent you a PM, dunno if you got it. It was off topic from this thread
Logged

DARK SIDE POINTS PLEASE

Ultrasabers owned:
-Scorpion with Obsidian v3 soundboard and Sunriders Destiny color
-Converted Anakin Episode III Lightsaber with Red color
-Archon v3.1 Emerald and Obsidian v4 Soundboard
-Consular with green color obsidian v3
-Fulcrum with green color
-Prophecy V3 White color with standard sound
-Sentinel V4 Blue color with Obsidian V3

RevanReborn
Technomancer of the Graflex Order
Knight Commander
*

Force Alignment: -1086
Posts: 1121


« Reply #79 on: March 28, 2017, 07:44:15 PM »

Thanks everyone!

I must ask where did you find a gear for that blade plug? It's awesome by the way.


eBay has a ton of that type of stuff- it's probably the way to go if you need it fast.  Etsy and sites like that have them too- i got mine off Wish, cheapest option by far, but that's coming direct from china with no real tracking, it can take months sometimes for stuff to arrive.


Hey Rev, sent you a PM, dunno if you got it. It was off topic from this thread


thanks for the heads up Ginsu, i would have missed it- i'll go find it asap- tbo I've pretty much given up on pm's lately lol, i wish i had more time- at one point i had it down to like 30, i'd be busy for a couple days, come back on and almost catch up, then get busy for a couple more days, etc, slipping a little further behind each time.  right now my inbox is at 130 lol.  i'm so short on time atm and i NEED to have this done really soon so I've just been focused on using any time here- once this is complete i can get back in touch with everyone/ thing Smiley.  Don't get me wrong tho lol, i'll def go find that pm- i just meant in general that's pretty much how it's been lately.  In general tho you never have to worry about that in my threads man lol Smiley.  You can post tangents or random detours as many and often as you'd like, i'm totally cool with it- just more to love lol.  It's like a surprise bonus in a thread the way i see it. 

So my phone has basically become useless except for calls etc, it can't even run photo bucket or a lot of other 3rd party apps etc, so for now i've actually got to get on my computer to update threads and such Sad, gonna be a huge pain, being so busy i often just took pics and did all my posting on mobile it was way faster/ easier that way. 

Ok, so anyways lol, i retried the connections to the emerald on that back side in case they weren't good, and also on the top side, and no dice either way unfortunately, pun intended lol.  also double checked that the connections to green die were good, which, don't know why i did that really, it's getting redone either way, but they worked, so that wasn't the prob lol.  i'm thinking it's all in the assembly/ set up of the board, but who knows- not this cat.  One day. 

therefore- officially time to grab the other 4 channel emerald. 

tbo, i've kinda always felt it was wasteful having this in here anyways, because other than orange or purple for fun here and there... i mean safe to say this is a red saber lol.  I might just go with something totally diff to replace the catalyst internals and save the 3 channel emerald for something else- thinking i can make better use of the rgb emerald than here in the uber sith catalyst. 

starting to get the new boards ready- since I've already tested the rig and have an assembled version of it in front me, i'm gonna go about putting this one together differently- cutting to the chase more and going straight for finished state wherever possible- tho i still need to leave excess for install and all that of course.  but i can at least start off the hop doing a more 'finished' version of everything.  containing the mess in a shield, and labeled the mini usb access' for ethan as well.


the detail around the port i mentioned earlier from Kouri's idea-


this still needs a lot of cleaning up- the edges are really rough from some angles, etc.  it needs a good sanding for sure, this is just raw pretty much after the tape came off.  but i'm thrilled with how this came out!  not perfect by a long shot lol, some of the edges got away from me a bit, but it's such a tiny area that it's really not a thing- like when you look at this whole detail it's not even obvious in person, you have to really check it out close- i had to try and find all the angles that made this areas pop for pics.  in person it's surprisingly subtle- but i love it Smiley.  Just a nice little bit of extra detail, depth to finalize the port, and tie everything together.  the gold took more like what i expected to get the first time, so doesn't match the upper inlay, but that's because this etch can't hold as much paint, the patina shows through the gold.  looks more bronze or old brass- but it's gonna look good, cause all the etching that goes on the lower portion of hilt (below that port) is just getting blackened.  so all the etched designs will transition from black at the bottom to gold at the emitter, will look sweet. 

but like i said lol, i really need to sand along the lower edges.  they need some serious cleaning/ straightening.  already sanded the upper edges and those look great Smiley.


that's easy though.

love how it looks like a grill, or like a heat sink or something like that- it just makes the port look like its supposed to be there somehow. 

I'm outta time i gotta crash, seriously spent.  i'll def tackle some pm's tonight when i get up tho and get back to people.  really sorry i'm awol guys- but we need this to be ready for ethan's last treatment so i'm really just being super determined about my scheduling.  keep you posted.
Logged

hazard502
Vanguard of the Archon Order
Knight Commander
*

Force Alignment: 2272
Posts: 4853


[Give Light Side Points!]


« Reply #80 on: March 29, 2017, 12:04:21 AM »

Looks so good - from the inside to the outside!  +1 Cheesy
Logged

Customized Flamberge/BR, Customized LostGray/HP or Tri-AS

Hansrad
Knight Commander
*

Force Alignment: -670
Posts: 748


Jedi? Sith? I'm the one with the lightsaber.


« Reply #81 on: March 29, 2017, 03:07:25 AM »

Looks great Rev, but the poor Catalyst. Love that saber.
Logged

Own: Emerald Overlord, BHManticore, BR Renegade,FO Dominix LE V4 (stunt), CG Dominix LE V4 (stunt), GB Apprentice LE(stunt),BR Dark Initiate LE V4 (stunt), AS Apprentice LE V4 (stunt), CG Dominix V3 (stunt), SRD Darkish Liberator (stunt) Emerald Lost Grey.

Ginsu117
Knight Templar
*

Force Alignment: -67
Posts: 304


(Jacen) The End Justify the Means


« Reply #82 on: March 29, 2017, 05:15:02 AM »

It might behoove you to read my pm because it deals with having an emerald drive so you dont have to take one of your other saber apart, or you can put it back in if you already did
Logged

DARK SIDE POINTS PLEASE

Ultrasabers owned:
-Scorpion with Obsidian v3 soundboard and Sunriders Destiny color
-Converted Anakin Episode III Lightsaber with Red color
-Archon v3.1 Emerald and Obsidian v4 Soundboard
-Consular with green color obsidian v3
-Fulcrum with green color
-Prophecy V3 White color with standard sound
-Sentinel V4 Blue color with Obsidian V3

Jediseth
Knight Commander
*

Force Alignment: 828
Posts: 1551


"If I told you, you wouldn't like it." Han Solo


« Reply #83 on: March 29, 2017, 06:35:10 AM »

Yup- frosted/ diffused lens 5mm common anode rgb led.  Wow that's a mouthful isn't it lol?  

you see shared negative rgb's used in sabers more often- but for this set up it's more straightforward to go with common anode (shared positive) rgb.  Although, this is a 4 cannnel emerald lol... but don't even get me started lol, we need this by the dawn of April.

It's simple enough, not complicated, though it creates an awful lot of splices all over the place and extra wire to worry about- so good thing to be comfortable with installs before trying.  If you're like me and you wanna visually follow everything around to make sure it works in theory before powering, even somehting small/ simple like this can be enough to give you an ulcer lol- small price to pay for this indicator tho IMO.  

There's different ways you could do it, and you could choose to use any colours/ mix in any sequence you wanted, but here's what I'm doing.  All the dice share their positive, that's important to visualizing how this works/ keep in mind- they're all live at once.  So I'm gonna do the green as the idle/ stand by status indication.  Seems natural choice, and remember Ethan wants a green blade (tho he'll be able to set to whatever he wants) so that jives nicely too.  So to start I'll wire the positive (for all dice) to my positive recharge port post, the equivalent of wiring directly to battery basically, for an always on (except when kill key inserted) stand by indication type configuration for that first colour, green, so our indicators green even  when saber off.  The negative of that green diode simply gets wired to the switched negative post of the recharge port, or the negative of battery directly if no port, the same way you'd do any accent you wanted direct wired (like a switch etc).  So that's our first status taken care of.  

Next colour will be yellow, to indicate the sabers working full power, and at this point the light will actually start to articulate what the sabers doing-  so like when the sabers sound fonts hum is really spiking or during a particularly climactic sounding point in a swing sound (or even flash but we'll get to that) etc the yellow will flare the brightest, and in general the yellow will fire to the rhythm of the saber, sputter, flare, basically animate what the sound is doing.  that shift from a nice solid steady green status to this type of yellow is really effective for an indicator light Smiley, looks great.  

introducing the red diode gets the golden yellow colour I need- so I just have to wire the negative of the red diode to the speaker negative.  The power is already sitting right on the reds front door step waiting to go running through its light emitting diode, but it can't cause the door's closed until the channel opens up for the speaker signal.  That gives the yellow life in harmony with what the saber's doing at the moment.  

Then for extra flare, I'll have that yellow spike to a bright complex white'ish colour with random diff hues in it but mainly a hint of purple.  I'll grab the remaining blue diode's negative and send it to the flash on clash pin.  With all dice firing you get a white'ish colour, but the yellow cuts out for nano's at a time, leaving purple that's a little too brief to show outright.  I was gonna do a purple hue'd white for the foc anyways, plus I think that white is a good neutral flash colour- will provide the right effect no matter how he's got the emerald set.  

Something similar to this, but obviously not exactly- this one uses multiple leds, but they're actually wired exactly the same way.  Somehting like that would be too clunky here, this will be nice and low impact... but at same time high impact if you know what I mean:

https://youtu.be/DAEnhu5byjs

Ah I see!  That's a sweet idea with the knurled screw and washer Kouri Smiley.  I also like the brass idea big time.  Thought about that too intially, thought I could slip some trimmed brass rod into the vertical running holes on each side of the rear of the emitter shroud too, not sticking out but just to have shiny brass plugs in there to match brass hardware, which automatically had me thinking electrical pins lol- but then I thought pins and brass might be a bit overzealous lol, I'd almost certainly do it if it were mine haha!  I really like the sound of the tool free retention tho, perfect idea for a younger guy who's gonna grow into this saber Smiley

Thanks again everybody!!  Points coming to eveyone as soon as possible! 


I had to read this a couple times, but I think I'm catching on. Thanks!!!
Logged

Guardian : GB, FOC Red, V4, 11-15                        Reaper: V4, BR, 4-17
Chosen One CE : Emerald, V4, 12-15
Consular: Emerald V4, 1-16
Manticore: BR, FOC Orange, QD, V4, 11-16
Monarch: Emerald, V4, 2016 Autumn Raffle -1st
Arbiter: V4, SD, Silver FOC, QD, 3-17
Archon V2.1, Diamond, 4-17

JediXIX
Alchemist of the Sentinel Order
Knight Commander
*

Force Alignment: 1172
Posts: 2190


« Reply #84 on: March 29, 2017, 07:16:58 AM »

I'm still following along too, Rev . . . more points bro  Smiley

It might behoove you to read my pm because it deals with having an emerald drive so you dont have to take one of your other saber apart, or you can put it back in if you already did

And, I also had a suggestion with the other Emerald issues, that'll be buried in your pile of PM's . . .  Wink

but either way, I know you're good with what you're doing . . .  Cool
Logged

Remember... The Force will be with you... Always . . . (Just let it in)

RevanReborn
Technomancer of the Graflex Order
Knight Commander
*

Force Alignment: -1086
Posts: 1121


« Reply #85 on: April 01, 2017, 12:34:33 PM »

Hey everybody sorry!!

THANK YOU ALL SOOOO MUCH for all the offers of help and ideas/ thoughts etc!!  It just goes to show you what an amazing community we have here- i truly can't thank you guys enough.  No need to worry about anything at all guys, i appreciate everyones ideas of solutions etc BIG TIME, but we're totally good on this one, I'm knocking on wood as i say this lol, but i've got everything i need and i'm on pace for d day- the start of next week sometime.  It'll be done this weekend basically. 

these darn technical difficulties with my junk phone are preventing me from updating as frequently (or simply being present on the forum for that matter) just cause i'm in the home stretch and can't afford the time to get that sorted out atm or to be at my computer- once this project is complete ill get my devices and whatnot sorted out and be back around like normal for sure.

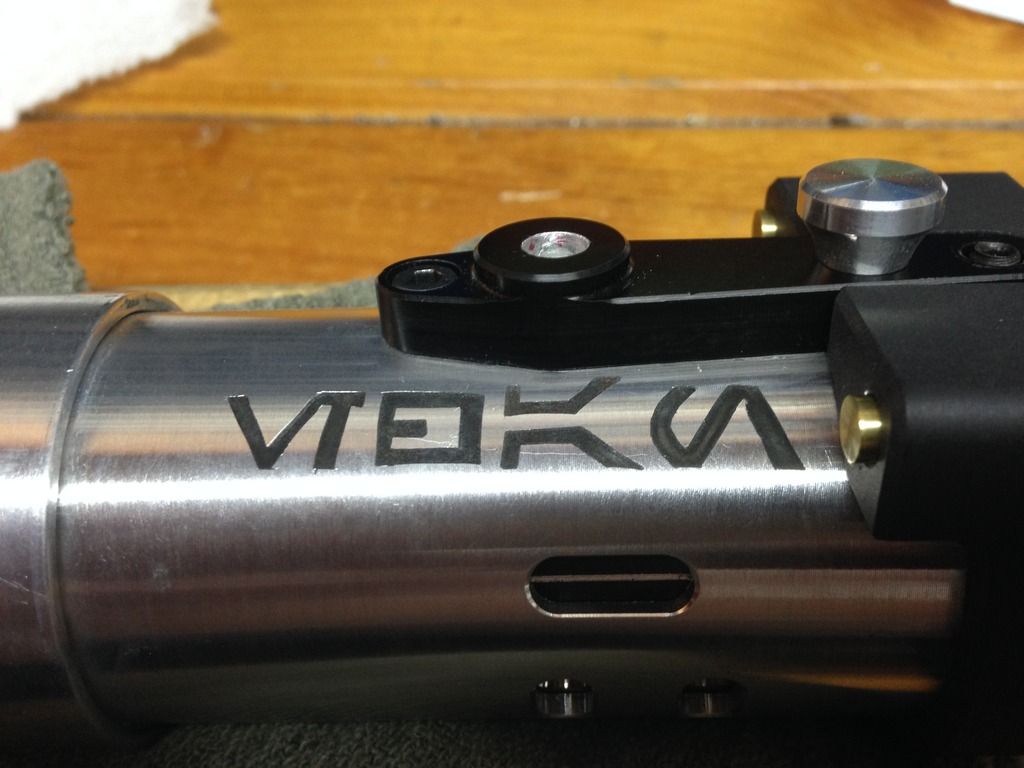
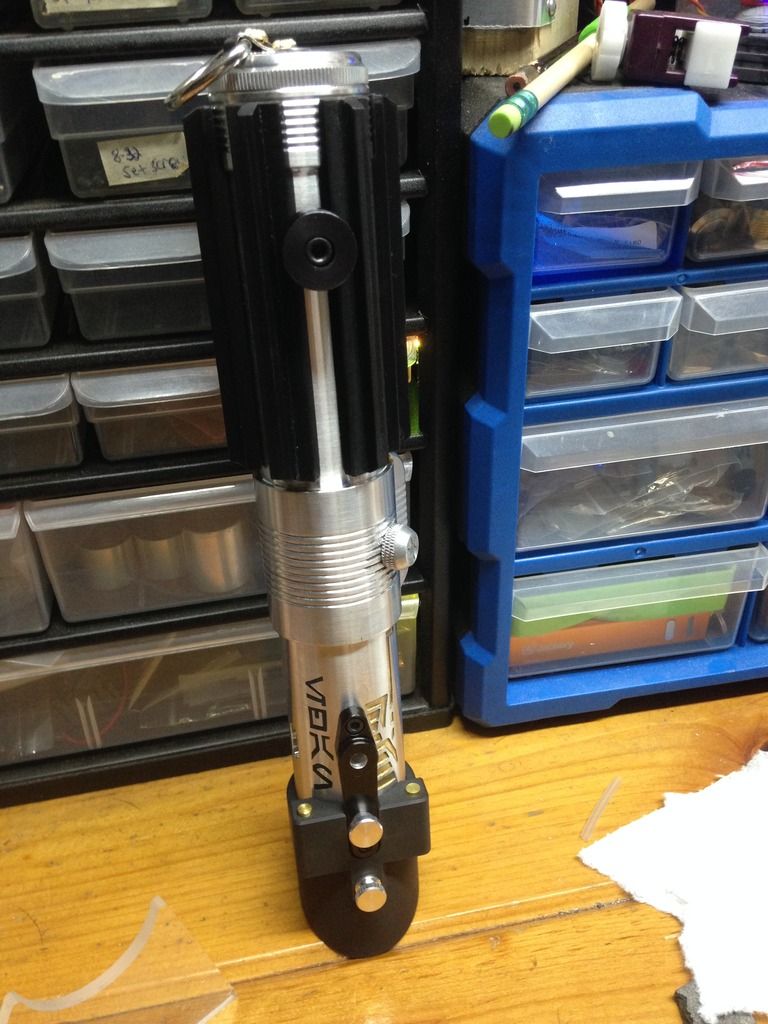
Ok- so lots to catch you up on, i've been busting my butt on this.  we left off with the etch around the port.  Next came one of the things i had been most nervous about from the start- etching the aurebesh.  i practiced plenty with this technique (which is good cause i made some mistakes along the way) so time to just see how it goes lol...
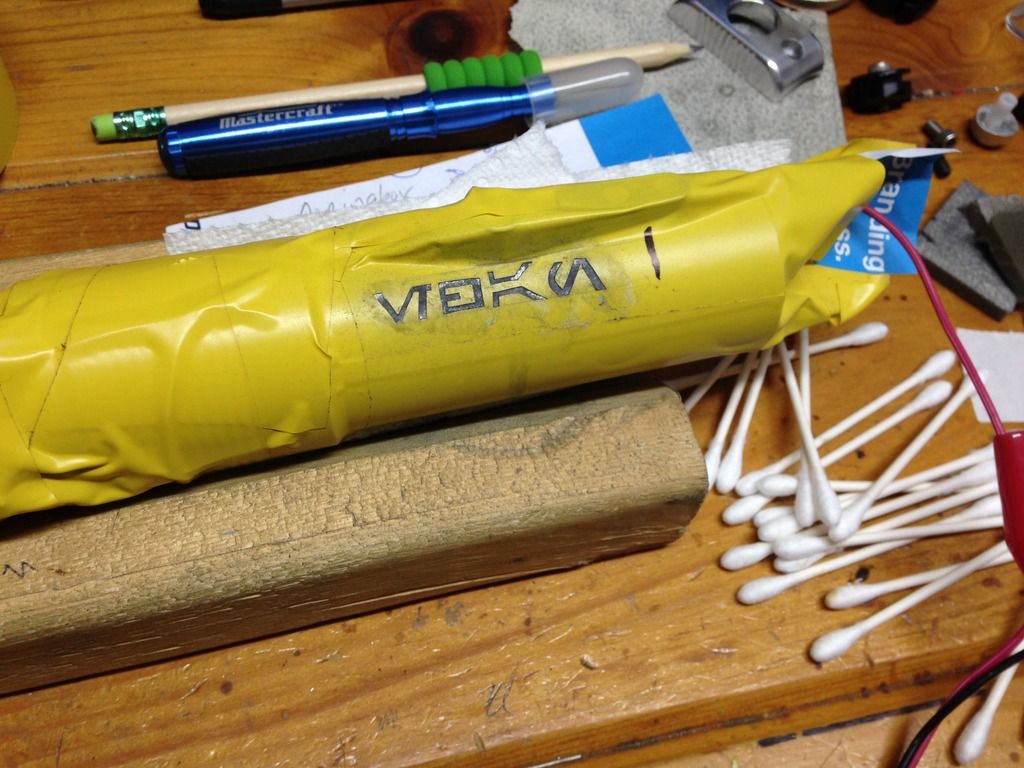

i didn't need this nearly as deep, since the blackening doesn't raise the profile to speak of (unlike the gold).  And Charlie, this isn't a typo haha!, in aurebesh when 'th' are together they can be represented by that one character Smiley.


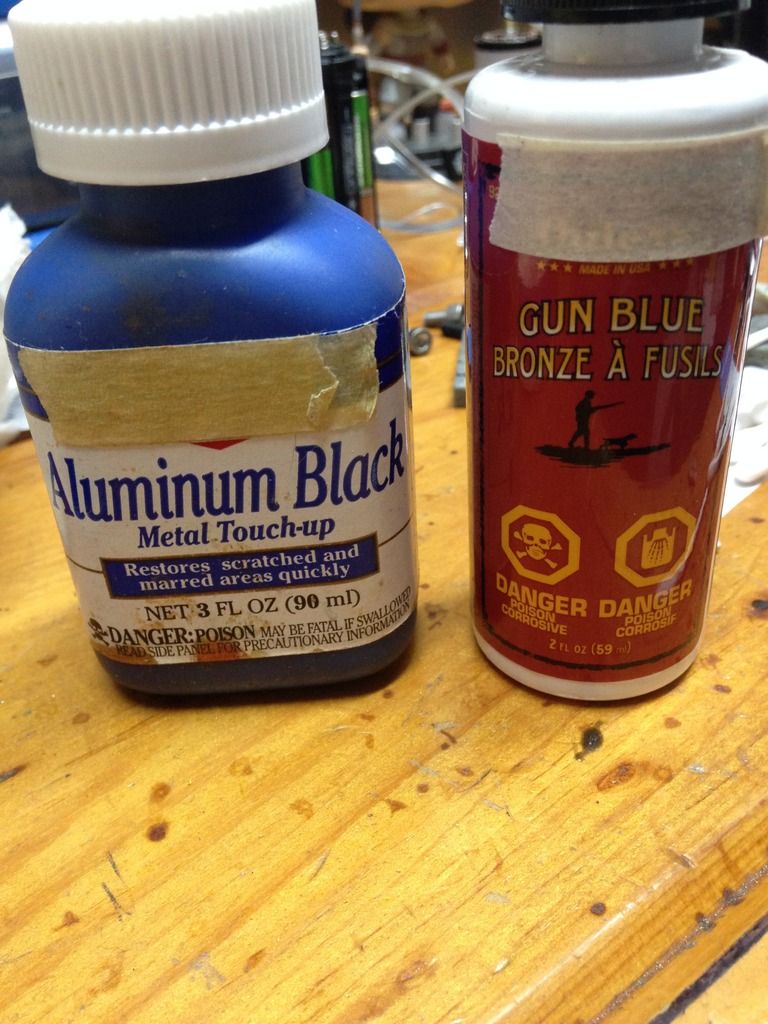
either of these will do the trick- the aluminum blackener on the left is the more traditional go to, but i find it takes some practice getting it down well, it can be really brittle/ flaky and also prone to really dirty finishes until you figure it out- the gun blue on the right isn't really thought of for use on non ferrous metals so much, but it works too, it's a wildcard, cause sometimes you can get it to do neat things on the finish.  it's what i used here.
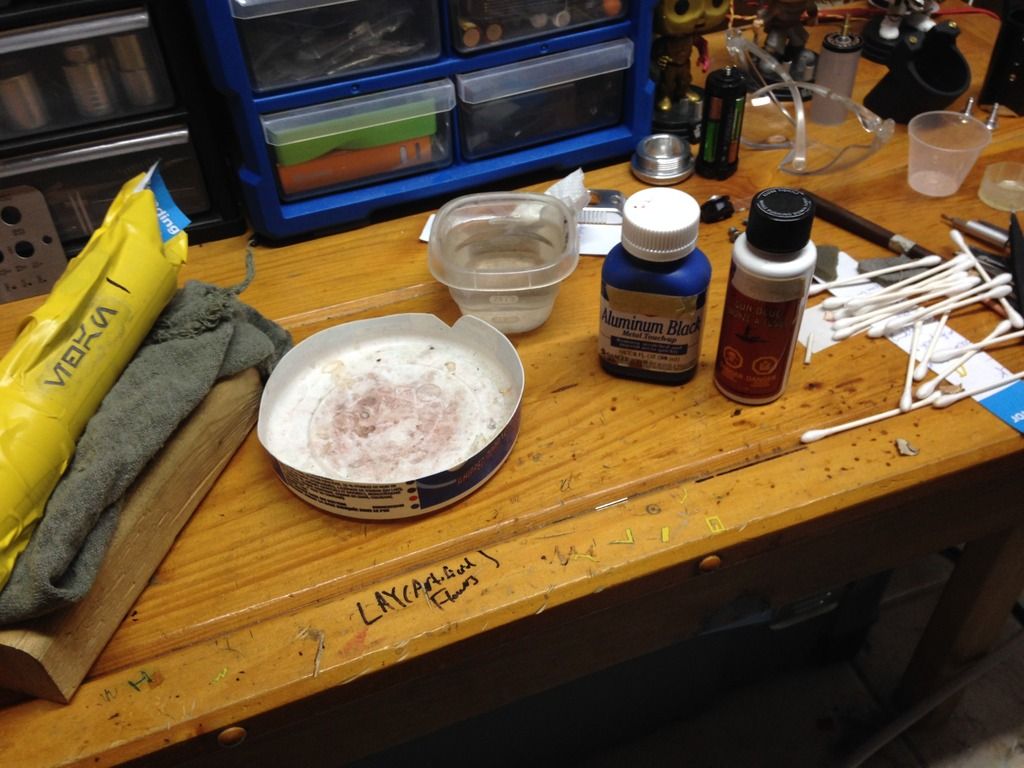
this was super easy to put down, since all the work taping it off was already done for the etch.  I just rinsed the etch out well and cleaned gently with acetone before i applied.
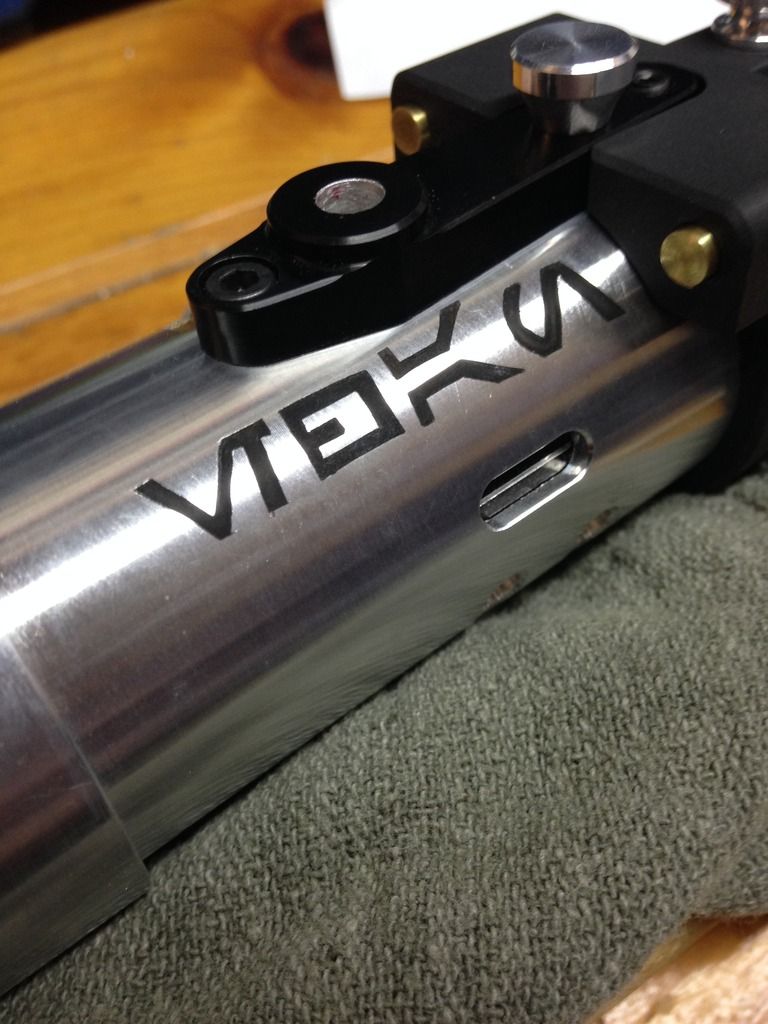

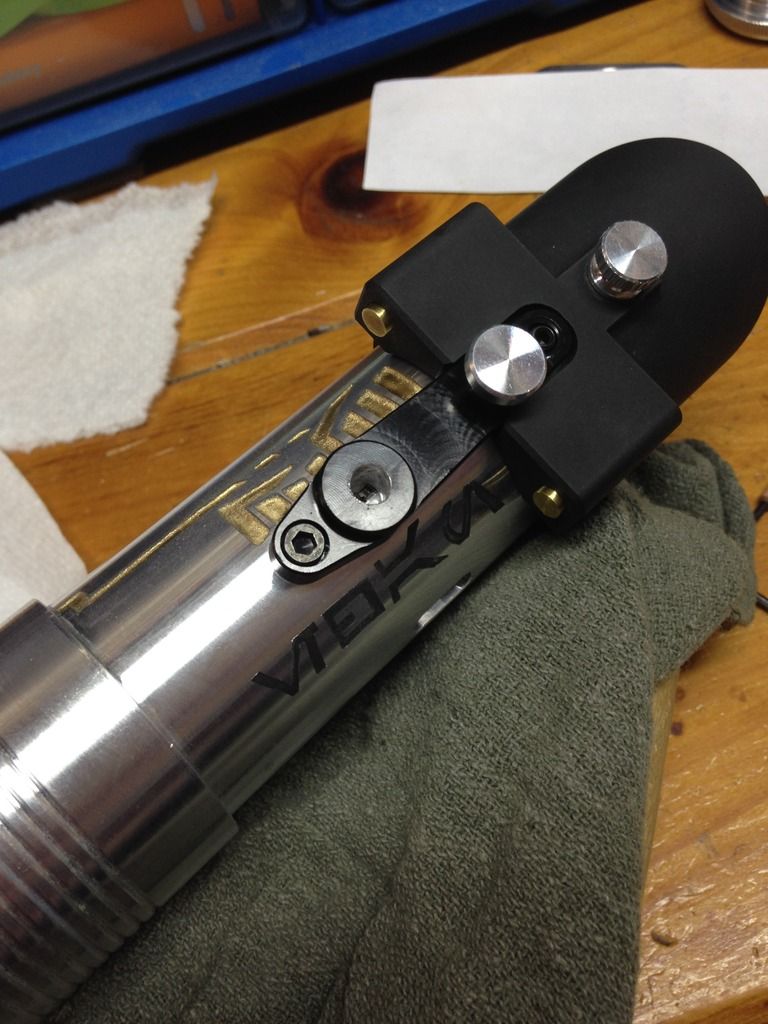
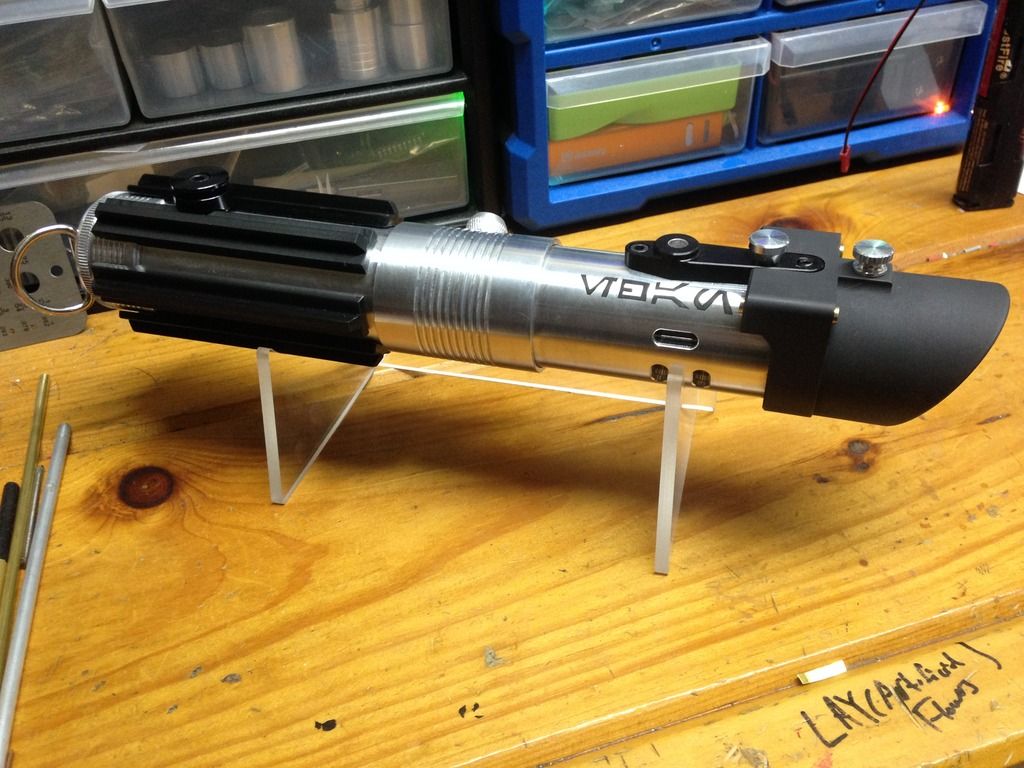
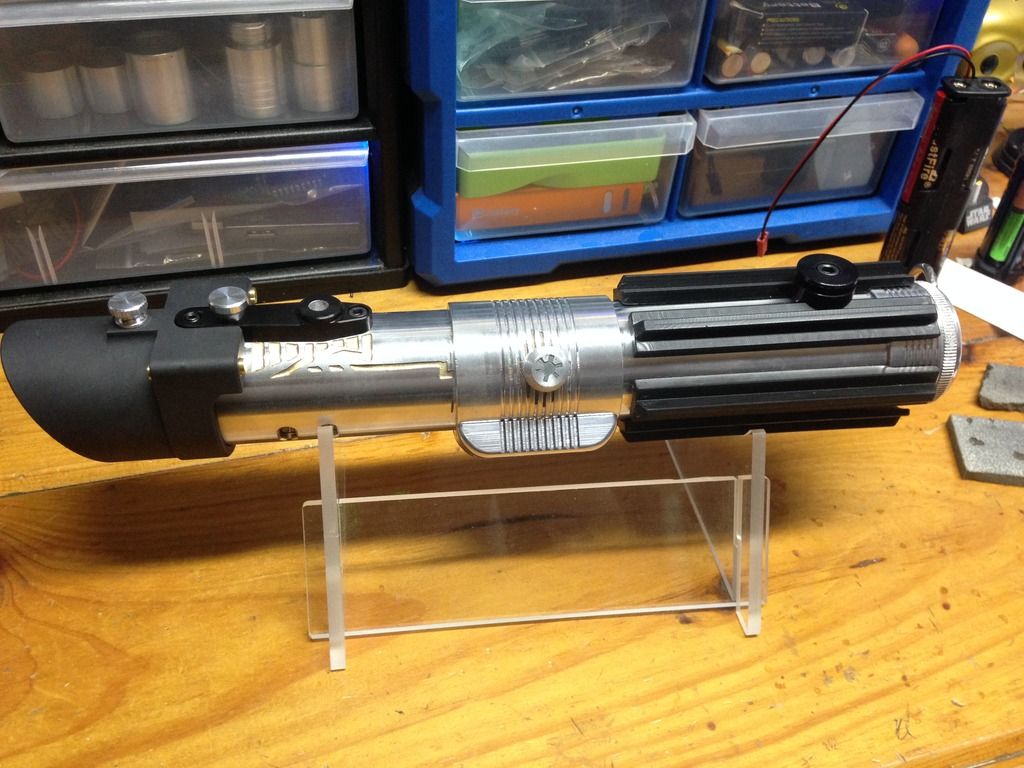
here you can see all the etched areas in one shot.
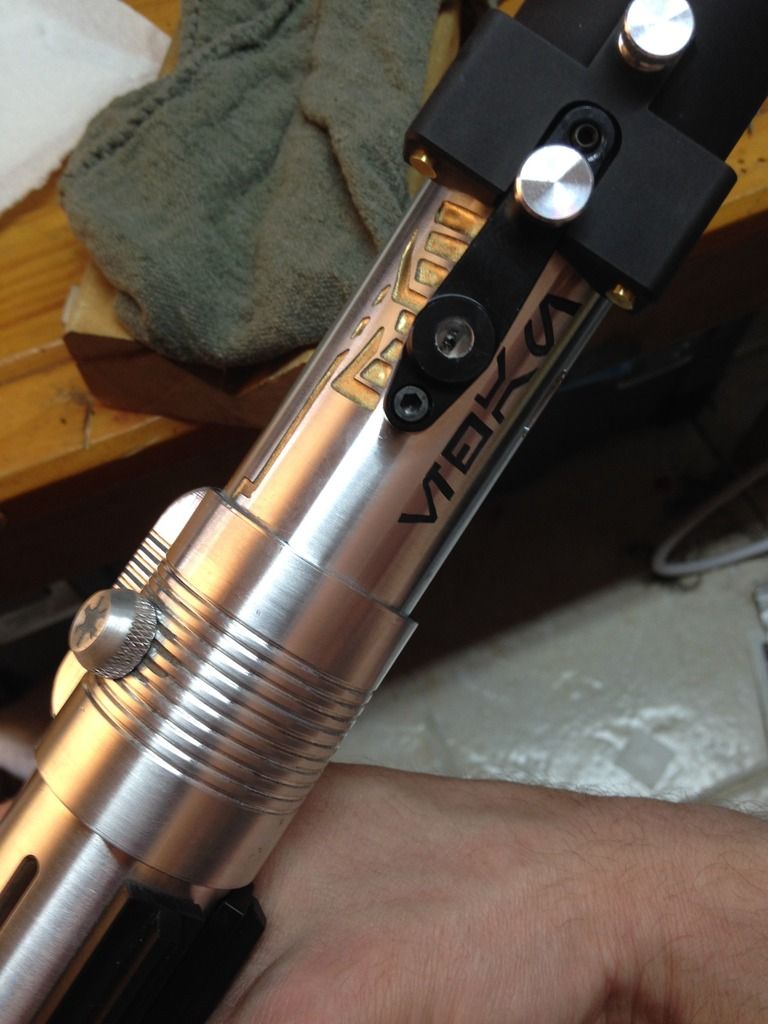
So the good news is i'm thrilled with how this came out- the bad news is, my idea about the 1st line of the jedi code will have to wait... it's just beyond my skill level atm with this manual pattern cutting method, and i don't have the time to learn the digital transfer method (i will be doing that in near future).  to put it in perspective, the aurebesh lettering here is about a 1/2 centimetre in height (6/7mm's) and about 4.5 cm's long in total- i probably could have gone a little smaller, but i'd need at least twice as small to fit the line in the spots i was thinking, and just to not fill up the whole hilt in writing lol.  i simply couldn't get that pattern worth a darn right now at that miniature of a scale- the cutting involved in lettering that small is insane, you poke the tiniest tip of the knife through the resist and you're already outside the lines, it's a nightmare lol. 
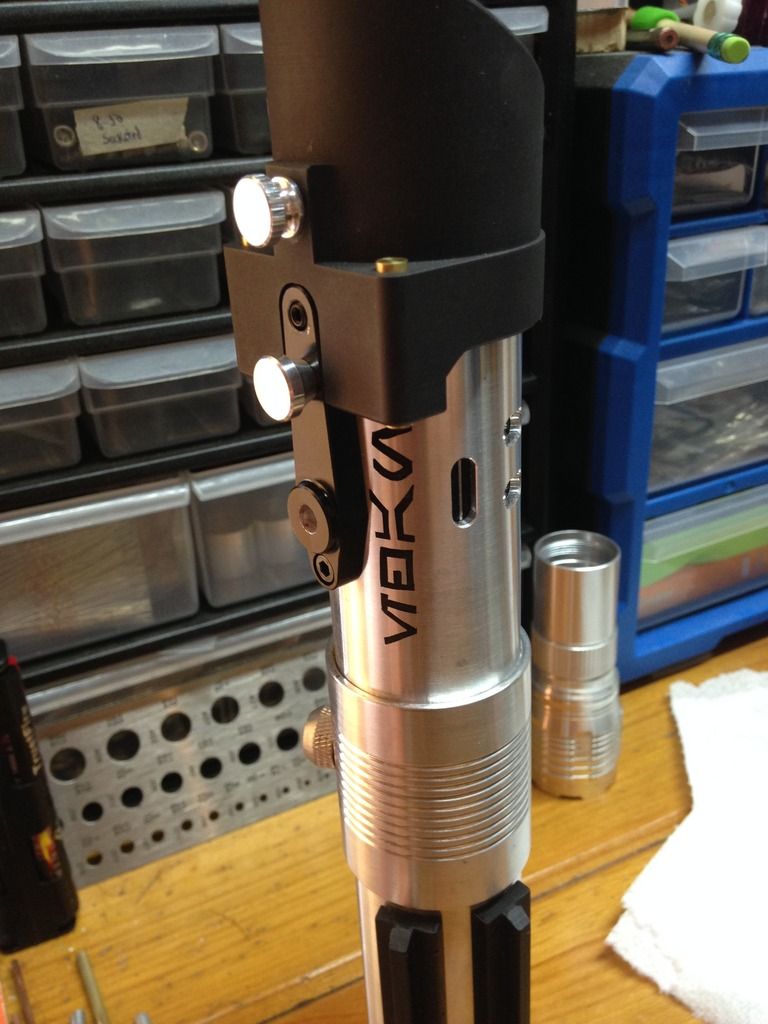
but that's no biggie- getting Ethan etched in there was the main thing, in the future once i've got digital transferring down i can always add anything to this if he wants no problem, i'll be doing tune ups/ maintenance every once in a blue moon i imagine down the road sometime anyways.  if i have time I'm gonna make a metal plaque for the stand thats etched with the "there is no fear" in aurebesh which will do for now at least.

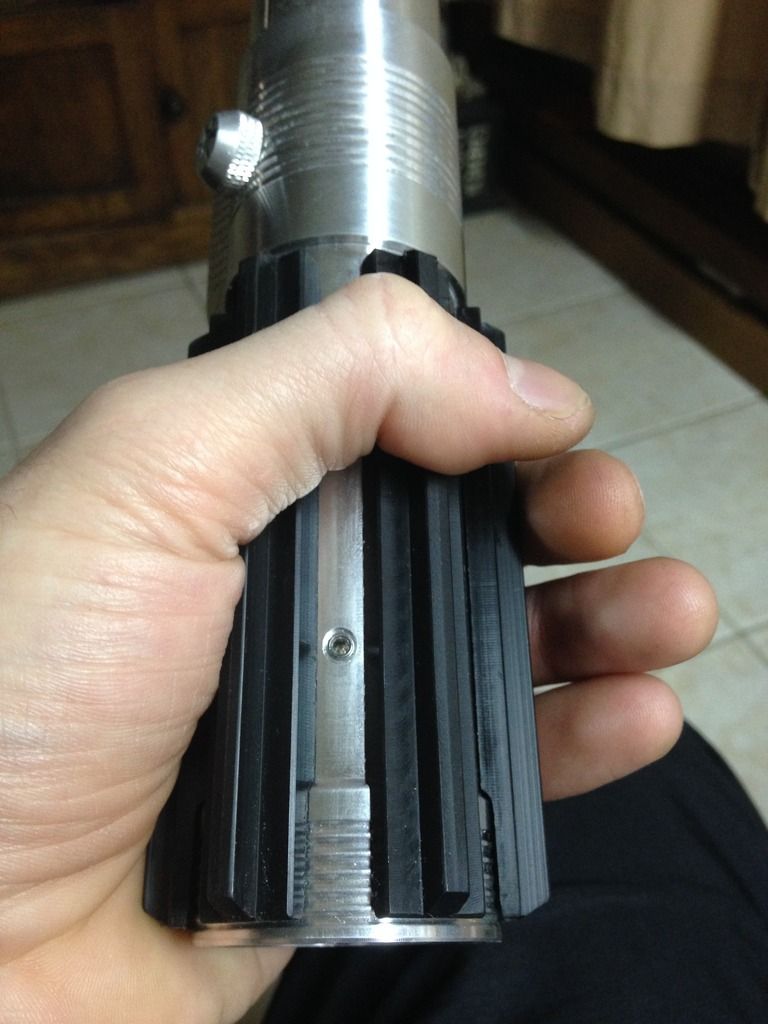
So i didn't realize this at first, but this chosen one came with a silver finish socket screw- so i swapped it out for a black one which i think looks better in this case, and trimmed the new one so it doesn't protrude into the ID. 
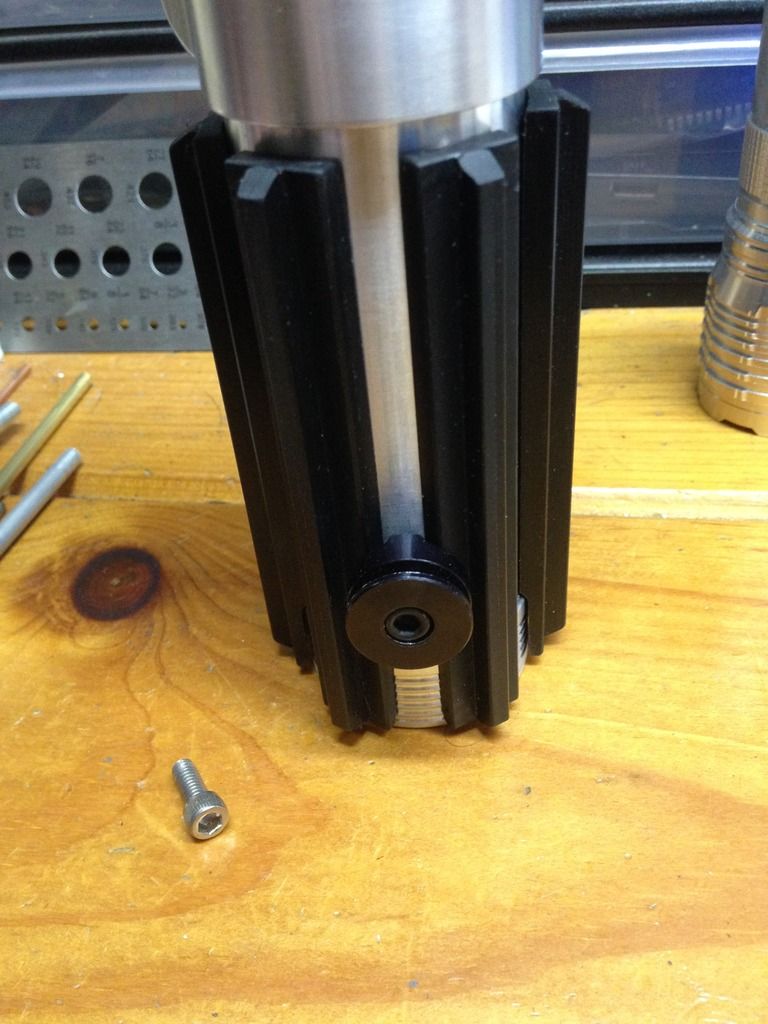
 

Now, this got me 'ta think'n...
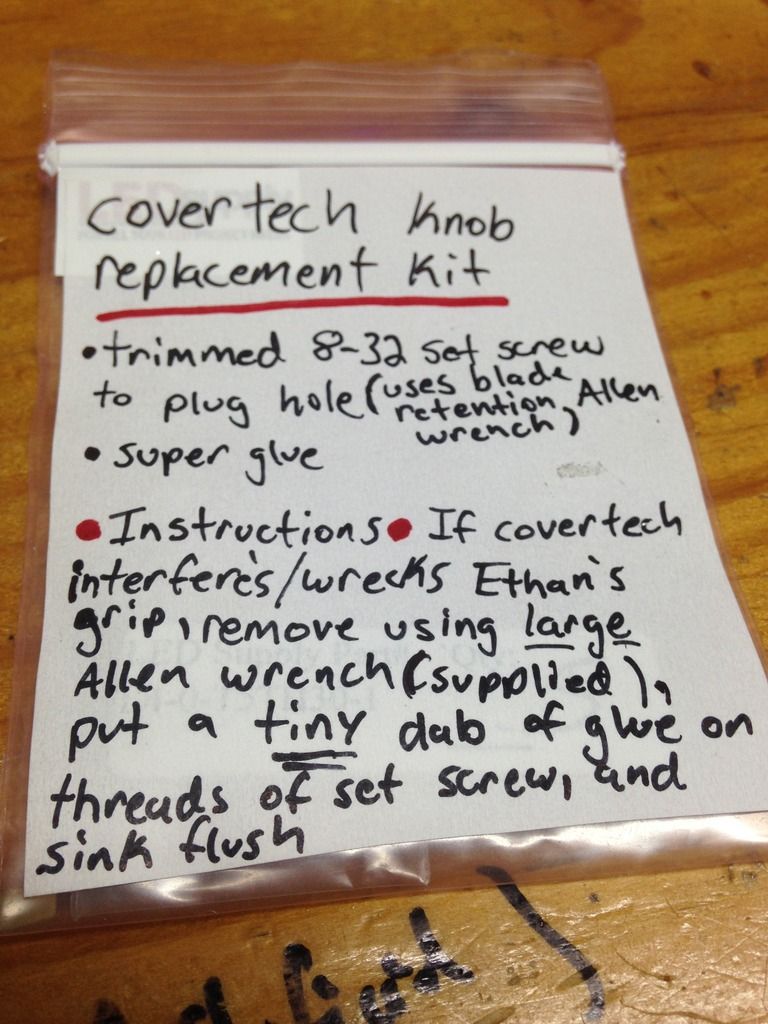
I don't mind the covertech knob at all in the grips, kinda like them actually it gives you an anchor, but especially for a younger guy like Ethan who will be likely 'growing into' this hilt in some ways, i thought the t tracks might already be pushing it a bit, so wouldn't it be best to let him see what he likes, and then have the option to go covertec or d-ring?  I love having both on my hilts whenever possible, because the wheel is most solid and great for when really moving around hard, i mean nothing sucks worse than getting smacked in the nether region by your own hilt mid lunge due to d ring lol- but that said i like how the d rings hang the saber a little better, so when i'm not going nuts (pun intended lol) i prefer to use those.  But anywho- now Ethan will be able to decide for himself... with a little help from Charlie of course Smiley.  I'm including a covertech removal kit along with this so that if the wheel is too much for Ethan, Charlie can just use the larger of the two allen wrenches in this bag to remove it for him, and then take the little silver set screw that i've trimmed (kinda painstaking lol) to be a plug for the covertec hole and sink it nice and flush, it's just the tiniest nub, so it doesn't stick down into ID- and i'll include a mini tube of super glue so he can put just a micro dab on the threads, that way it can't wiggle loose with jarring over time and end up lost or rattling inside the saber lol. 
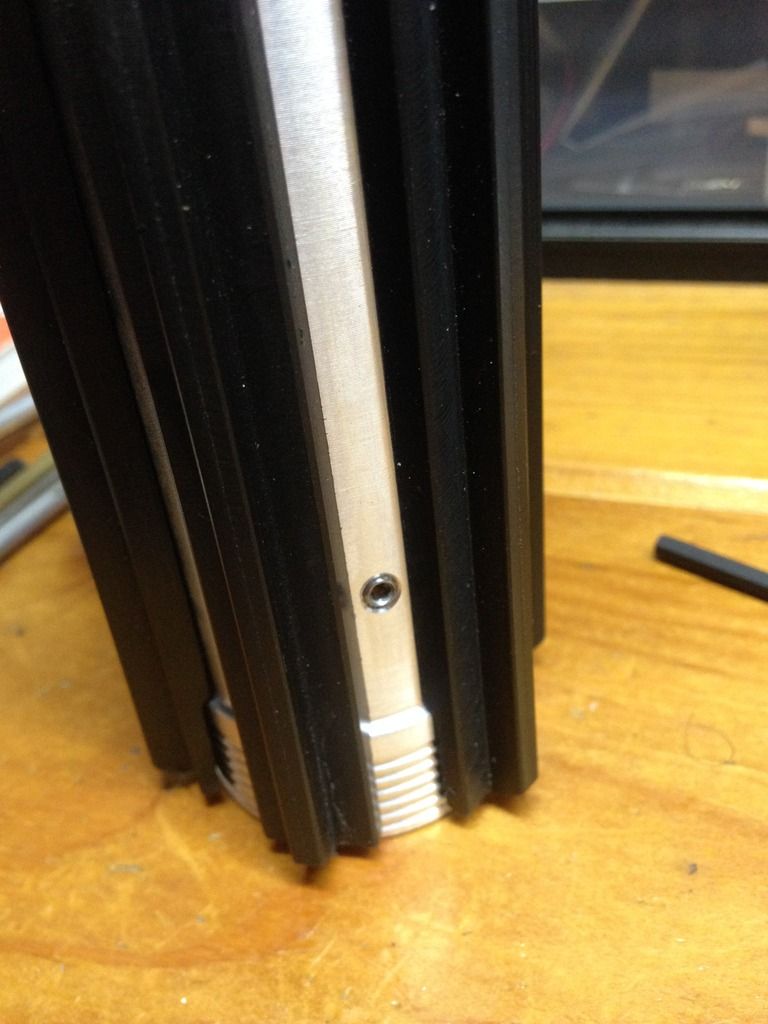
like i said, i genuinely like having both, but if Ethan finds that wheel to be too much i'm sure this will be better.

and while i was putting that little 'kit' together i did this one up too, cause it just seems like a good idea.
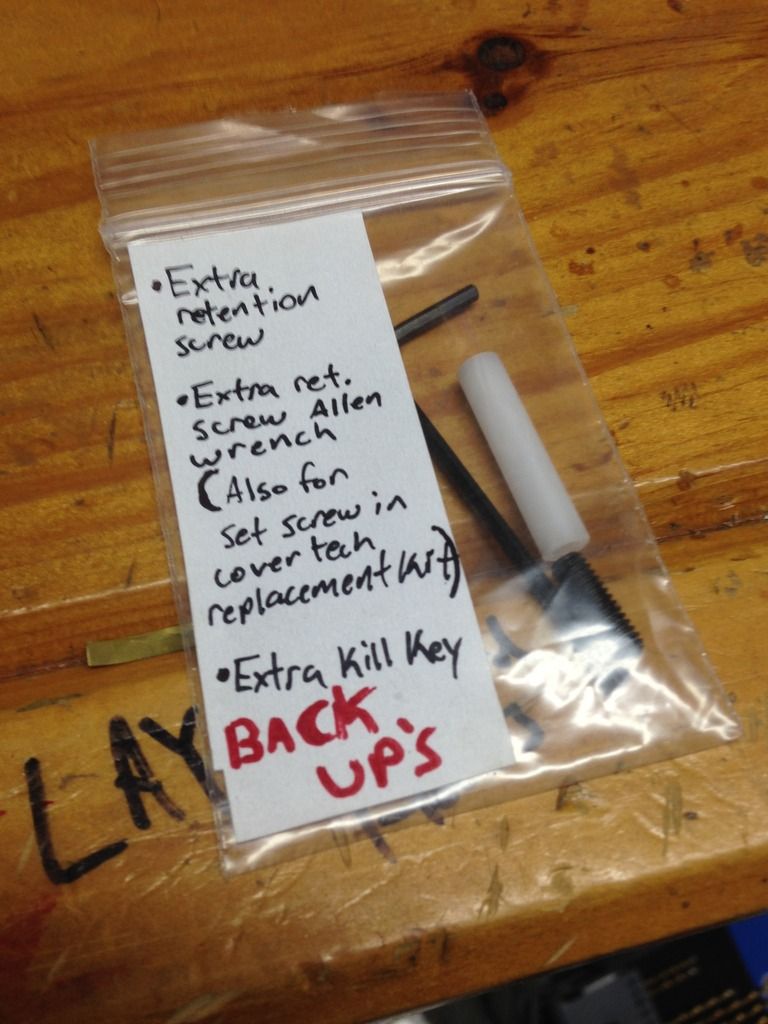
Ok, so now for that d ring lol... i was excited for this part, but, like the etch, i was also a bit nervous because i only had one of these d ring pieces to try this with, not to mention i only had one chosen one pommel lol!

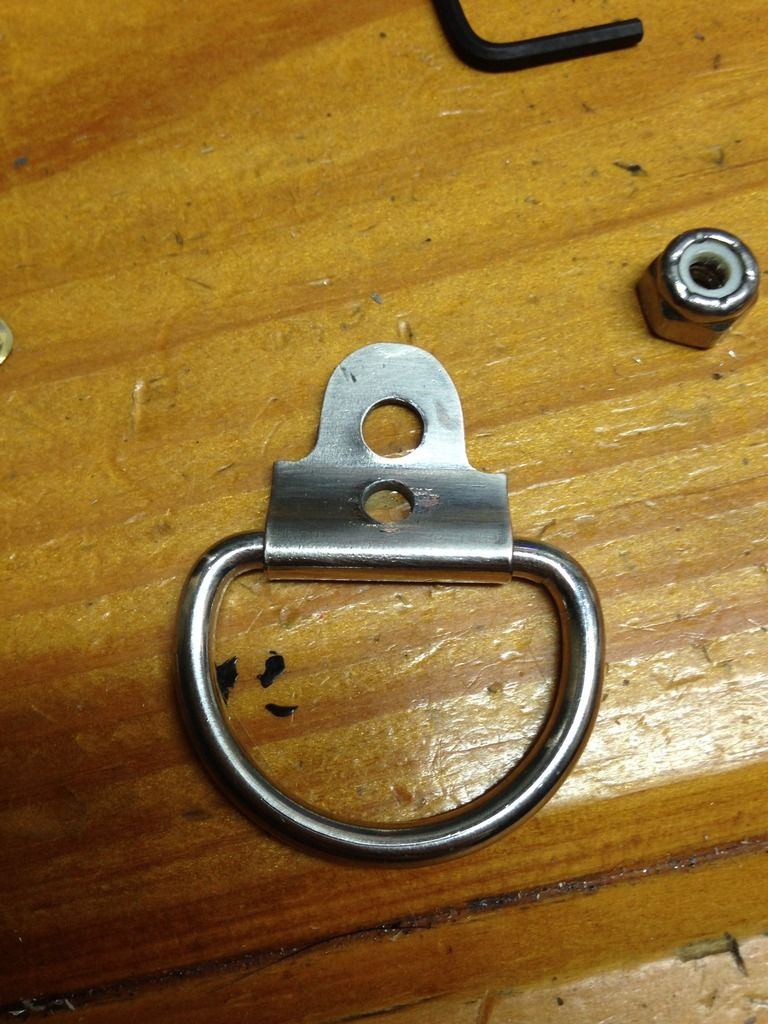
starting out with the ANH d ring from a 2.0 graflex kit i'd been saving, and a couple brass pan head knurled screws (aka 'lamp screw').
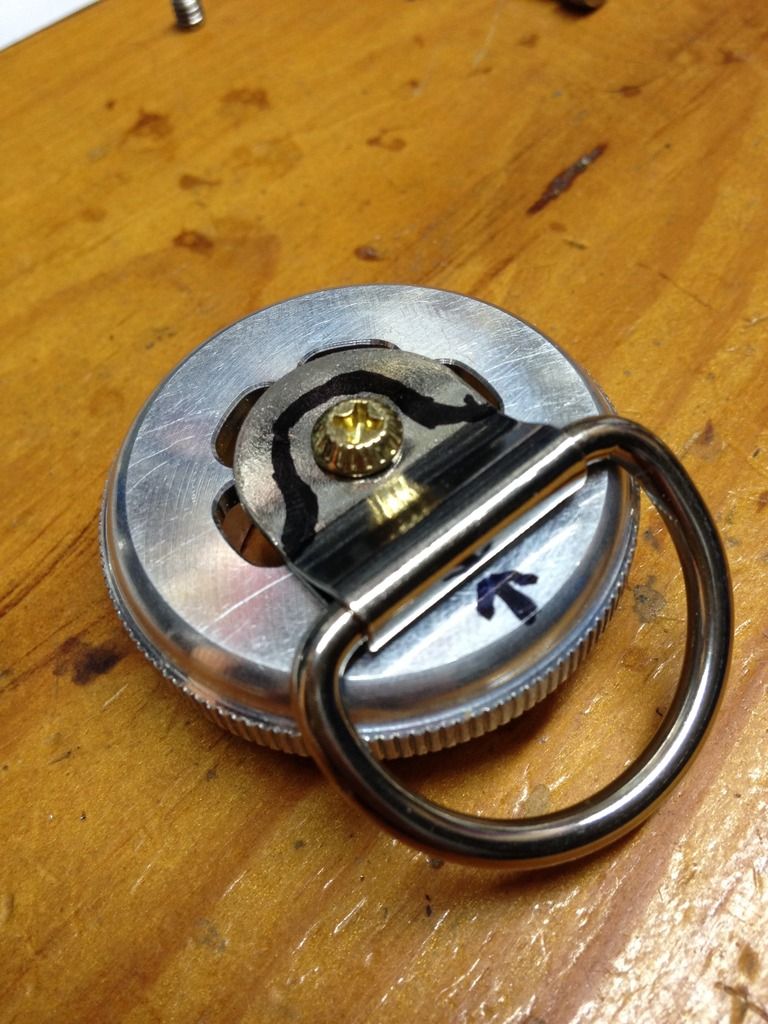
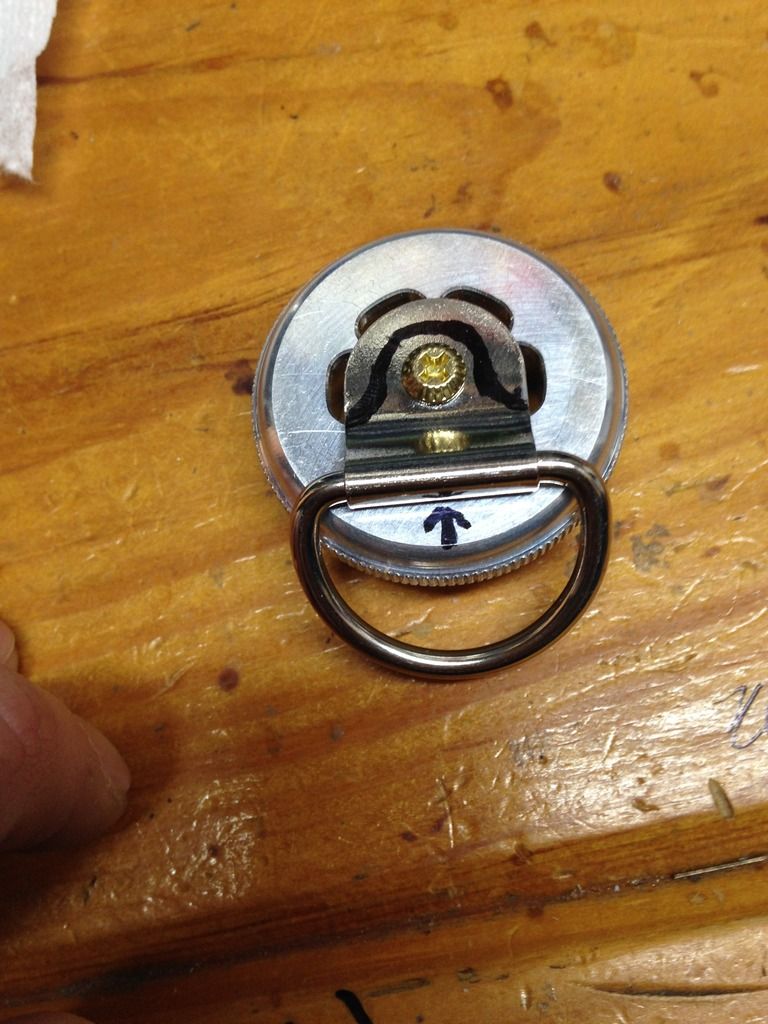
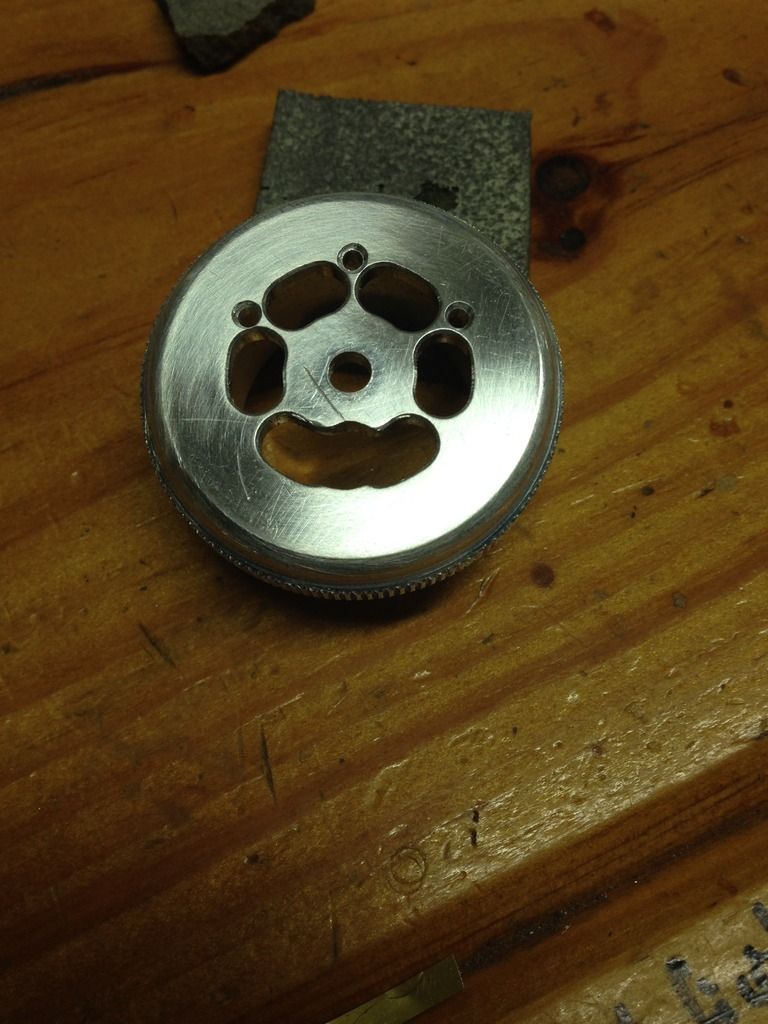
but you can see how this covers most of the sound vents, and also just looks bad lol.  So time to turn this into a one of a kind vented pommel/ d ring solution Cool.


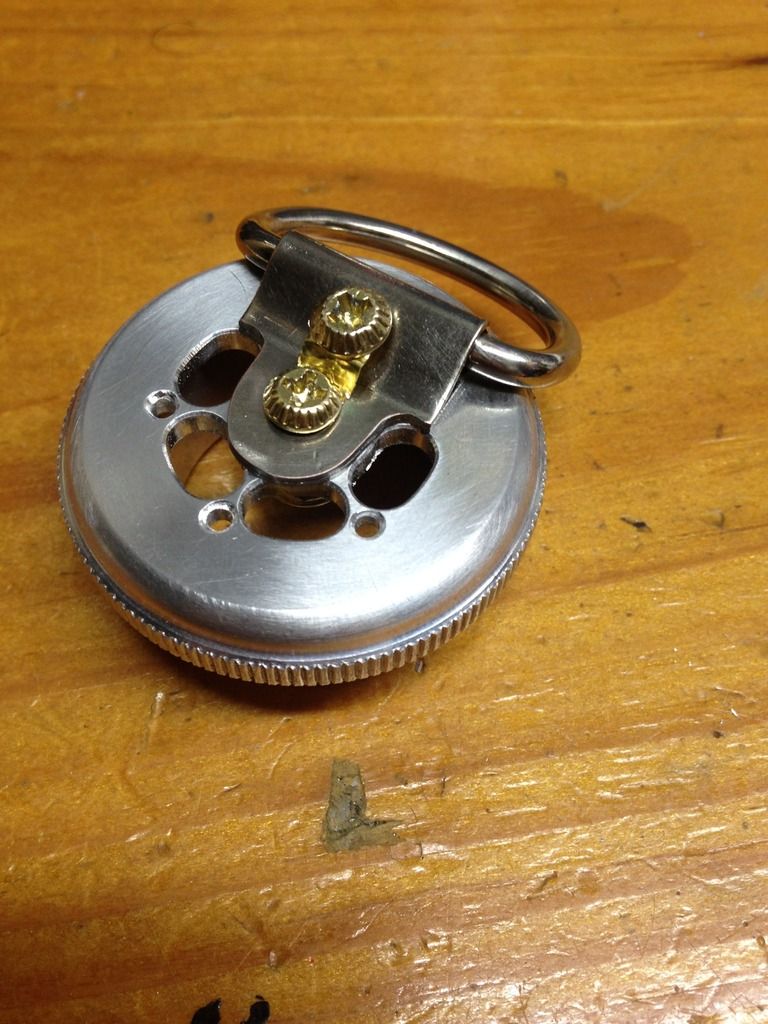
strategically shape the d ring tab for the vents, and get a very carefully placed hole for a second screw, which is super important because by eliminating all that material on the tab i've taken away what used to give it the rigidity it needed to not bend upward/ away from hilt slowly over time from the weight of the saber when hanging etc.  but now this second screw will secure the tab flat to the pommel much better anyways Smiley, with a very cool added bonus.  Ethan will be able to adjust the rattle'y'ness of his d ring completely.  i'm totally doing this in the future- the main screw up in the rounded area will be held in place by a locking nut- it's not budging.  but this second screw that sits in the slant of where the tab wraps around the d ring, it's just got regular 'ol hex nut holding it in place so that it's easy to loosen/ tighten- and by doing so you make the d ring looser/ wiggly/ rattly, or super tight so it just holds its position and doesn't wiggle at all.
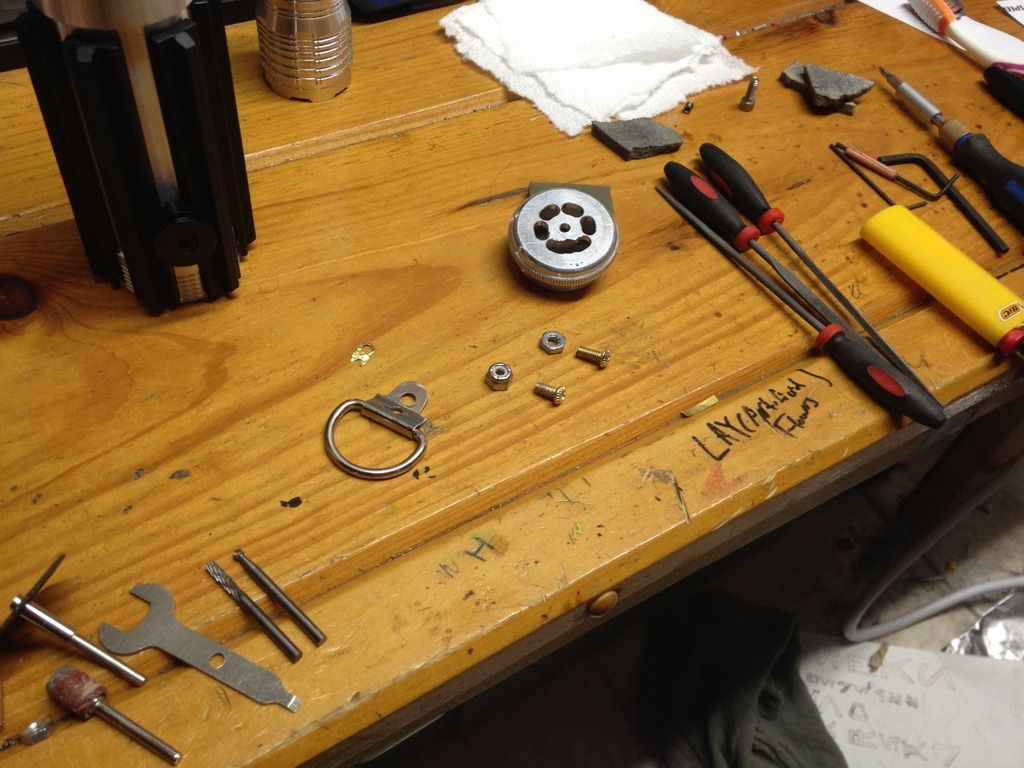
 

then break out the files, sand paper/ sponges, and dremel stuff.  drill out the centre hole for the first/ main anchoring screw, then remove the material in the way of the second screw and the nuts on the inside, trim the length of the screws etc.
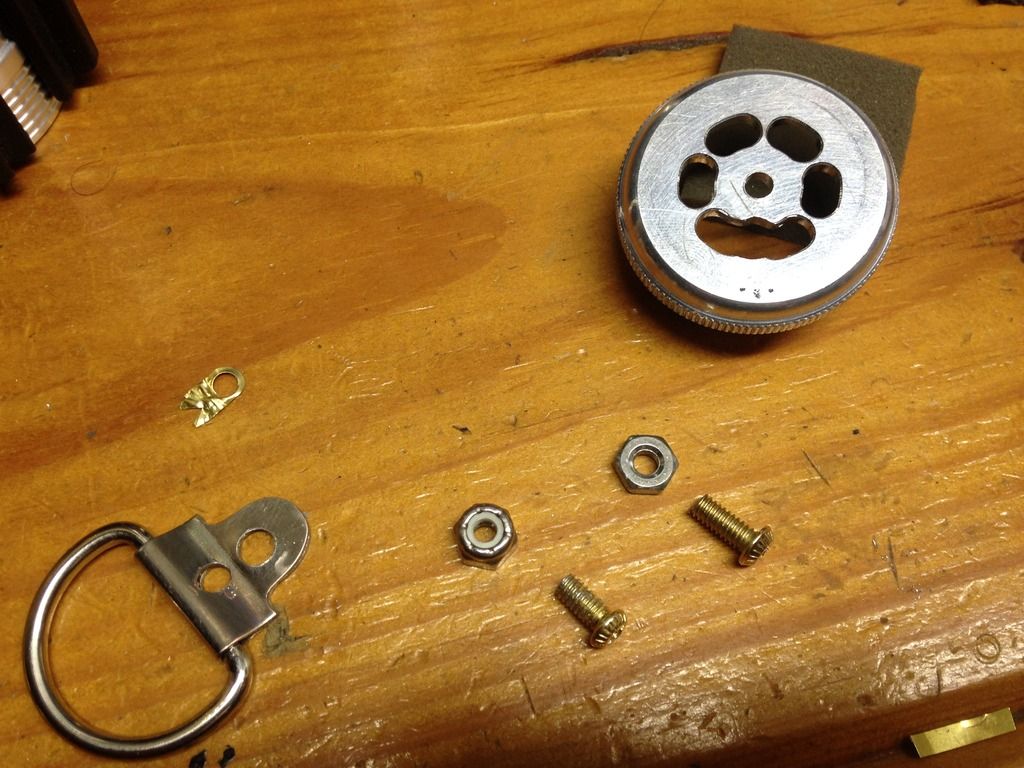

that brass piece is a left over bit from a graflex electrical pin contact strip that i've put the screws through- since the second screw will be raised slightly this will hide the exposed thread and just give a better look down there.

add a few custom vents to help make up for the bit covered by the tab, and plus i just thought this would look totally sick Smiley.
 

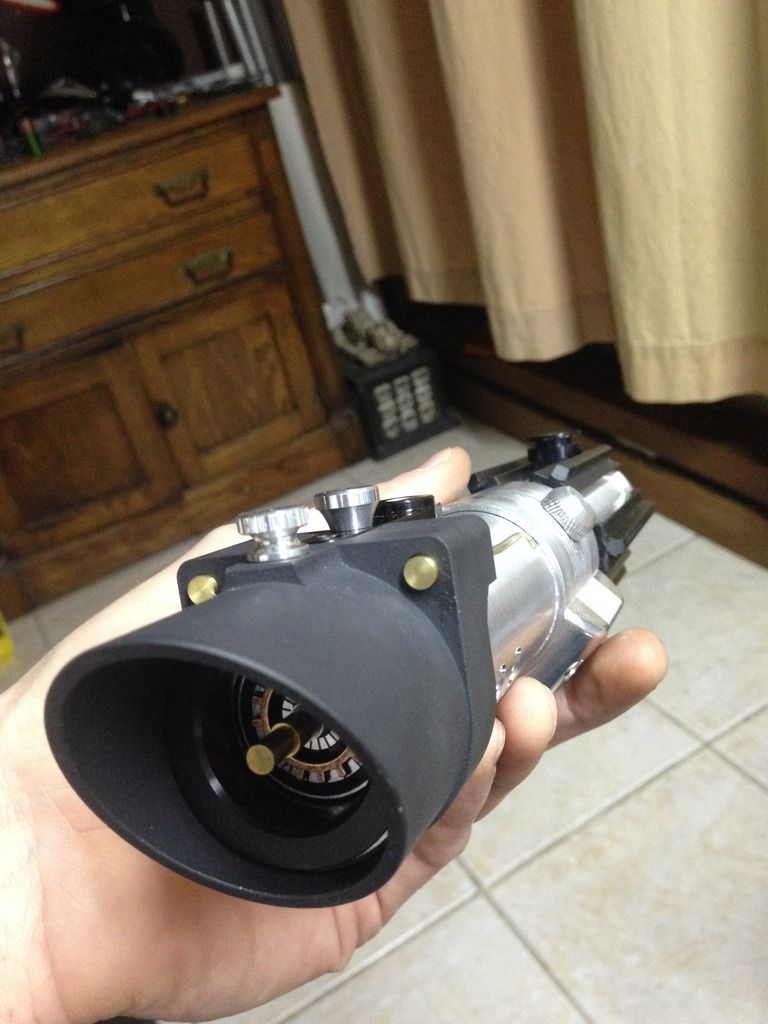
and voila!, one wicked custom vented d ring pommel:
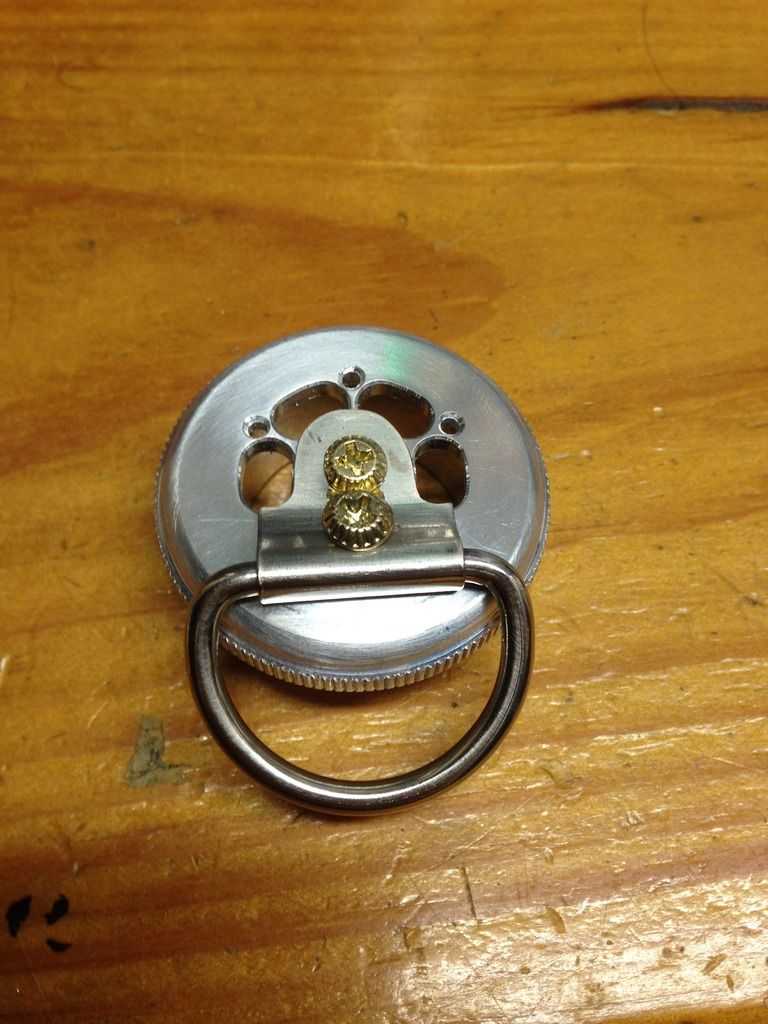
i gave it what i'm pretty sure is the best orientation for a right hander- which is also a pretty familiar orientation to buffs of OT hilts.
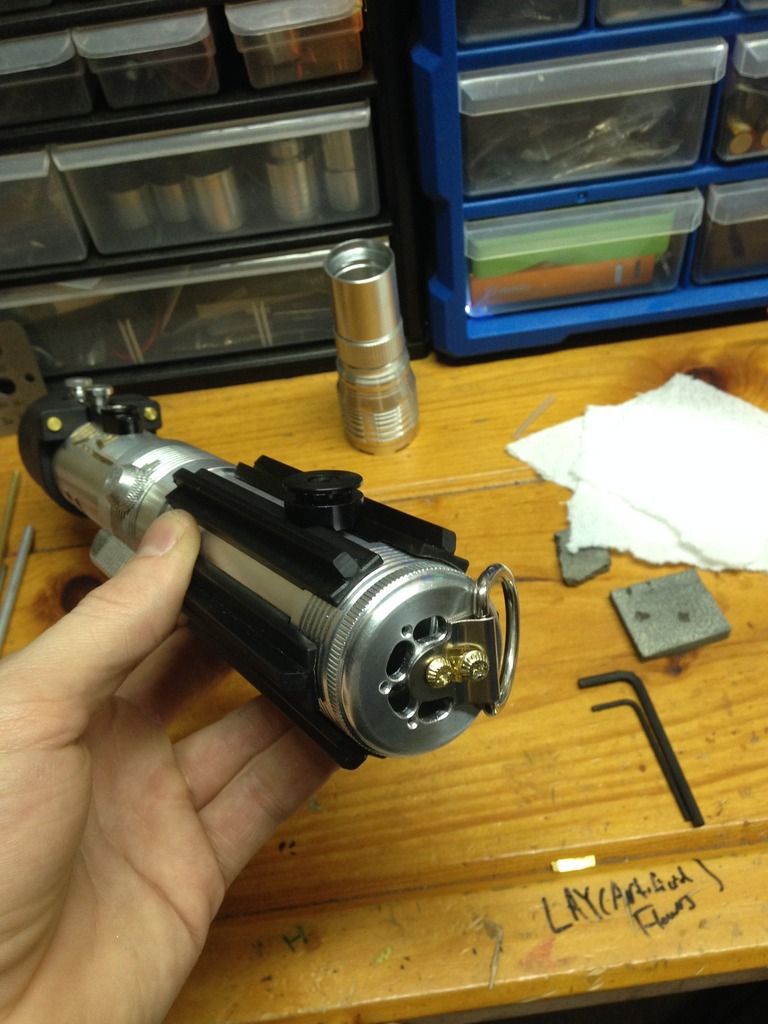
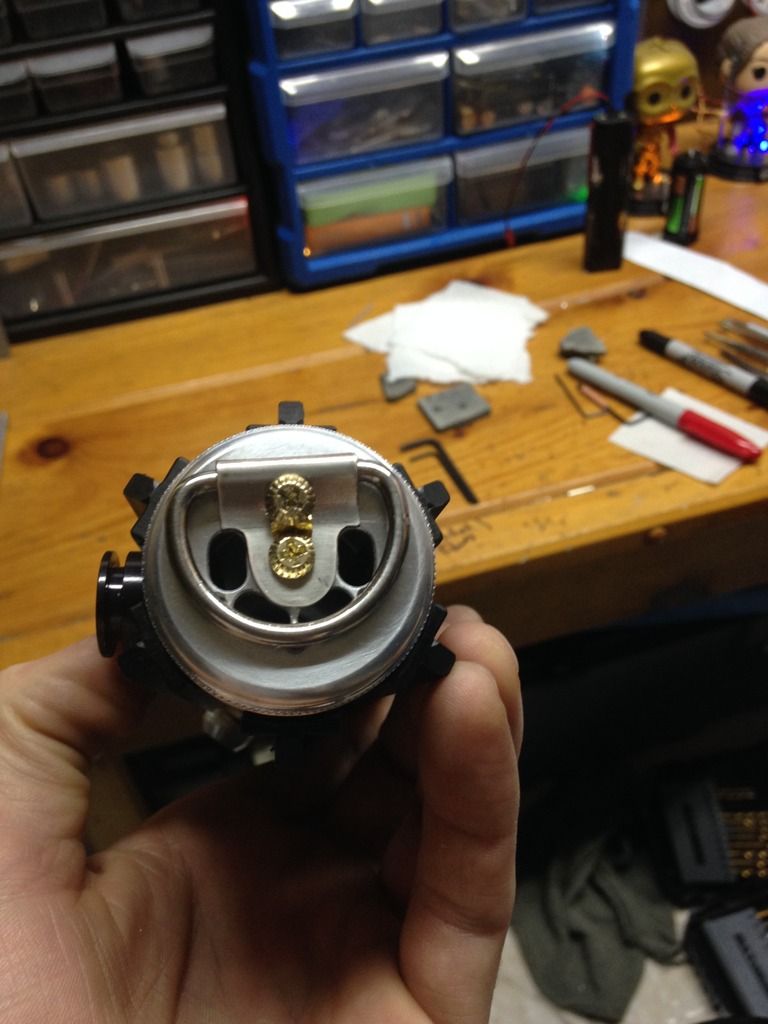
if you look close you can see the brass sheet between/ under the screws, giving a more finished look.
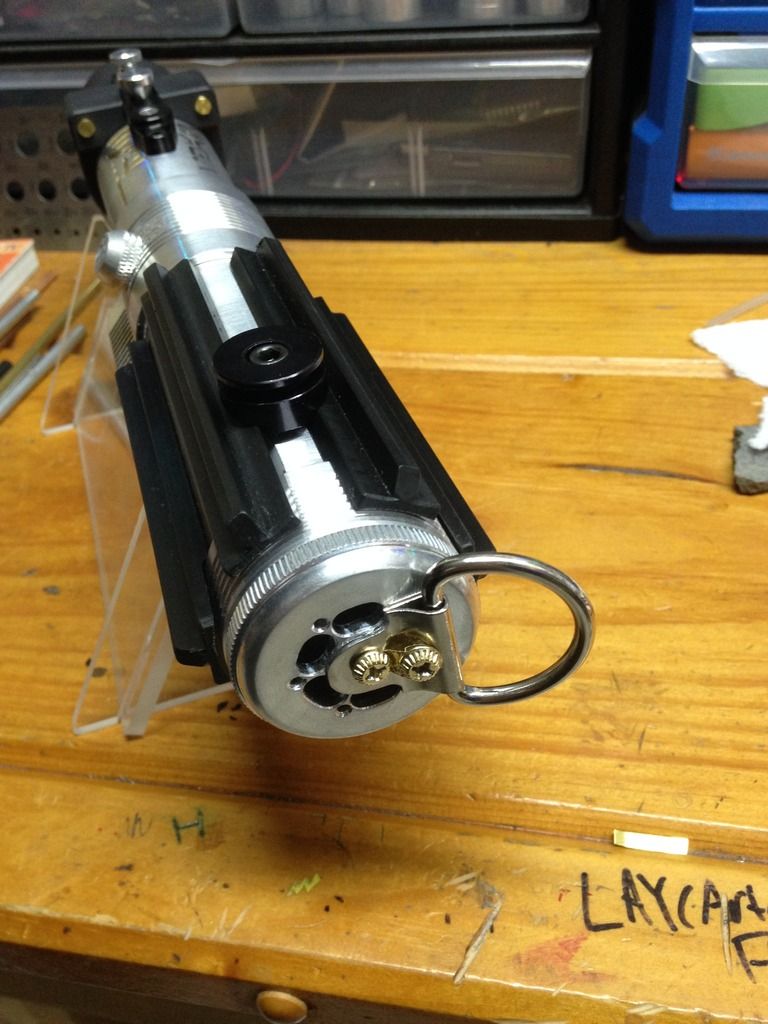
and there's how it would hang- i think thats best for a right handed person, to have this on your left side (easiest to grab with right hand and remove saber) and this way it sits with the business end forward, and the kill key on the outside and ready to be popped he he.

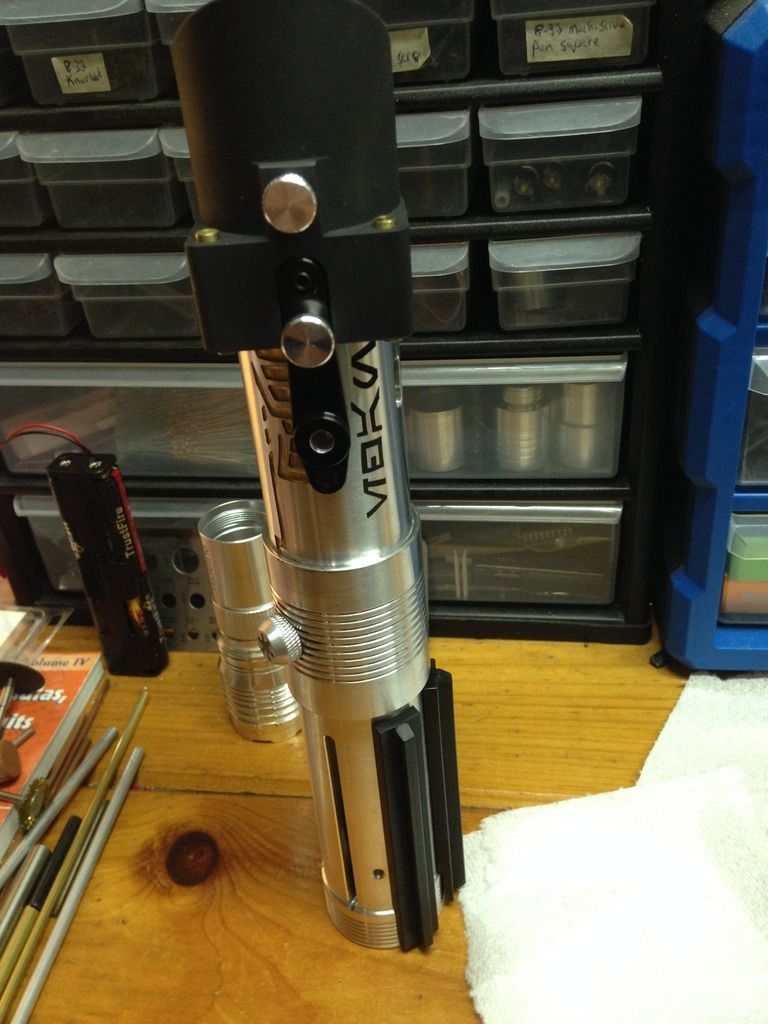
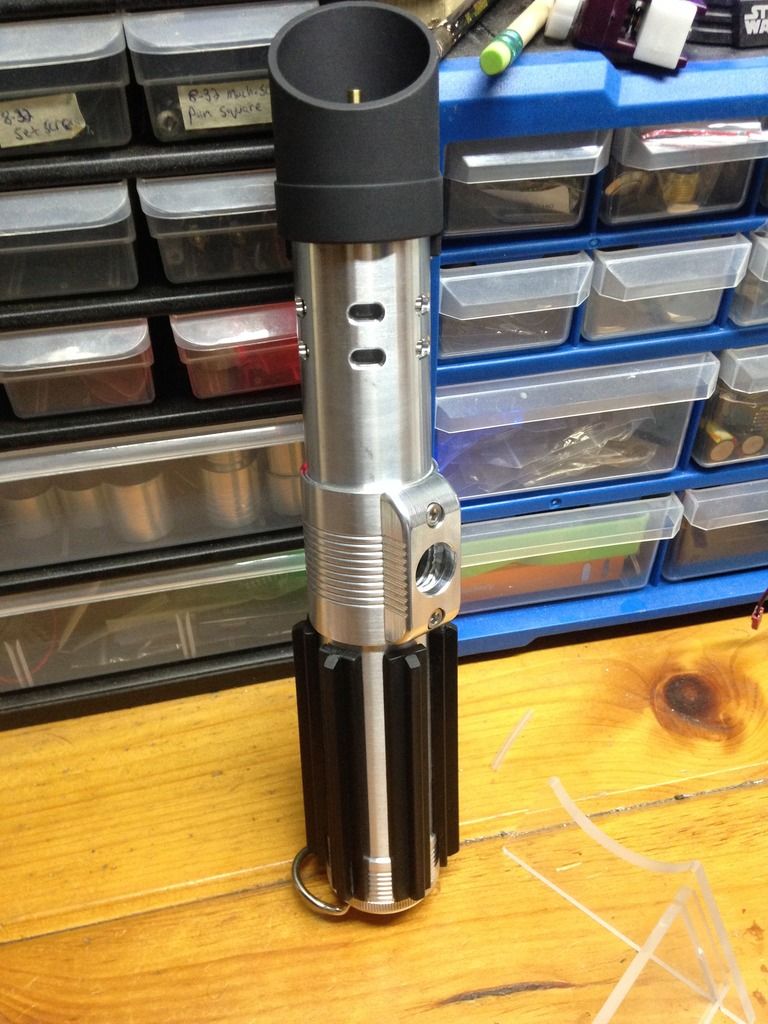
So there we have it guys!!  that's the body totally built Smiley


The electronics are most of the way there, i'm just messing with some 1/4W resistors on the green of the rgb trying to get a more true yellow on the second stage of the accent indicator, but all that's left to do is get the electronics inside at this point.  That's my mission for the rest of the weekend.

keep you posted (well actually the next update will likely be the finish, just due to time and technical constraints), but i can't wait to have this all together and configured!!! I'm really loving this saber. 

Thanks again everybody and sorry for not being around!  I'll try and get back to everybody who's pm'd me as quck as possible- I've got SO much correspondence i'm behind on it's overwhelming lol, but i'll get it all eventually- right now i just have to give this project top priority though, as every hour of this weekend counts.  like literally lol, i put in a full 24hr's from the time i got home from work yesterday morning until just now lol, and this is my first break to get to computer.  I'll likely be taking (first a nap lol) care of all the loose ends, installing, and wrapping up here before i get back to the computer again.  Thanks for bearing with me, and for all the support!!
Logged

Rapine
Honoured Recipient of the Warlord Order
SaberForum.Com Moderator
Knight Commander
*****

Force Alignment: -3020
Posts: 7792


Always scanning the horizon...


« Reply #86 on: April 01, 2017, 12:59:48 PM »

Truly spectacular Rev!   Shocked Shocked

That etching is the bomb. Smiley

Can't wait to see the finished product, and maybe even get some technomancer back. Tongue

-1 all day.
Logged

"The thing that always drives me hazy, is wondering whether it's them or me who's crazy." ~ A. Einstein

Lord Canterbury
Dark Knight of The Scorpion Order
Knight Commander
*

Force Alignment: -1313
Posts: 1972


Fish Fingers & Custard


« Reply #87 on: April 01, 2017, 01:05:04 PM »

Lookin' good.  Smiley
Logged

Winning? Is that what you think it's about? I'm not trying to win. I'm not doing this because I want to beat someone, or because I hate someone, or because I want to blame someone. It's not because it's fun. God knows it's not because it's easy. It's not even because it works, because it hardly ever does. I do what I do because it's right! Because it's decent! And above all, it's kind! It's just that. Just kind.


~ The 12th Doctor in "The Doctor Falls"

Corwyn VonBeck
Knight Commander
*

Force Alignment: -340
Posts: 1071


Grey Knight


« Reply #88 on: April 01, 2017, 08:56:14 PM »

Phenomenal work my friend, just awesome. So happy for you that you are so close to finished with a little time to spare!
Points all day Rapine? more like all week! lol
Logged

Rapine
Honoured Recipient of the Warlord Order
SaberForum.Com Moderator
Knight Commander
*****

Force Alignment: -3020
Posts: 7792


Always scanning the horizon...


« Reply #89 on: April 02, 2017, 01:46:51 PM »

Points all day Rapine? more like all week! lol
Yeah, well...look at his ratio...doesn't exactly need a boost...lol

(-1 again Rev Wink)
Logged

"The thing that always drives me hazy, is wondering whether it's them or me who's crazy." ~ A. Einstein

Pages: 1 ... 4 5 [6] 7 8 9   Go Up
Send this topic | Print
Jump to: