Click here for lightsabers
  • Home
  • Help
  • Login
  • Register
Pages: 1 2 3 [4] 5 6 ... 12   Go Down
Author Topic: my main duelling saber: log  (Read 52684 times)
RevanReborn
Technomancer of the Graflex Order
Knight Commander
*

Force Alignment: -1086
Posts: 1121


« Reply #45 on: March 08, 2016, 07:57:33 PM »

Thanks Bulvoy!  Sorry I somehow missed your first comment- I totally agree, there's nothing quite like the feeling of dreaming something up and then seeing it come into reality.  Thanks for coming along on the journey Smiley.
Logged

Hansrad
Knight Commander
*

Force Alignment: -670
Posts: 748


Jedi? Sith? I'm the one with the lightsaber.


« Reply #46 on: March 09, 2016, 01:22:00 AM »

Holy cow I can't imagine the guts it took to do that to your saber. That's awesome. I agree with you and Bulvoy that seeing something from your head transform into something in your hand is amazing. The most important thing is having the perseverance to get through any bumps in the road that pop up along the way. And lots and lots of patience ( that's the part that gets me a lot of the time).
Logged

Own: Emerald Overlord, BHManticore, BR Renegade,FO Dominix LE V4 (stunt), CG Dominix LE V4 (stunt), GB Apprentice LE(stunt),BR Dark Initiate LE V4 (stunt), AS Apprentice LE V4 (stunt), CG Dominix V3 (stunt), SRD Darkish Liberator (stunt) Emerald Lost Grey.

JediXIX
Alchemist of the Sentinel Order
Knight Commander
*

Force Alignment: 1172
Posts: 2190


« Reply #47 on: March 09, 2016, 08:16:31 AM »

Another +1 Rev . . . enjoying the journey  Wink

A question . . . have you ever looked into a milling vice and milling cutter to use with your drill press ? . . . could be handy for small projects like this ?  Smiley
Logged

Remember... The Force will be with you... Always . . . (Just let it in)

RevanReborn
Technomancer of the Graflex Order
Knight Commander
*

Force Alignment: -1086
Posts: 1121


« Reply #48 on: March 09, 2016, 01:13:48 PM »

Another +1 Rev . . . enjoying the journey  Wink

A question . . . have you ever looked into a milling vice and milling cutter to use with your drill press ? . . . could be handy for small projects like this ?  Smiley

Thanks Jed! 

Ummm... just a question back at you lol, are you telepathic or something Wink ?  I've been looking around, in decision mode for about a month or so now lol.  Ive even been looking around at these companies out there that take old industrial/ commercial equipment and refurbish it- a lot of businesses buy major pieces of equipment this way because costs are so high- like some of these machines are still multi million dollar purchases 20 years later on the used market.  I intitially set about finding out what a run down CNC machine would set a guy back.  Turns out in some places in Canada you can own a decent sized home on a good chunk of land for about the same price lol- now I don't think my landlord would be cool with me moving it into the apartment, and any way I don't think it'd fit up our stairs lol (it'd probably collapse my dillapidated floor lol) so I think I better go with the house first!  But there are lathes and milling and axis stations that turn up here and there in decent shape for more realistic, though still pretty huge, prices.  It sounds nutty, but it'd basically just be like buying a car, something so common place for the average person in first world counties these days that it's mundane, just taken for granted. 

These really are big decisions so who knows, they're so long term they're just pipe dreams for now I guess... But how cool would it be to only ever order parts because a piece caught your eye, never because you needed it.  You'd never really be in need of an emitter, pommel, etc. when you can just hunker down on a weekend with some stock and make one  Cool.
Logged

Venthros
Knight Apprentice
*

Force Alignment: 5
Posts: 39

Light Side Points Please!


« Reply #49 on: March 09, 2016, 01:21:48 PM »

Wow, don't know why I haven't looked at this thread before. Awesome work so far!

Can't wait to see the finished results!
Logged

Owned
Mantis CE Emerald
SIBS V3 Blazing Red (Grab Bag)

"If you strike me down, I will become more powerful than you could ever imagine".

RevanReborn
Technomancer of the Graflex Order
Knight Commander
*

Force Alignment: -1086
Posts: 1121


« Reply #50 on: March 13, 2016, 11:50:19 AM »

Thanks so much everyone!  It's easy to do Venthros, there's just so much great stuff on the forum, it's hard to catch them all right away- I'm always finding threads i missed.  Yeah i was PRETTY nervous not gonna lie, Hansrad lol.  I just went really slow, and cut in really short bursts to not loose focus on the very cutting edge of the disk and grinding stone, you're staring so intensely in on EXACTLY where the edge of the disk will touch metal and holding you're breath.  But as you start to see the shape emerge and you start to achieve a fit you realize you're gonna be able to pull it off lol, and its so rewarding! 

So this piece is almost a wrap Smiley.  It's all permanently secured/ assembled etc.  I just have to dress up the little port where the wire exits still to match it with the overall look of the box a bit more- also this isn't how the wire will actually run, its just to give you the basic idea of the look:
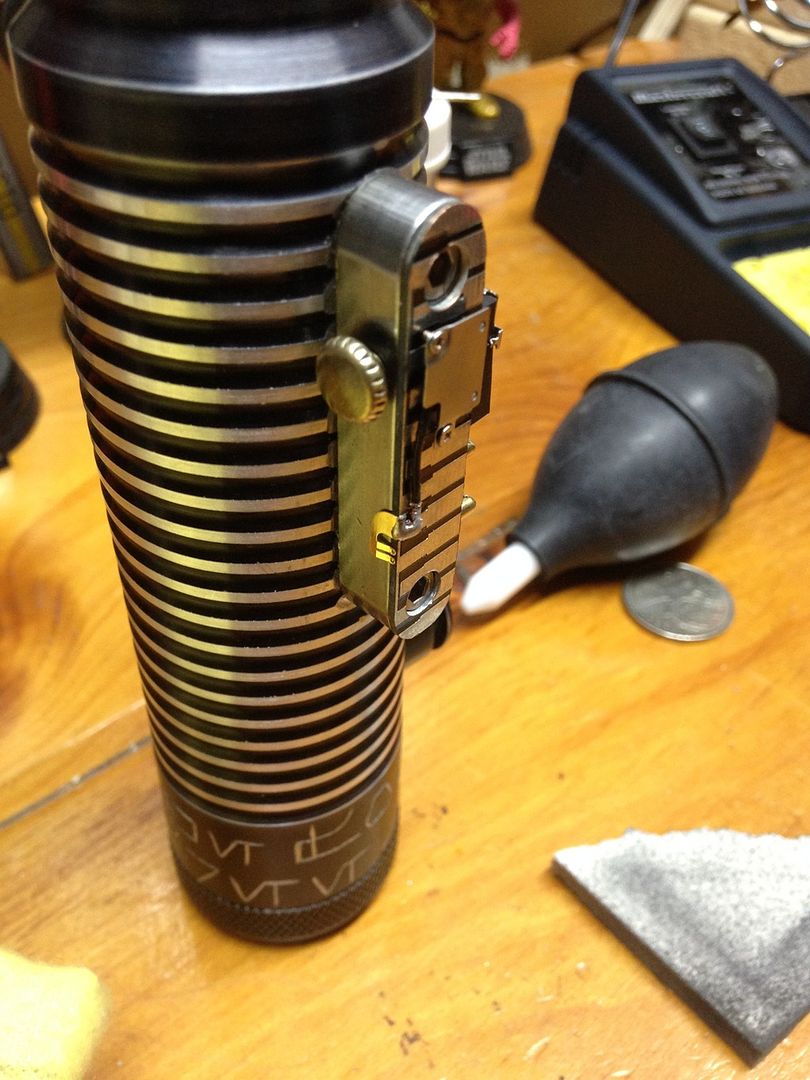
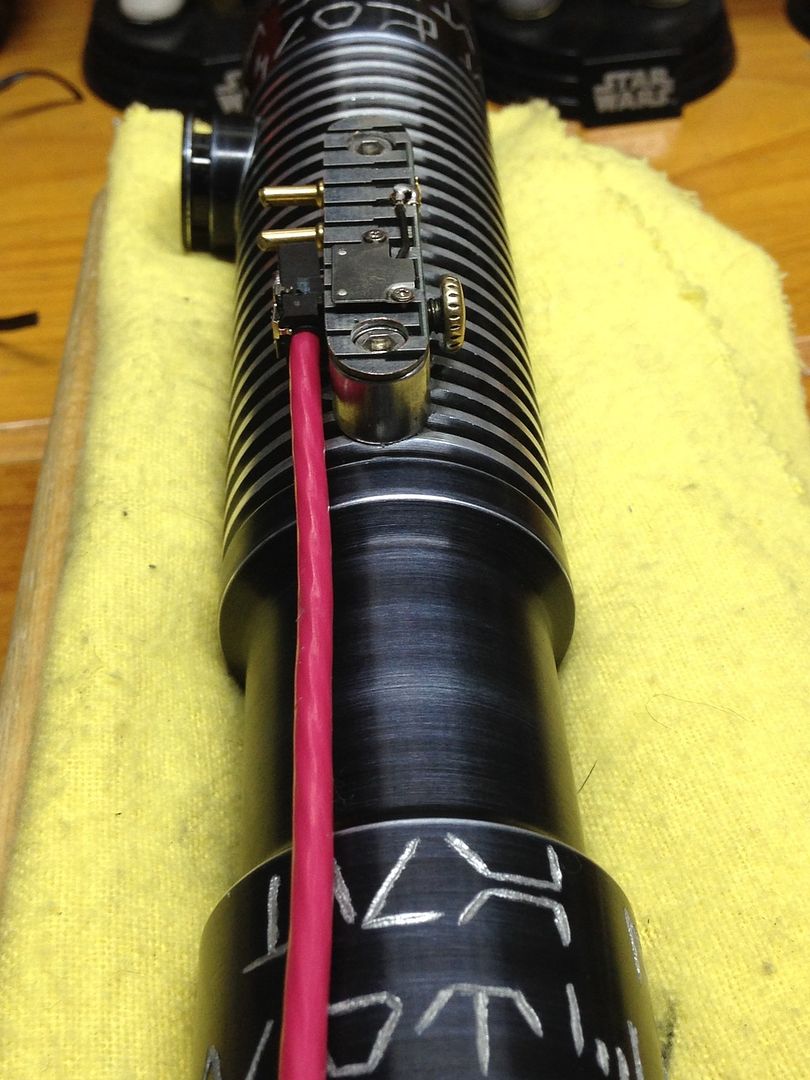
I actually soldered some of the components in because it looked cooler, and helped secure them better.

I'm relocating the latching switch- so in its place i'm making a sort of bezel to allow for the mounting of an accent led:

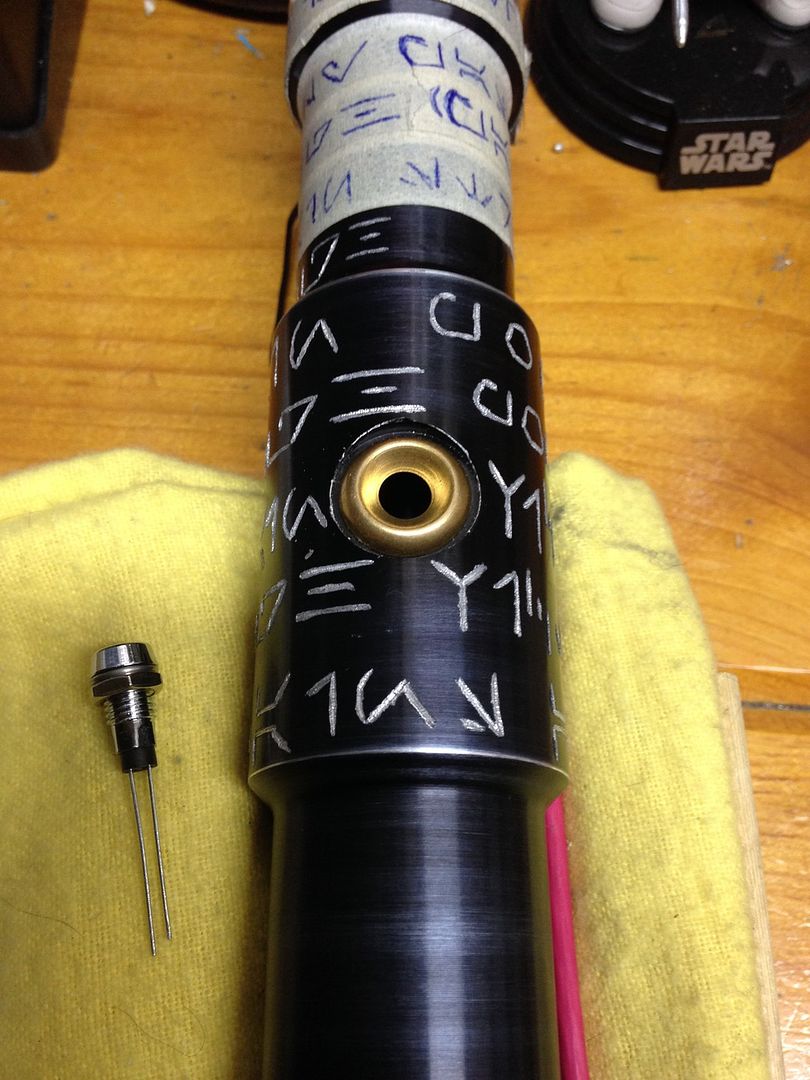
(side note, only the very bottom line of aurebesh here has been retouched with the scriber- only made one pass on that line and it made a noticeable diff, so I'm feeling good about the way the engraving will turn out once I've gone over it all many times)
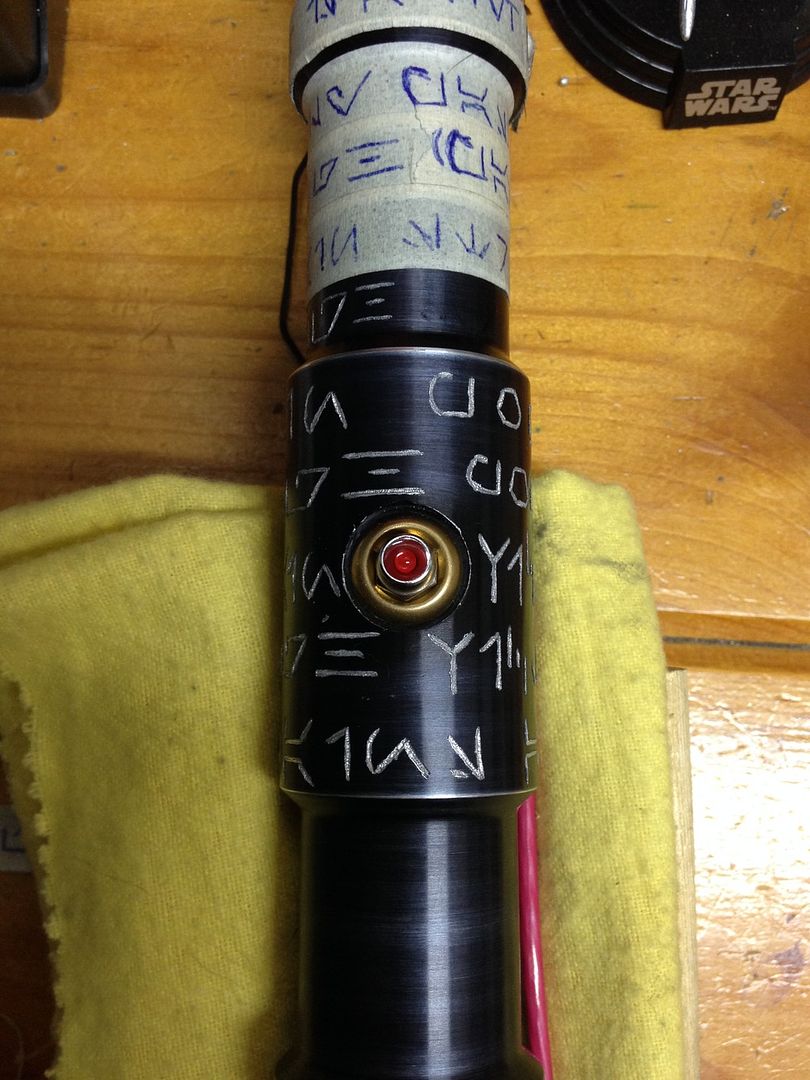
I could use your guys' opinions on this one... I'm kinda torn as to which style accent to go with:

This one has a narrower, tiny protruding bezel type look, like a micro version of a graflex red button almost.  I like the bezel and how much of the die is exposed on it.  this is the one lying on the cloth in the first pic for ref of size of profile/ protrusion.

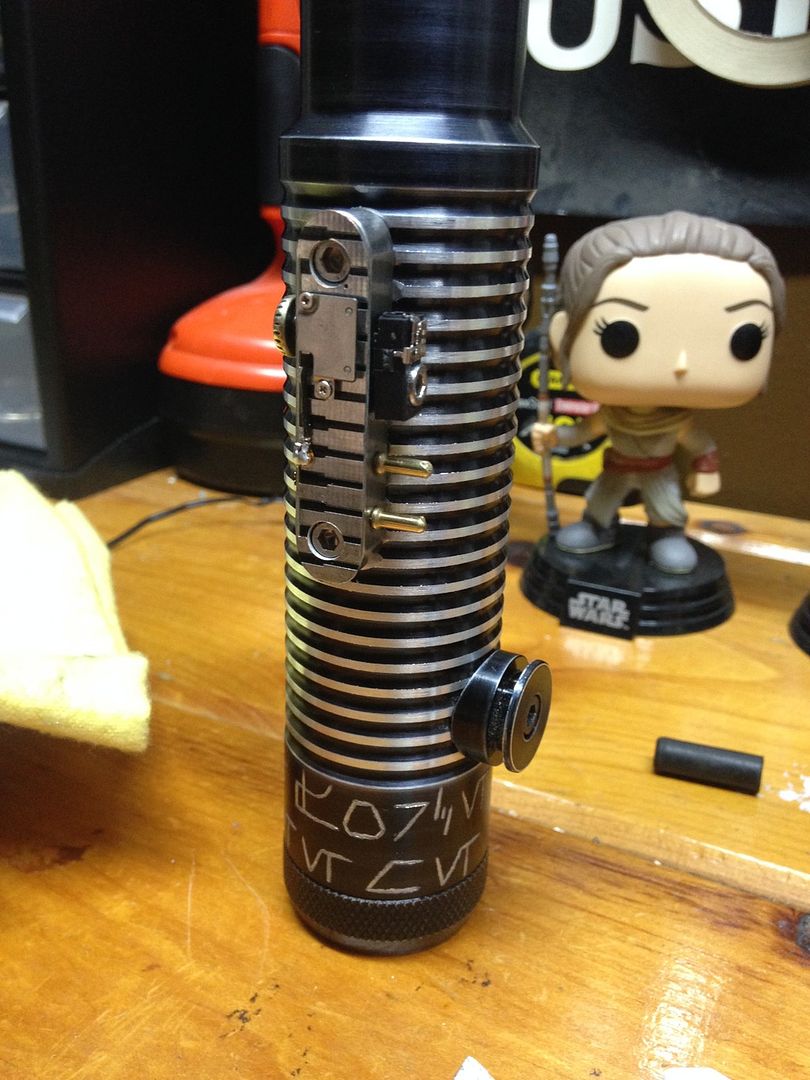
This next one is more low pro, which i like, tho its housing is wider and less of the die shows:

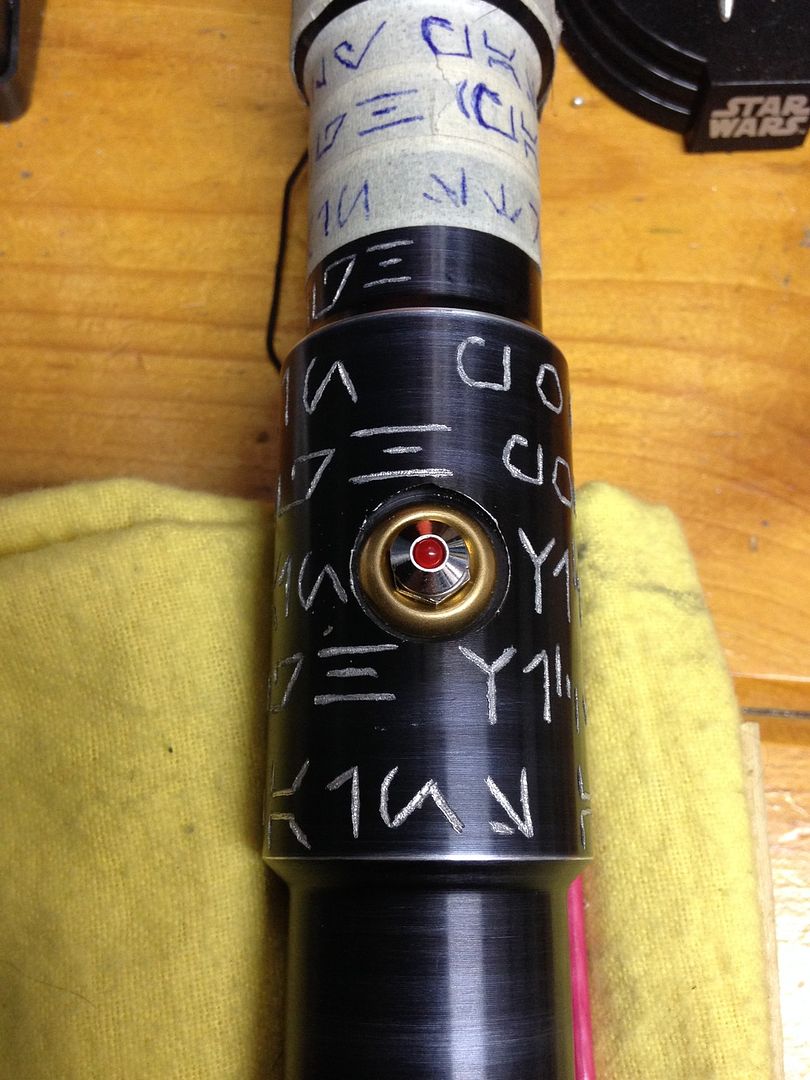
What do you guys think?  I should point out both will sit down in the bezel a lot better, i just threw them in quick for ref pic- the back nut is still sitting on both in these shots causing them to sit higher up and uneven.  Also, the brass bezel itself has more to it than that washer, I just have some of it tied up in progress atm.

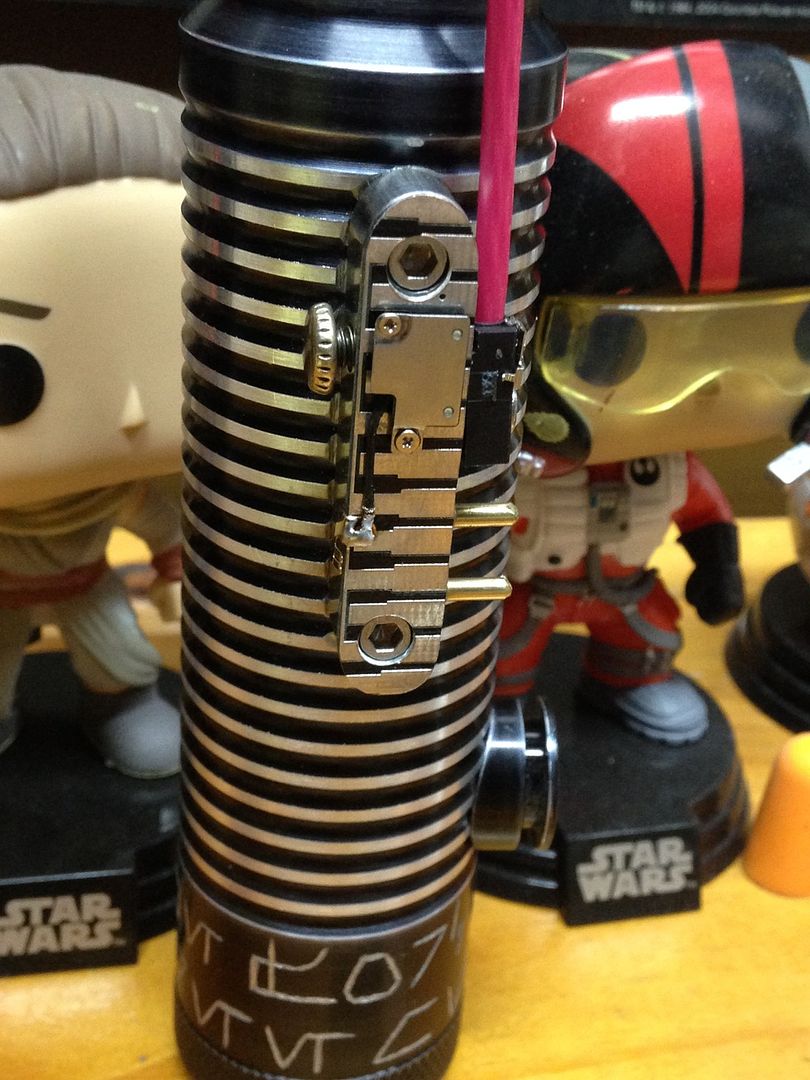
Ok, so- the plans for this project are still up in the air for a couple reasons.  I want to swap the battery pack for a power bank i have on the way atm- but i'm not knowledgeable about electronics enough yet to know if the 5V output of the bank will be enough for the resistored red led AND the accent led.  If not i may have to just stick with the rechargeable batteries I've got now, which would kind of be a bummer.  If the bank's a viable power solution, i have to figure out if my resistor value changes- but other than that i'd be good, i've got some variable resistors incoming for the accent. 

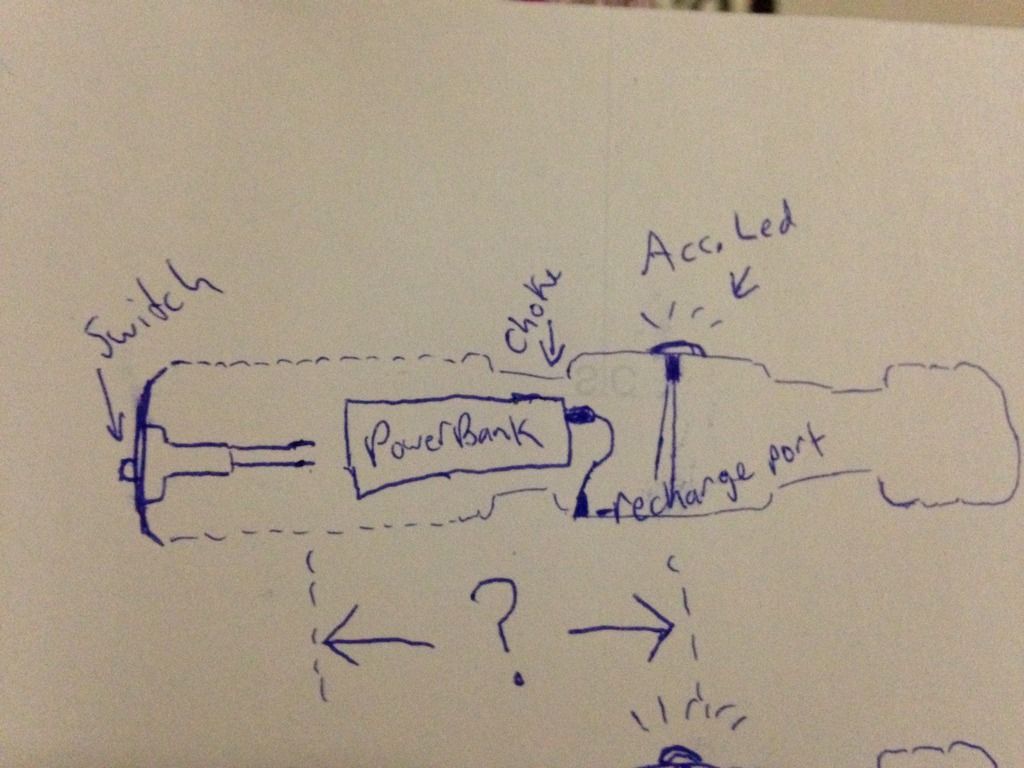
But even IF the bank can power it, my plans are still up in the air due to space inside the hilt.  Ideally, i'd put the latching switch down in the centre of the pommel- but, with the connections sticking straight up into the area that typically contains the power source, i imagine it'll be a miracle to fit the power bank in behind it.  The choke would be the first obstacle, though its thick enough to bore out more.  But the next roadblock would be the pins/ connections to the accent led sticking down from the old switch location.  I'd essentially have to pray the bank fits between the connections of the switch and the accent.  If i could get it to, i'd run the usb out to a recharge port to eliminate ever having to remove the bank:


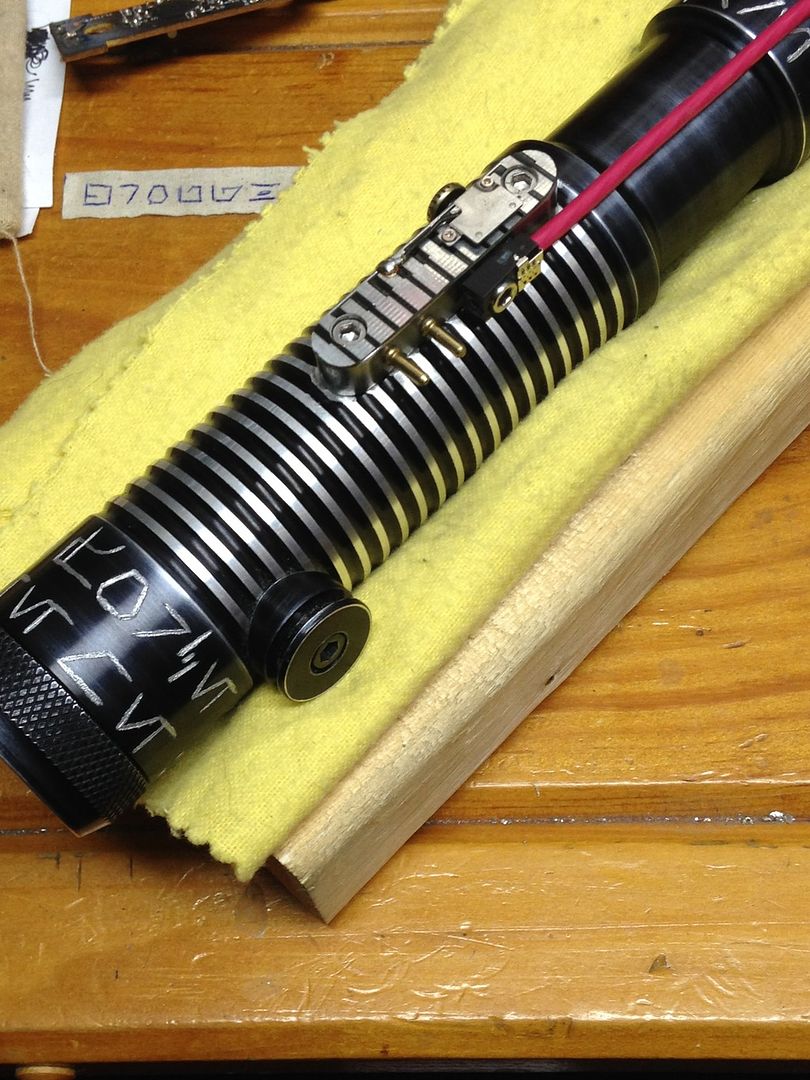
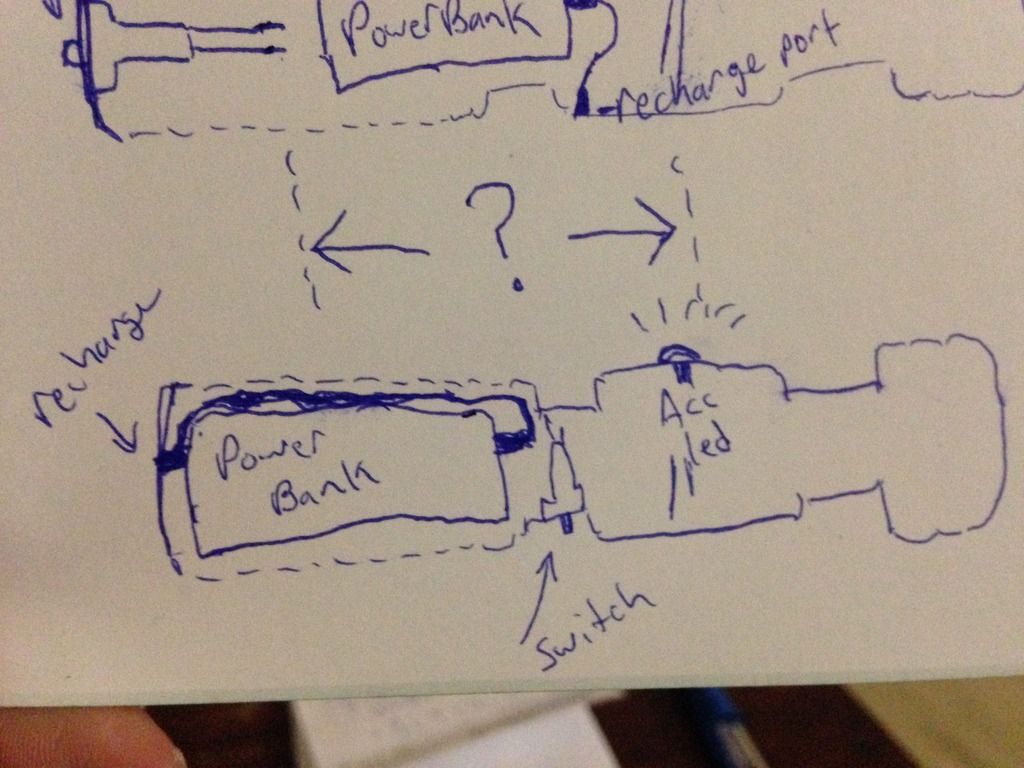
If the bank can't be made to fit, I'd just put the switch on the back of the hilt somewhere, in the choke if it'll fit depth wise, tho i suspect not so probably down low on the back of the main body section.  In that case I'd run the recharge port out the bottom of the pommel, tho it wouldn't be as big of a deal since the bank would be easily accessible with that set up:

If for some reason the power bank can't power the accent AND the main led, there would be one huge silver lining Smiley.  I know for a fact i can easily fit the existing AAA battery pack in the hilt with the switch in the pommel set up i'd prefer!  So no matter how you slice it, this is gonna be a fun, cool little mod for my current main dueling saber Smiley.  O!!  Which seem like just about as good a segue as there is to another thing i was considering lol.  The name... what do you guys think about something like the Splicer, or Sith Splicer etc. to go along with the crazy, splicer, patchwork, alchemy type look this things gonna rock?

Apologies for those two-second diagrams lol!  Keep you posted, MTFBWY- and i'd love to hear your preferences on the accent Smiley
« Last Edit: March 13, 2016, 12:03:45 PM by RevanReborn » Logged

sedstiskyfaller
Artisan of the Azure Order
Knight Commander
*

Force Alignment: 617
Posts: 2214


Blue is my color, it is who I am


WWW
« Reply #51 on: March 13, 2016, 01:08:38 PM »

Nice, Rev! It's coming together! The box you added looks great  Smiley

I prefer the second, sloped accent LED. I think it fits better with the design of the saber you have.

I'm gonna go ahead and say you're right that the normal latching switch won't fit into the choke point, but you may be able to fit a simpler one in there if you really wanted.
Logged


Hansrad
Knight Commander
*

Force Alignment: -670
Posts: 748


Jedi? Sith? I'm the one with the lightsaber.


« Reply #52 on: March 13, 2016, 02:19:45 PM »

I agree that the second led option seems to fit better. As always looking this looking amazing.
Logged

Own: Emerald Overlord, BHManticore, BR Renegade,FO Dominix LE V4 (stunt), CG Dominix LE V4 (stunt), GB Apprentice LE(stunt),BR Dark Initiate LE V4 (stunt), AS Apprentice LE V4 (stunt), CG Dominix V3 (stunt), SRD Darkish Liberator (stunt) Emerald Lost Grey.

RevanReborn
Technomancer of the Graflex Order
Knight Commander
*

Force Alignment: -1086
Posts: 1121


« Reply #53 on: March 13, 2016, 02:56:37 PM »

Thanks guys!  Appreciate the input and encouragement Smiley.  Ya I'm leaning that way too.  One big factor is everything so far has followed a form follows function principle- despite what it might look like, I've been making sure to stay true to the dueling saber function- grip, etc been deciding factors of placement of things.  That's actually the whole reason I wanted to move the switch.  Though I usually grip up higher (I take pretty wide grip like katana), I wanted to go extra mile and get it right outta the way.  The second accent is by far the most low pro, best gripping. 
Logged

RevanReborn
Technomancer of the Graflex Order
Knight Commander
*

Force Alignment: -1086
Posts: 1121


« Reply #54 on: March 24, 2016, 12:48:10 PM »

Got the power bank in today Smiley.  Originally it was just going to be burried inside the hilt (obviously lol) but now that I'm holding it, my wheels are whirling involuntarily lol!  I'm surprisingly thrilled with it, not that I expected it to be terrible or anything lol! but I've always just thought about it as a practicality... Like I mean, what excited me about the bank was the functionality of it/ incorporating it into build- but I didn't expect to be inspired to make it contribute greatly to the overall look of the project.

  I must not have looked at the pics of it closely when I ordered it (was more concerned about dimensions and specs) - surprised to see that it has this huge/ and surprisingly bright status indication led cleverly located in the word 'power' on its front face. 

Don't worry, not breaking the add rule- that's not the brand/ company name- evidently the creative juices just weren't flowing the day they had to decide what to have printed in bold letters across the product lol!  Or like maybe the big boss was just hungry at that meeting lol: "Hmmm... 'Power Bank'... I like that Johnson, let's go with that.  Lunch time people."  Lol.


The light glows bright sky blue when discharging power to device, and a deep red when charging.  The charging pic was taken under some industrial lighting, so I tried to block it out with my sweater so you could see brightness. 


So the new game plan is to secure the bank in exact/ permanent place via tapping and black set screws and spacers mounted inside hilt, and cut or drill a window into the hilt to allow a mini cross section type view of a tiny bit of the battery bank (where the light is) gaining an extra 'freebie' accent led of sorts- when my sabers on it'll shine bright blue, when it's charging, a deep red.  Really excited about this- combined with the legit red accent I'm mounting in the old switch location it's gonna look sweet!  it'll really go well with the look of this crazy sith splicer saber to have another blue/red light peeking out down there, and the look inside to the actual power source jives with the mad science project too Smiley.  Keep you posted- just waiting on a small truckload of variable resistors of diff mA values which will be in any day now, then I'll have everything I need to finish! 

I'll ding the rest of the engraving off in the meantime while i wait for the last components- prob be done this weekend, then it's on to the wiring.  I've got another small detail to make for the body, but I'm holding off until I know 100% where I'm putting the switch, in order to get the best placement. 

Will have some new progress pics up soon- MTFBWY Smiley


Logged

Bulvoy
Knight Commander
*

Force Alignment: 500
Posts: 547


~Sipra Gehaz~ Rebel Legion "Ghost Base"


« Reply #55 on: March 24, 2016, 03:15:18 PM »

Im liking this idea, a little extra Umhfff. i musta missed the post originally on the switch. I vote for the more exposed bezel ,
Logged

UltraSaber's by bulvoy, on Flickr
Menace - Emerald V4s- RavenSS pommel
Manticore V4s-CG- S /FOC-Renegade small pommel
Crimson Scorpion- V4s-BR- O/FOC
Dominix V3s-SRD
Initiate V4 Lite- VA
            "Im here to chew bubblegum & kick ass, and I'm all outta bubblegum"...

GregG124
Knight Commander
*

Force Alignment: 436
Posts: 1479


There is only The Force.


WWW
« Reply #56 on: March 24, 2016, 03:55:46 PM »

Good thinking Rev. Point to you!
Logged

Sabers I Own:
Dominix LE V4 (Obsidian V3) - Consular Green
Arbiter (Obsidian Lite) - Consular Green
Liberator V3 (Stunt) - Guardian Blue

Light Side Points Appreciated

blackrockminerson
Knight Lance Corporal
*

Force Alignment: 7
Posts: 51


« Reply #57 on: March 24, 2016, 08:11:56 PM »

Nice freehand engraving! Very creative design, thanks for sharing.
Logged

RevanReborn
Technomancer of the Graflex Order
Knight Commander
*

Force Alignment: -1086
Posts: 1121


« Reply #58 on: March 25, 2016, 01:06:51 AM »

Thanks everyone! 

Thanks blackrock, I've only gone back over some of the engraving with a scribe- the rest is just roughed in with an electric engraver.  I'm really happy with how the combo of electric and manual engraving tools is turning out, once I've touched it all up it'll look really nice Smiley

Thanks for the input Bulvoy- I'm really torn, so good to hear everyone's opinions Smiley.  There's things I really like about both accents.  Can't wait to be able to cut one in!  I got everything all ready n waiting for that now, so will be pretty quick/ easy once resistors arrive:


Was every bit as easy as CJ Nihilus said it was when he showed how to do it in his thread about 'the best battery set up for stunts'.  You simply cut the back off the end of a usb cable to access the pins and solder the leads in place and its in the bag:

Lol
Keep you posted, MTFBWY Smiley.
Logged

blackrockminerson
Knight Lance Corporal
*

Force Alignment: 7
Posts: 51


« Reply #59 on: March 26, 2016, 07:20:37 PM »

I prefer the 2nd tapered LED the best. It just feels more realistic to me. This rig is really turning out top notch. Keep it up!
Logged

Pages: 1 2 3 [4] 5 6 ... 12   Go Up
Send this topic | Print
Jump to: