RevanReborn
Technomancer of the Graflex Order
Knight Commander

Force Alignment: -1086
Posts: 1121
|
 |
« Reply #75 on: April 03, 2016, 07:54:58 PM » |
|
Sorry for all these tiny updates lol, but I've got so much to do for this project, and with life being so good at keeping me swamped with all kinds of other crap to do all the time lol, I really need to take advantage of every little morcel of free time I get- so latley my progress seems to come in constant but small increments as I squeeze tiny bursts of work in on the day to day whenever possible  . As much as I liked the cover tech wheel placement and how it locked my hand in a good grip- now that I'm extending the pommel end of the hilt it's gonna have to move- won't look right floating oddly mid hilt, especially not when being worn. So I'm taking advantage of the hole left behind and using black 8-32 set screws to lock the power bank in place. The cover tech hole came to me with the blemish you see there, must have gotten nicked when they put it in, but I never cared before because was hidden under wheel. Still doesn't really bother me much, as this thing's gonna collect an awful lot more of those in battle lol, but I'm gonna touch up with blackener when I touch up the other little nicks (window/ box). They'll all hide no prob . 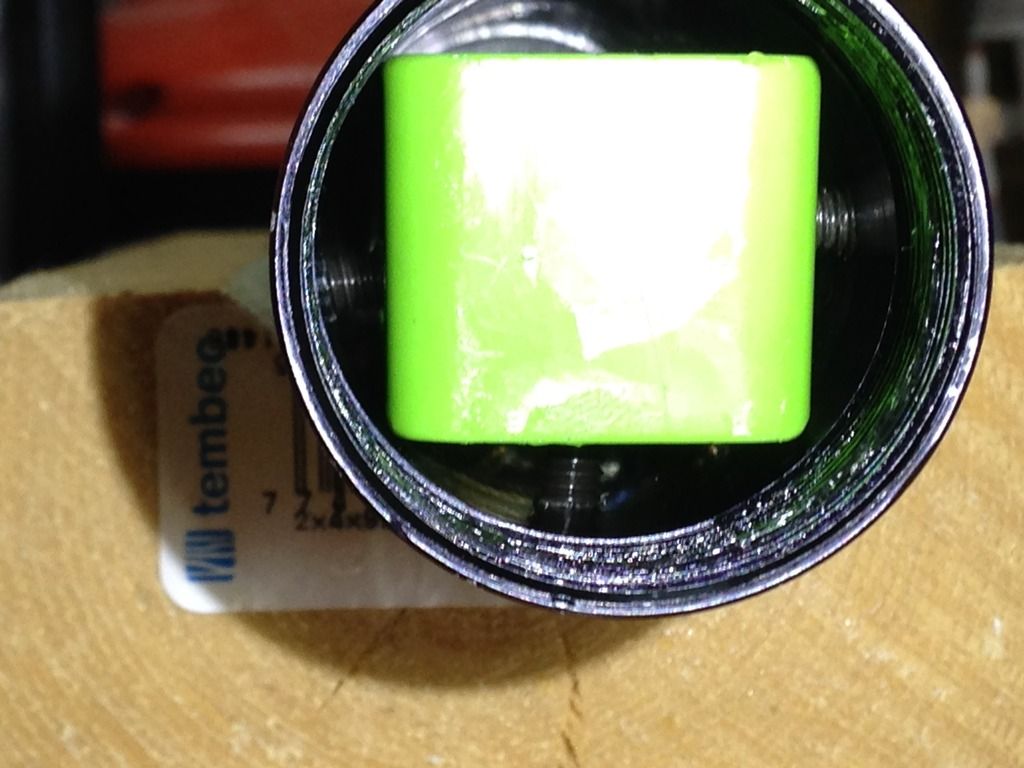 That's grease on the threads if wondering, just looks funny with light shining on it.  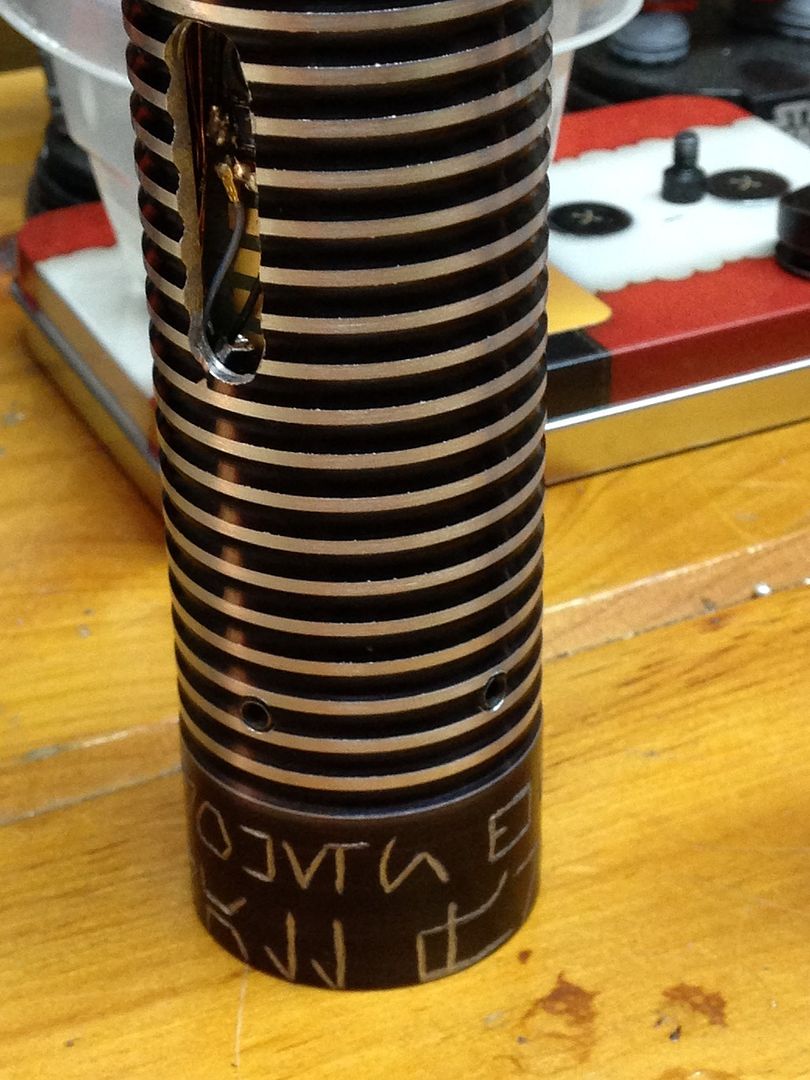 The two I tapped in- nice and clean.  The existing cover tech hole with blemish. This saber was a grab bag pull- so in a way I love that nick, since it's what brought this beauty home to me in the first place lol. Be sad to see it go lol . Decided against doing the chassis segments for the bank- mainly because not necessary. Been testing, and this thing just will not budge. I'm just gonna make some little plastic bushings to cover the exposed threads on the interior, a little extra short protection, will just be stubby little plastic tubes that fit around the threads. Looking down into this thing now, I'm feeling better about the install and the sheer amount of wiring that I'll have going in lol. Because of how I'm wiring, and also where I'm putting everything all spread out, there's gonna be an AWFUL LOT of wire in here- and it'll be running back and forth, up and down the whole length of the saber and back every which way lol, so I'm glad that the bank's square shape inside the round hilt created these 4 channels which I can use to keep everything organized when it goes in. It made these four nicely separated pathways, divided again by the set screws on three sides, and basically compartmentalized the main through-way for me . The inside of this bad boy, though cram packed lol, will be nice and clean! Keep you posted, MTFBWY. |
|
|
|
|
 Logged
|
|
|
|
|
Bulvoy
Knight Commander
Force Alignment: 500
Posts: 547
~Sipra Gehaz~ Rebel Legion "Ghost Base"
|
|
« Reply #76 on: April 04, 2016, 01:48:01 PM » |
|
Nice progress. I bet it's stuffed inside lol. Good tap job
|
|
|
|
|
Logged
|
 UltraSaber's UltraSaber's by bulvoy, on Flickr Menace - Emerald V4s- RavenSS pommel Manticore V4s-CG- S /FOC-Renegade small pommel Crimson Scorpion- V4s-BR- O/FOC Dominix V3s-SRD Initiate V4 Lite- VA "Im here to chew bubblegum & kick ass, and I'm all outta bubblegum"... |
|
|
|
RevanReborn
Technomancer of the Graflex Order
Knight Commander
Force Alignment: -1086
Posts: 1121
|
|
« Reply #77 on: April 04, 2016, 02:39:50 PM » |
|
Thanks Bulvoy . Yeah, it's gonna be INSANELY packed in there for a saber without sound, just because of the the extra loop for the switch accent light, the loop for the direct accent- made more cumbersome by the kill key, and also the wires for the actual recharge recharge port (micro USB) and the rigged up USB port itself. The banks input is a micro USB (800mA at 5V), so I'm running one out to a female USB micro to female USB adapter I'll be rigging up as the port and mounting somewhere. That way the charger's micro USB will just plug conveniently into a jack/ port on the outside of hilt same as normal ports. All that in there (plus obviously the switch leads and main led leads) with the addition of quick connects on most of the components makes for one LOADED stunt lol. Keep you posted . |
|
|
|
|
Logged
|
|
|
|
|
RevanReborn
Technomancer of the Graflex Order
Knight Commander
Force Alignment: -1086
Posts: 1121
|
|
« Reply #78 on: April 05, 2016, 06:52:37 PM » |
|
|
|
|
|
|
Logged
|
|
|
|
|
GregG124
Knight Commander
Force Alignment: 436
Posts: 1479
There is only The Force.

|
|
« Reply #79 on: April 05, 2016, 10:15:31 PM » |
|
Revan, maybe I missed this.. Is your external wire going to have a functional aspect or is purely aesthetic?
|
|
|
|
|
Logged
|
Sabers I Own:
Dominix LE V4 (Obsidian V3) - Consular Green
Arbiter (Obsidian Lite) - Consular Green
Liberator V3 (Stunt) - Guardian Blue
Light Side Points Appreciated
|
|
|
|
|
|
|
« Reply #80 on: April 06, 2016, 03:00:25 AM » |
|
That is nice looking. Just hope non of the inner wires never become exposed x.x
|
|
|
|
|
Logged
|
Sabers: Liberator V3 CG ObsV4 sound!, Graflex GB, Overlord AB, Crimson Savior BR, Bane PO, Dark Initiate V2 LE BH, Shock GB, Archon V2.1 CG, Dark Sentinel LE GB ObSLite!, Standard Issue V3 CG, Dominix V3 LE BR, Sentinel SRD, Dominix V2 FO, Exile CG  [/url] SW1 by joshgarcia07[/url |
|
|
|
RevanReborn
Technomancer of the Graflex Order
Knight Commander
Force Alignment: -1086
Posts: 1121
|
|
« Reply #81 on: April 06, 2016, 02:11:43 PM » |
|
Hey Greg . The idea was mainly for looks- I've been studying a lot of ref pics of kylo's hilt for a build I'm doing ATM, and the influence krept in- also I'm going to have to do a lot of this stuff for that kylo build so this mod was a way of testing ideas before hand if you know what I meAn. At first I REALLY wanted to run one or two of the functioning leads there, but after a ton of testing I had to give that idea up. If this saber was gonna be a display only, 'shelf queen', then I would have 100%. But since it's my main dueler- it would have been too delicate/ liable to cause problems. About the thickest wire I think anybody would ever use on a saber is 18AWG, that's really thick- the kind of heat you need to get that wire to take solder would almost certainly transfer up the wire and burn components if not using a soldering heat sink. And if you tried to solder it to a board, you'd inadvertently bridge all the pads in the area just because the wire has such girth lol. Most ppl stick with 26/28AWG, maybe 24 (what I used)- which is drastically thinner/ flimsier. This thinner/ flimsy wire, even with a bunch of bracing on the outside of hilt and even with a bunch of extra slack sitting inside the hilt at exit/ entry points, would almost certainly get yanked all around too much. Like even just from the squeezing of grip, over time it would start to stretch and pull and put stress on solder joints and connections to components. And like even the 18guage, though arguably too cumbersome, bulky, and rigid to be practical for use inside a hilt, is still a tad too light for me to be comfortable with how it'd fair under that much stress. The wire I'm using is 10guage, I think, or 12- King Kong wire lol- acts more like speaker wire or craft/ fencing wire. Once bent to shape, it'll want to hold that shape surprisingly stubbornly, even when subjected to pressure. You pretty much have to take it between two hands or in pliers and intentionally bend it to get it to flex. It's perfect for this application, since it will pretty much stay where I run it, with a little bracing. It'll hold up- and since it's not functional, it's no biggie to just patch up as needed . And thanks Zren . Exposed wire inside ANY hilt would be bad, since the hilt walls and most components are metal- but there's actually nothing in particular about this hilt that'd make it especially dangerous/ vulnerable that way. Actually I've all but eleminated the risk by trimming back any threads flush with the inner walls so nothing sticks down into hilt at all except for the power bank set screws, which I have concealed inside plastic bushings so no exposed metal . Picked up those set screws- IMO looks way better without that big ol' silver button head sitting on top . 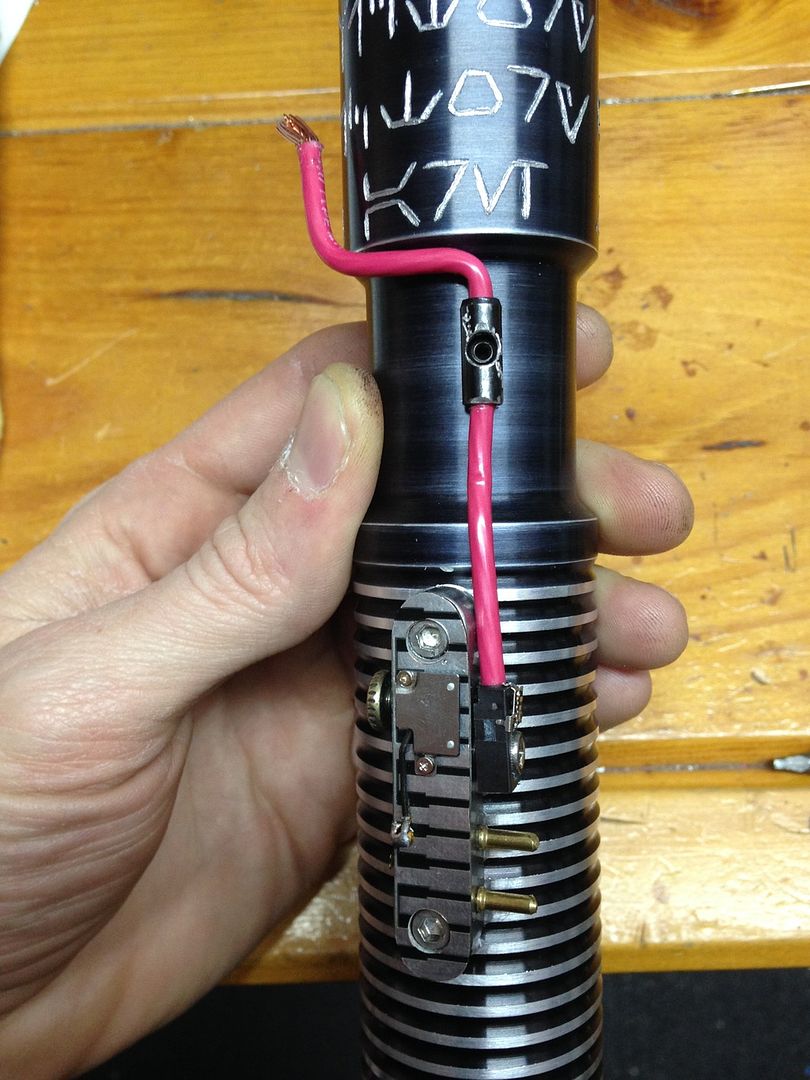 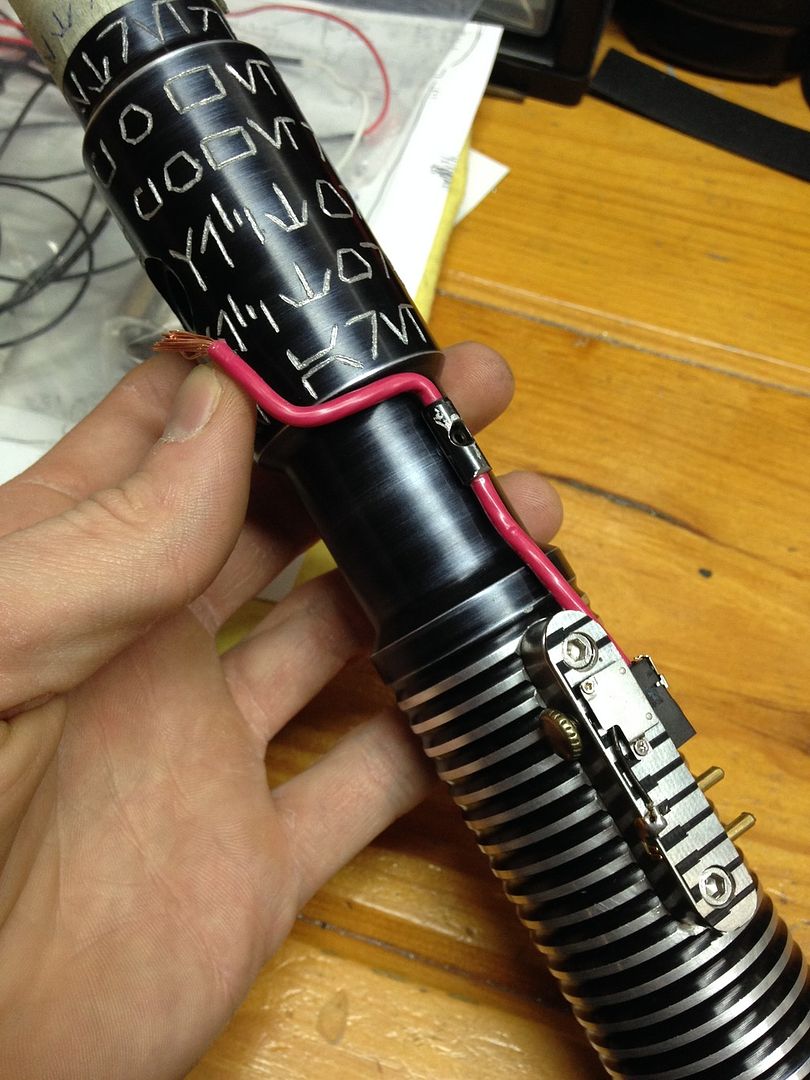 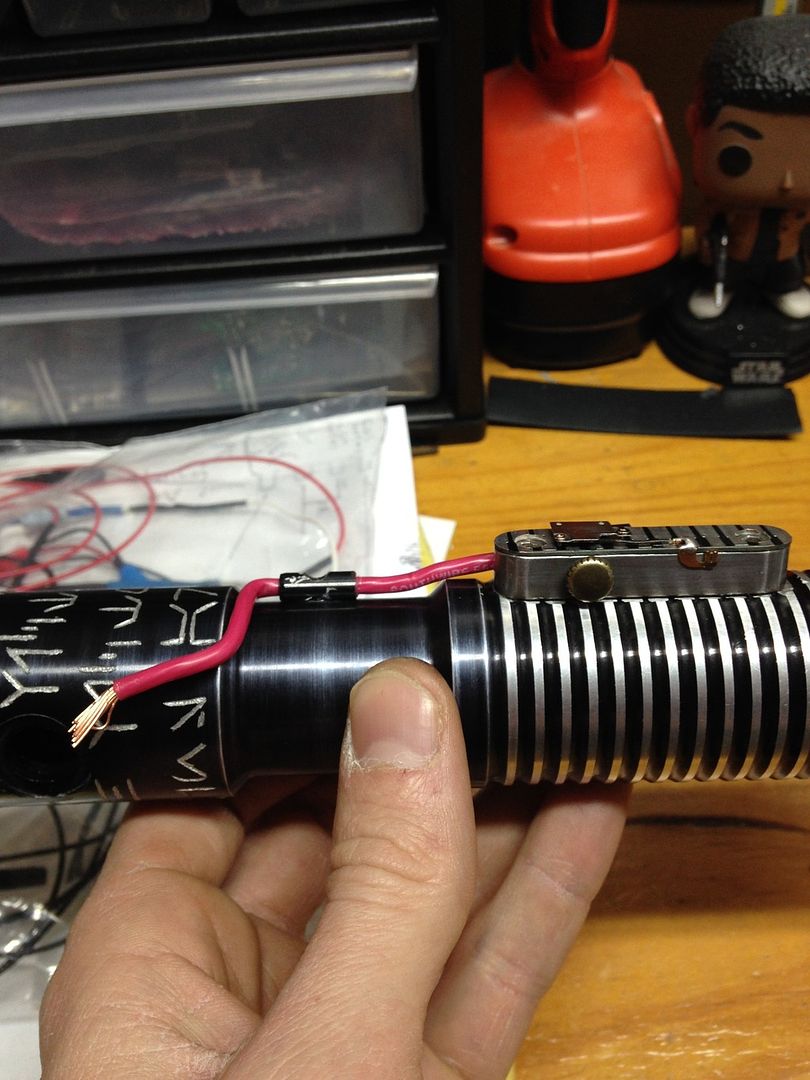 Keep you posted, MTFBWY. |
|
|
|
|
Logged
|
|
|
|
|
GQtattooed
Knight Lance Corporal

Force Alignment: 34
Posts: 73
|
|
« Reply #82 on: April 12, 2016, 01:06:54 AM » |
|
Looking great bud
Sent from my iPhone using Tapatalk
|
|
|
|
|
Logged
|
|
|
|
|
Darth Weinstein
Knight Major

Force Alignment: -124
Posts: 365
It's more fun on the dark side!
|
|
« Reply #83 on: April 12, 2016, 02:08:27 AM » |
|
Its really coming along beautifully.Nice work!
|
|
|
|
|
Logged
|
My sabers: Dominix LE V4 BR, Manticore CE Nickel Plated VA, Grab Bag Aeon V3 CG, Bellicose SRD, Grab Bag Dark Apprentice LE V4 GB, Dark Liberator V3 DVA, Bane BH, Raffle Third Prize Dark Initiate V4 GB.
The only Jewish Sith Lord in the galaxy. I'm as ruthless as the next guy, but I feel guilty about it.
|
|
|
|
RevanReborn
Technomancer of the Graflex Order
Knight Commander
Force Alignment: -1086
Posts: 1121
|
|
« Reply #84 on: April 12, 2016, 11:05:59 AM » |
|
Thanks guys! Really appreciate . I'm super excited/ anxious to get a start on the last major structural component of this mod: the USB recharge port- got a really cool idea for it I'm gonna try out. I've had thoughts about doing something like this before to add a crystal chamber to a saber, but haven't had chance to try out yet- so this will be the perfect opportunity. I think for a crystal chamber I'd have to go much more elaborate, but something rudimentary will suit the nature of this project best I think- and probly best to go as simple as possible on my first attempt at something like this, since going to be fairly tricky I think. Don't want to ruin the surprise TOO much, so all I'll say is that I've got some brass narrow hinges ready to go, and my dremel finger is itch'n lol . I've also got to mount the AV switch and kill key port still- not underestimating that task. Normally I think this would be fairly easy, but I have a feeling that available space will make it a bit tricky on this one. I'd like to put the kill key down in, or at least near, the pommel too, but I'm not sure it'll fit. We'll see. got other 16mm switches here but I wanna wait till I'm holding the actual switch in hand before I make any holes. Just like for the USB port- I'm dying to start cutting lol, but my better judgment tells me to wait till I've got all my parts sitting in front of me and ready to go so that I can be sure everything works out properly- last thing i want to do is get ahead of myself/ impatient and wreck stuff at this point. Exact placement of some of these things isn't finalized for same reasons, until I can confirm everything's gonna fit properly. But I do pretty much know how it's gonna go, so once I double check it should all come together pretty quickly. For now I'm just gonna finish the last three lines (well, first three lines really) of the sith code, and then go back over with the scribe to clean up etc. That'll be time consuming, so it kinda works out perfectly- with any luck I'll have that wrapped up by the time the last few parts are here. At the same time, my gears are pretty much whirling madly around the clock about the last few decisions to be finalized lol. So good to have the time to let that digest at the back of my mind while I'm getting to some of the accumulating little unfinished aspects. O, like the blackening to hide the scratches/ blemishes- almost forgot about that! Keep you posted- MTFBWY . |
|
|
|
« Last Edit: April 12, 2016, 11:58:27 AM by RevanReborn »
|
Logged
|
|
|
|
|
GQtattooed
Knight Lance Corporal
Force Alignment: 34
Posts: 73
|
|
« Reply #85 on: April 13, 2016, 03:31:52 PM » |
|
That red wire tho!!
Sent from my iPhone using Tapatalk
|
|
|
|
|
Logged
|
|
|
|
|
RevanReborn
Technomancer of the Graflex Order
Knight Commander
Force Alignment: -1086
Posts: 1121
|
|
« Reply #86 on: April 14, 2016, 08:37:54 PM » |
|
hi everyone well, again i have to say sorry for the quality of this vid- my phone died so had to take on old i pod with terrible camera that couldn't even get to focus lol. was just running too short on time to do proper treatment, ill update the log proper soon. but just to give you quick rundown anyway. been playing around/ experimenting for some of the final little touches- at least what i can do until I've got everything handy. https://youtu.be/DevAOsU9zpIi couldn't live with that terrible camera lol, so heres a couple at least from my phone while was charging, so that at you can see a focused shot of the area: 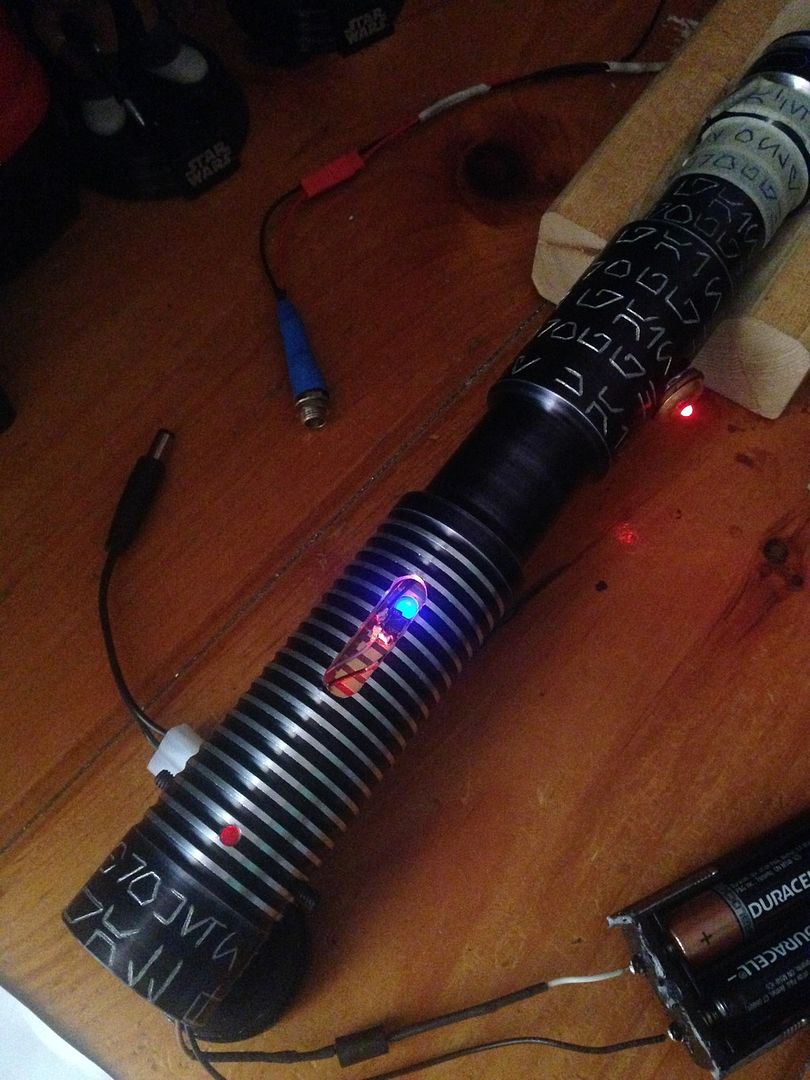 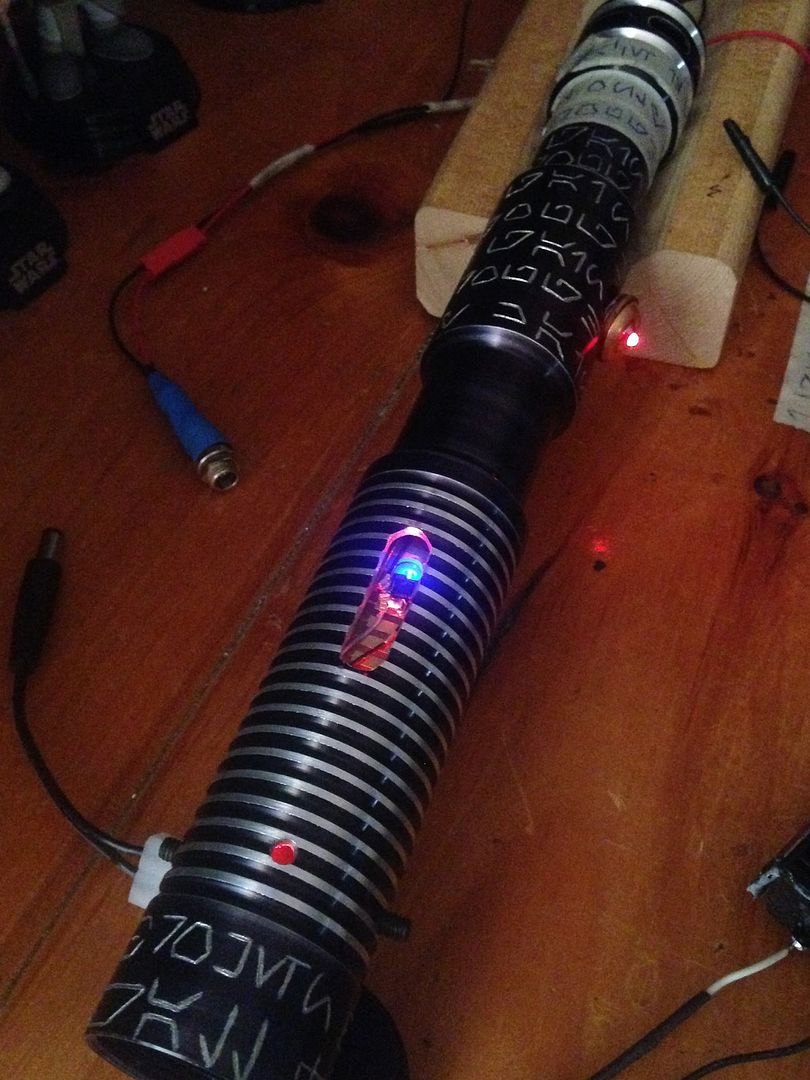 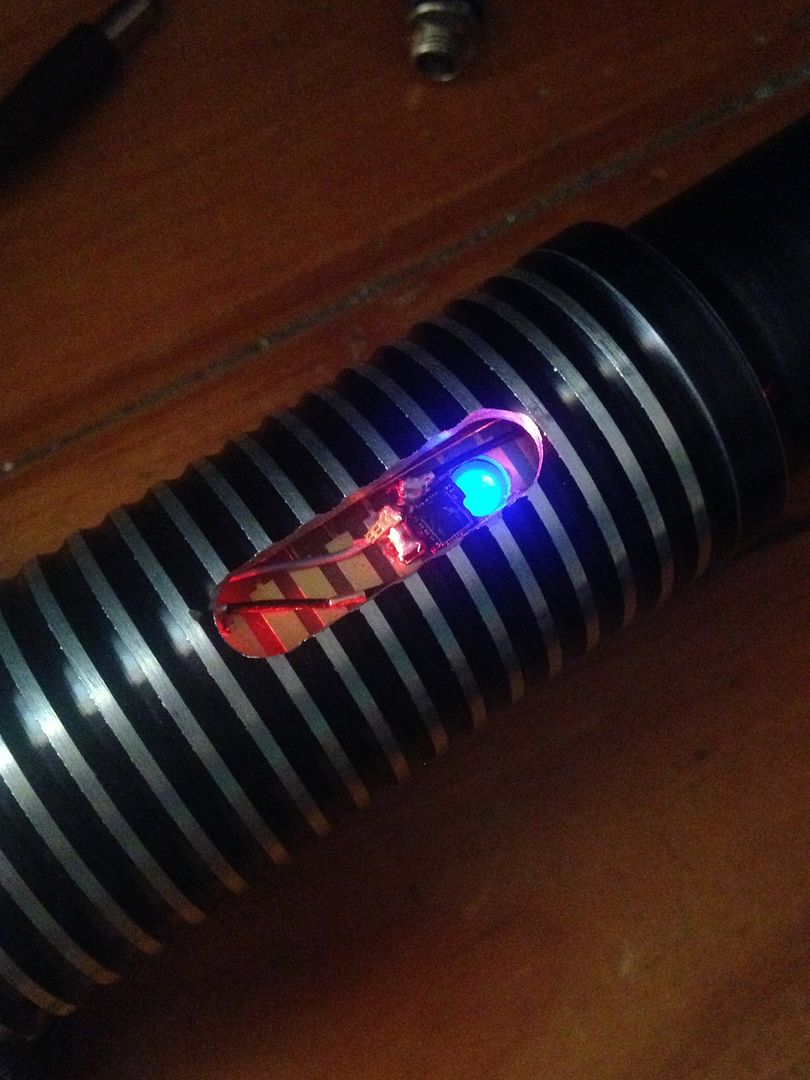 will post up a clearer, more organized look at everything soon- MTFBWY . |
|
|
|
|
Logged
|
|
|
|
|
GregG124
Knight Commander
Force Alignment: 436
Posts: 1479
There is only The Force.
|
|
« Reply #87 on: April 14, 2016, 08:58:13 PM » |
|
What comes next? Lol
|
|
|
|
|
Logged
|
Sabers I Own:
Dominix LE V4 (Obsidian V3) - Consular Green
Arbiter (Obsidian Lite) - Consular Green
Liberator V3 (Stunt) - Guardian Blue
Light Side Points Appreciated
|
|
|
|
RevanReborn
Technomancer of the Graflex Order
Knight Commander
Force Alignment: -1086
Posts: 1121
|
|
« Reply #88 on: April 16, 2016, 04:14:37 PM » |
|
Sorry, been swamped with work n arlo, and also trying to get the training back in gear- I run competitively and do extreme races etc. What comes next? Lol
HAHAHAHA- is that a subtle way of saying move along we're all sick of seeing this part lol!?  . That's fair lol . But I think you really do have to stop and dwell on these little things, mess with over and over until you get just right, along the way as the situation demands. A wise smith once said,"If you rush it you wreck it"- totally true. i really have to test this before i can finalize, because I need to know if there's room in my bank's output for all these accents, or if the over draw of current will trip the protection circuit. It'd be a shame to spend a ton of time doing this whole feature up, and to do some undoable things to the hilt in process, and then find out the bank can't run it lol! But I don't have an illuminated latching switch handy yet (on way) to hook it all up, plus I need to wait for extension for sake of strategically measuring wire etc anyway, so I'm gonna just use the current latching switch, but cut in an extra accent to pose as the new switch accent for the sake of testing, and then connect EVERYTHING all up and find out what she can take lol. Then I'll have the go ahead to finalize this bit, which along with the engraving and odd jobs mentioned in vid, should take me to when the last parts arrive . Then hopefully I'll be doing the port! Excited/ scared about that lol. Was talking to the pros and Kouri pointed out that the 3V from my tester packs wasn't quite enough to get the DynaOhm to give the full brightness on the accent- pleased to see what a noticeable diff he was taking about: popped in higher voltage 14500's: 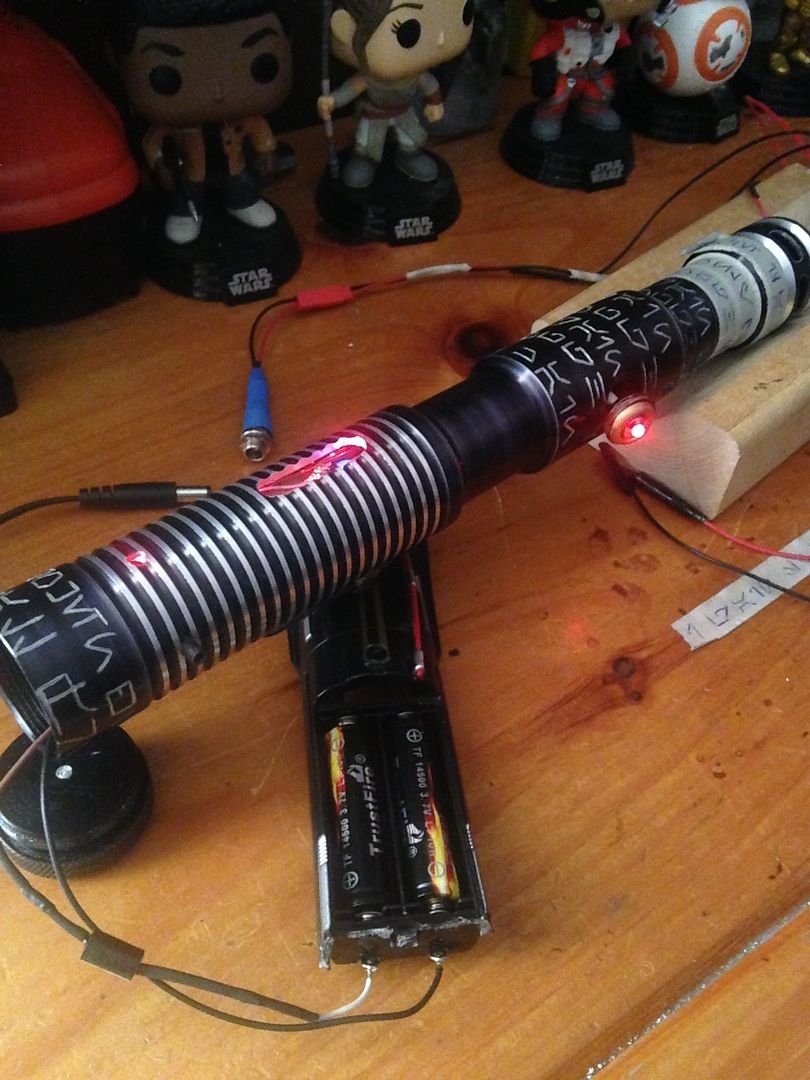 Even in bright overhead lighting it's quite a bit brighter. 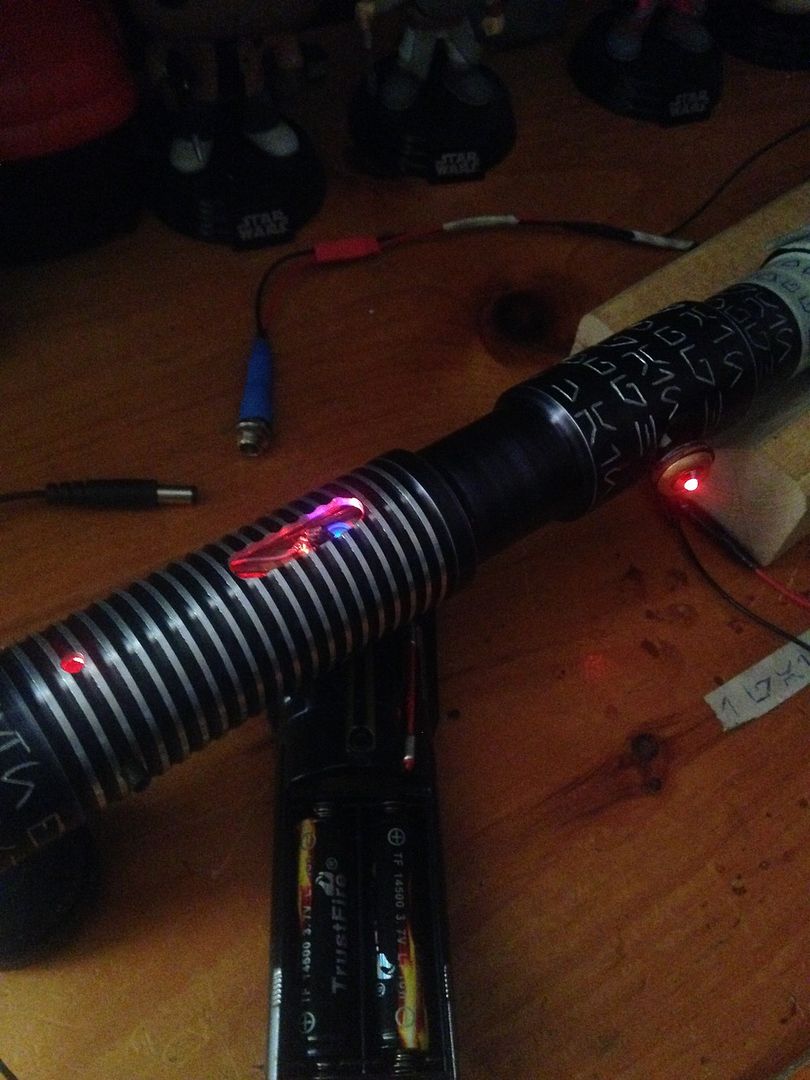 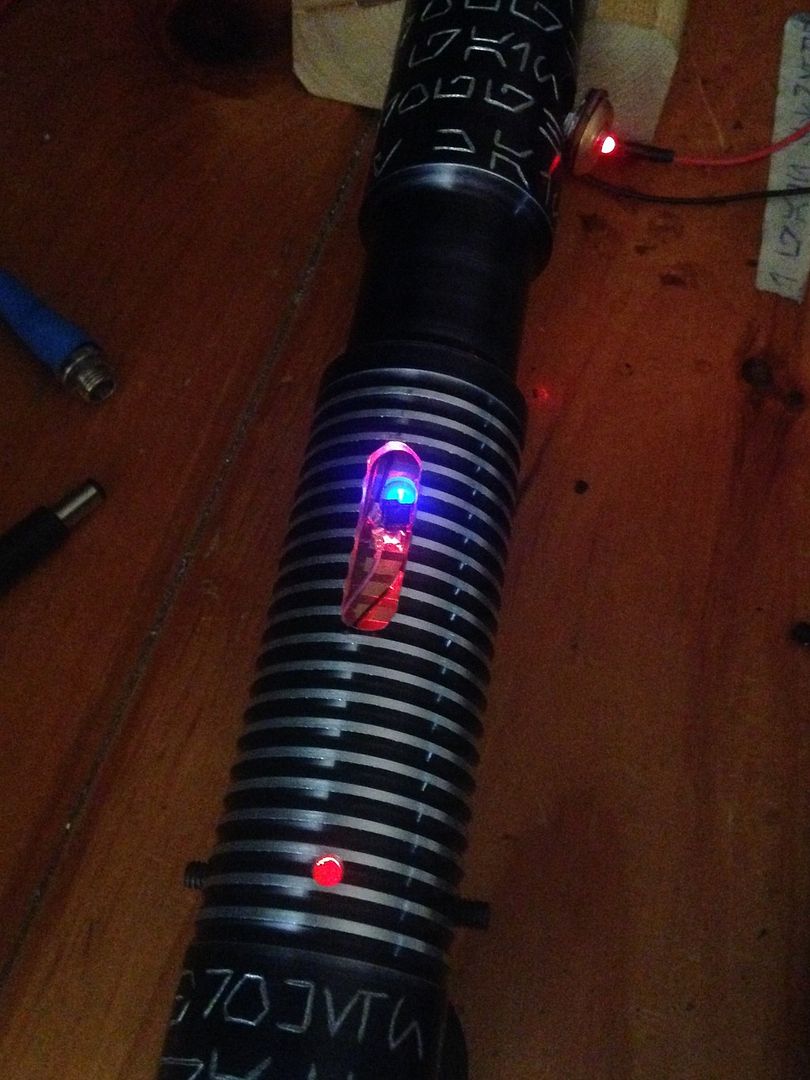 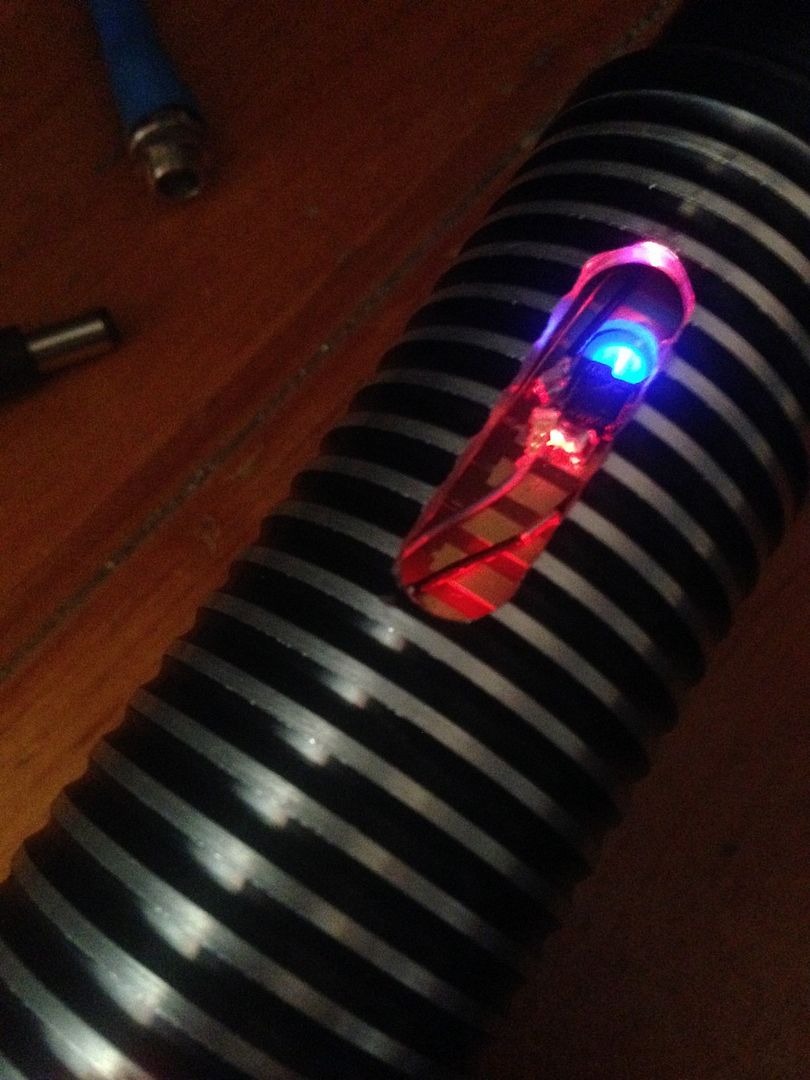 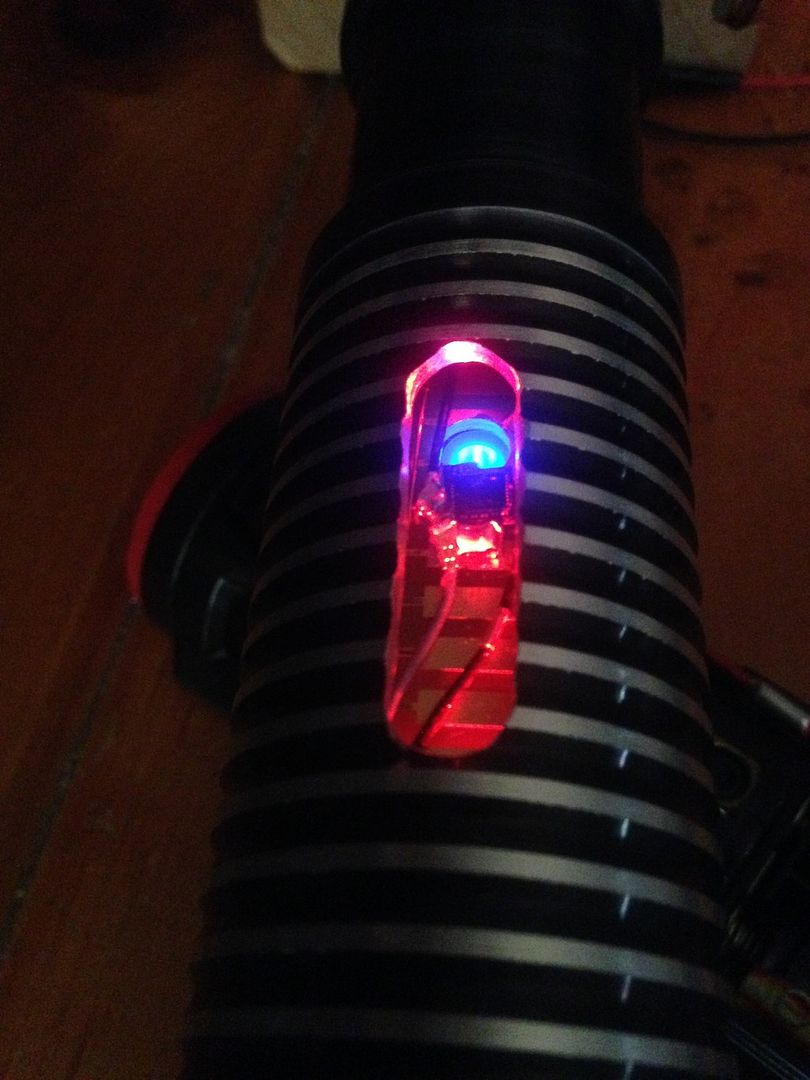 Be wrapped up today with obligatory stuff, but in evening gonna hook up that whole test- not looking forward to in way cause a ton of hooking stuff up that just gonna have to take right apart again after- but gotta confirm this idea will work 100%- anxious to know cause it's pretty wicked lol . Keep you posted. |
|
|
|
|
Logged
|
|
|
|
|
Hansrad
Knight Commander
Force Alignment: -670
Posts: 748
Jedi? Sith? I'm the one with the lightsaber.
|
|
« Reply #89 on: April 17, 2016, 12:13:44 AM » |
|
Holy cow all those lights look awesome!
|
|
|
|
|
Logged
|
Own: Emerald Overlord, BHManticore, BR Renegade,FO Dominix LE V4 (stunt), CG Dominix LE V4 (stunt), GB Apprentice LE(stunt),BR Dark Initiate LE V4 (stunt), AS Apprentice LE V4 (stunt), CG Dominix V3 (stunt), SRD Darkish Liberator (stunt) Emerald Lost Grey.
|
|
|
|
|


