Ninja-Jedi
Knight Commander

Force Alignment: 168
Posts: 778
|
 |
« on: April 07, 2012, 02:43:01 AM » |
|
he all wanted to start a thread to show how to make saber with no fabrication just a drill so what I am making is a ninja katana style saber using sink tube and PVC and a PVC kunaii so let get into it First I started off with regular sink tube 1 1/4, 1 pvc cap threaded and 2 different PVC couplers .First I wrapped fine line tape(orange) around the body to form where i want my grip and spacing. to emitter section that is piece of phenolic board that i used a hole saw to fit over coupling, then i drilled hole for blue AV switch here are some pics   so now that i have the basic shape i want onto next step, next i used double sided square tape and put in place for diamond section of saber then I took a peice of heat shrink and heated it up around the whole body and here is what I got   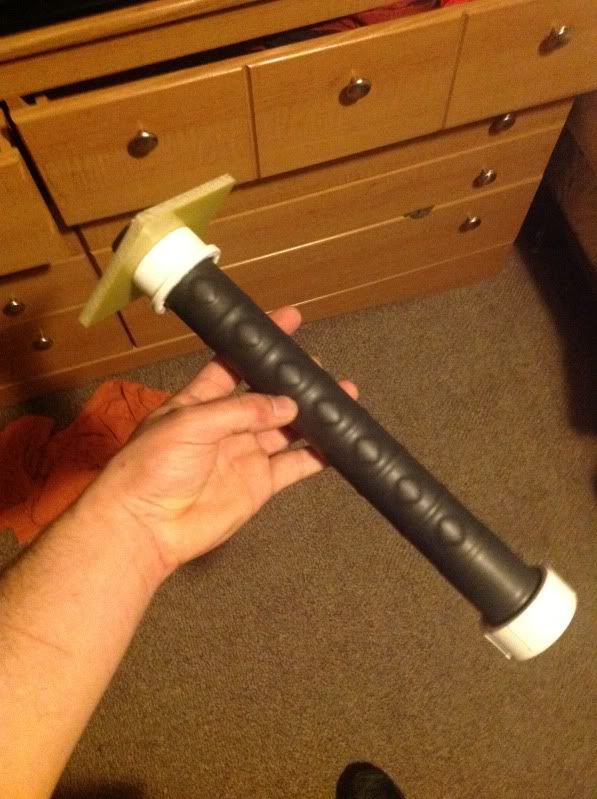 The last thing I will do to the body is a wrap with gray material not sure what I will use for that yet and still have alot more to do will post pics and show as I am making progress, I will be using 3.7V li-ion cell a heavy grade ultrasabers blade and guardian blue LED module more to come |
|
|
|
|
 Logged
|
|
|
|
|
Moderator Nightwing
SaberForum.Com Moderator
Knight Arbiter

Force Alignment: -262
Posts: 270
Peace is a lie; There is only passion
|
|
« Reply #1 on: April 07, 2012, 02:00:35 PM » |
|
That looks awesome! I've always like the idea of a katana saber. keep up the good work and be sure to keep us updated!
|
|
|
|
|
Logged
|
|
|
|
|
DarthCooper88
11th Disciple of Masamune
Knight Lt. Commander

Force Alignment: -248
Posts: 496
Old-world crafstman, Sabersmith
|
|
« Reply #2 on: April 07, 2012, 02:06:11 PM » |
|
Looks like you have a ton of room for an MR board & the batteries to run one, I do know of someone who has pre-wired complete MR circuit boards with battery packs & quick disconnects (it's not me LOL) Either way, neat saber!
|
|
|
|
|
Logged
|
"You have been forged in fire, tempered in blood & come out steel" Brave Rifles! 3rd Armored Cavalr
|
|
|
|
Ninja-Jedi
Knight Commander
Force Alignment: 168
Posts: 778
|
|
« Reply #3 on: April 07, 2012, 03:42:27 PM » |
|
yeah im still not sure on sound i could fit pretty much any soundboard in here hint hint darn you ultrasabers put the obsidian back in the store lol but on serious note this build i wanted to do for people who may not
have much in the way of tools at home and or experience so i want to keep it fairly simple. Orginal plan was to make this a stunt without sound but i can always add sound later if i get bored with it. One a side note as far as body design in the pictures the diamonds look a little round with heat shrink which isnt really a concern as they are just there for a reference when i do the wrap, and i left the bottom without diamonds because i want to incorporate like a metal dragon or something in the wrap which i have seen on actual katanas
|
|
|
|
|
Logged
|
|
|
|
|
Temple
Knight Lt. Commander
Force Alignment: 90
Posts: 496
Jedi Battle Knight
|
|
« Reply #4 on: April 09, 2012, 12:19:12 AM » |
|
Thanks a pretty cool idea
|
|
|
|
|
Logged
|
 A jedi Must sometimes prepare for war, and prepared we are ~ Temple |
|
|
|
Amanita
Knight Captain

Force Alignment: 39
Posts: 409
|
|
« Reply #5 on: April 09, 2012, 03:11:03 AM » |
|
The heatshrink is a great idea, where did you get it big enough to fit over a saber hilt?
|
|
|
|
|
Logged
|
|
|
|
|
Ninja-Jedi
Knight Commander
Force Alignment: 168
Posts: 778
|
|
« Reply #6 on: April 09, 2012, 05:23:43 AM » |
|
got online u prob wont find at any hardware store in that size, i had it laying around from a past project but the grip can be done alot of different ways, I used the heatshrink to prevent less slipping when I do the wrap. Another cheap alternative would be baseball bat grip tape or something similar, then u could do wrap right over it. Also did a little more work this weekend will post some more pics tommorow. I think the place i got the heatshrink was cableorganizer.com it was like $7 a foot for 1 1/2 diameter or something close
|
|
|
|
|
Logged
|
|
|
|
|
Master Rel
Game Master
Knight of the Consular Order
Knight Commander OVER 9000!!

Force Alignment: 1884
Posts: 12894
Martial artist, fabricator, chef, resident Ortolan
|
|
« Reply #7 on: April 10, 2012, 03:45:05 AM » |
|
Shockingly cool. It went quickly from "hey this is looking a bit of poo...those pieces will fall off" to "oohhhhh very nice, a dermal effect...clever clever"  |
|
|
|
|
Logged
|
 Light side points please  |
|
|
|
Veldryne
The Second Chosen One
Knight Commander
Force Alignment: 268
Posts: 2477
" Kind hearted jerk"

|
|
« Reply #8 on: April 10, 2012, 11:45:16 PM » |
|
props for the ingenious build mate, light side points for that one
now most of the people on the forums are gonna be casing everything in there homes wondering what they can turn into a lightsaber lol
|
|
|
|
|
Logged
|
 "Corellians... no wonder the other Jedi didn't want you leaving your system." "The rest of you were just afraid we wouldn't leave anything for you to do after we were done." Luke & Corran (I,J) |
|
|
|
Ninja-Jedi
Knight Commander
Force Alignment: 168
Posts: 778
|
|
« Reply #9 on: April 11, 2012, 05:36:05 PM » |
|
cheated a little bit and got out dremel to round in the corners on emitter peice, I just wanted this look. It is optional and if you dont have a dremel at home u could cut the corners with a saw and buy a round sanding drum for a drill, hand sanding would take forever, After that i just cut another peice of sinktube to go around pvc blade holder, and painted my peices with black enamel base coat, now i just need to wire everything up, i will use JST connectors for quick disconnects then I will epoxy everything together with some industrial strength epoxy and set screw everything in place and this will be done except for the wrap job, which I am new to doing wraps so prob be some trial and error there, also that is just an o-ring on top it will be PVC but I am painting that peice seperately 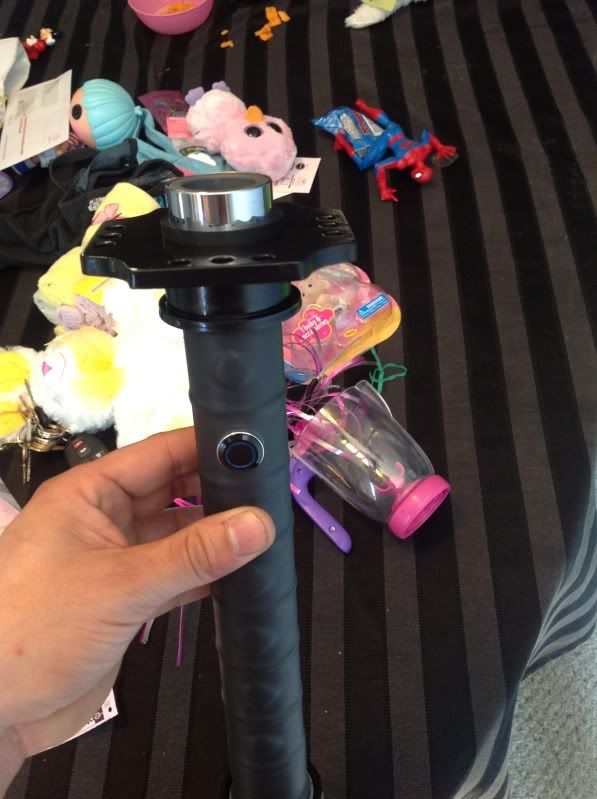 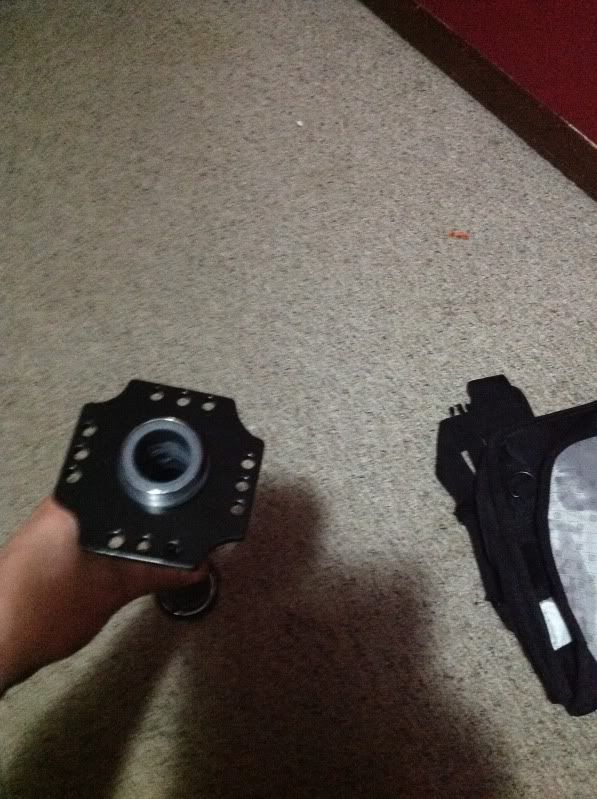 |
|
|
|
|
Logged
|
|
|
|
|
Veldryne
The Second Chosen One
Knight Commander
Force Alignment: 268
Posts: 2477
" Kind hearted jerk"
|
|
« Reply #10 on: April 11, 2012, 05:57:16 PM » |
|
it just keeps looking better and better
|
|
|
|
|
Logged
|
"Corellians... no wonder the other Jedi didn't want you leaving your system." "The rest of you were just afraid we wouldn't leave anything for you to do after we were done." Luke & Corran (I,J) |
|
|
|
Darth Nekesus
Knight Commander
Force Alignment: -164
Posts: 1947
Resident Zabrak and LoL addict.
|
|
« Reply #11 on: April 11, 2012, 06:32:06 PM » |
|
it just keeps looking better and better
but does it work yet. |
|
|
|
|
Logged
|
"At last we will reveal ourselves to the Jedi. At last we will have revenge" -Darth Maul-  DVA and CG Phantom V3 LE Custom Painted SRD Aeon V2 Overlord with Obsidian and Emerald |
|
|
|
Ninja-Jedi
Knight Commander
Force Alignment: 168
Posts: 778
|
|
« Reply #12 on: April 11, 2012, 08:42:17 PM » |
|
No the switch is just sitting in the hilt for picture, I havent wired anything yet, but this is just a GB LED, latching switch with LED and battery not even gonna use a buck puck cuz I dont need it for this, I do have 2 extra puck pucks but I am saving them for future builds with RED LED's it will only take about hour to wire up I just got to solder a couple wires with quick disconnects on LED and Battery
|
|
|
|
|
Logged
|
|
|
|
|
Master Rel
Game Master
Knight of the Consular Order
Knight Commander OVER 9000!!
Force Alignment: 1884
Posts: 12894
Martial artist, fabricator, chef, resident Ortolan
|
|
« Reply #13 on: April 12, 2012, 01:37:16 AM » |
|
Dude...did a toy box throw upon your bed? lol I like what you did with the dremel...s'nice! |
|
|
|
|
Logged
|
Light side points please |
|
|
|
Ninja-Jedi
Knight Commander
Force Alignment: 168
Posts: 778
|
|
« Reply #14 on: April 18, 2012, 10:53:26 PM » |
|
OK the Ninja saber is pretty much done. I just need to do the wrap on it. I am at work now but I will prob post a short vid tommorow, I kinda went of scope and added a qui gonn board cuz i had one laying around. I wont explaing the wiring on it is fairly simple, the only thing I did differntly i wire the negative from LED on switch to the negative for the speaker on the board. Now my LED switch fades with the sounds it still clashes with the blade as well. Basically the effect is that the switch is constantly pulsing to some degree which is what i wanted. When I wire up the Kunaii this weekend I will post pics of wire job since it will be real simple
|
|
|
|
|
Logged
|
|
|
|
|
|


