TheChosenOne
Knight Lance Corporal

Force Alignment: -10
Posts: 58

|
 |
« on: November 12, 2011, 07:18:15 AM » |
|
I thought it would be good to have a thread dedicated to installing a clip to your saber yourself. - Post questions you may have. - Show of your work. This is a relatively easy modification and pretty high on the list of things to a perfect saber. Though it can prove to be frustrating or even tragic. TRIPLE check everything:Before you start drilling holes make sure your electronics are out of the saber and will fit when you put them back on. ALWAYS start small and go bigger:You can drill bigger holes for your screws but you can't drill smaller ones. - - - I attached a clip to my Raven today. I do plan on ordering a metal one from Ultra with the curved bottom so that I don't have to use the washers I've placed in there.     |
|
|
|
|
 Logged
|
|
|
|
|
KelK1-
Knight Aspirant

Force Alignment: 3
Posts: 18
I'm a Jedi
|
|
« Reply #1 on: November 12, 2011, 11:17:48 AM » |
|
Wow ! impressive ! I love the photo in your signature ! I give you one point !
|
|
|
|
|
Logged
|
Consular UE blade - CG and BR
|
|
|
|
|
|
|
« Reply #2 on: November 13, 2011, 05:26:46 AM » |
|
Did you just drill a hole, drill and tap it?
|
|
|
|
|
Logged
|
=====================================================================
Zartom Socerer (Healer) Qui-Tom Sage (Healer)
Trenok Bounty Hunter (Powertech) Vartom Knight (Sentinel)
=====================================================================
|
|
|
|
TheChosenOne
Knight Lance Corporal
Force Alignment: -10
Posts: 58
|
|
« Reply #3 on: November 13, 2011, 05:31:15 AM » |
|
Qui-Tom, I simply drilled a hole, put a bolt through and tightened a nut inside the hilt.
|
|
|
|
|
Logged
|
|
|
|
|
|
|
|
« Reply #4 on: November 13, 2011, 11:12:34 PM » |
|
Qui-Tom, I simply drilled a hole, put a bolt through and tightened a nut inside the hilt. Interesting. Does the nut seem to interfere with sliding the battery pack/obsidian board out for battery recharge? The reason I ask is I have a couple of smaller sabers (as well as the raven) that I would like to put a covertec wheel on. |
|
|
|
|
Logged
|
=====================================================================
Zartom Socerer (Healer) Qui-Tom Sage (Healer)
Trenok Bounty Hunter (Powertech) Vartom Knight (Sentinel)
=====================================================================
|
|
|
|
|
|
|
« Reply #5 on: November 14, 2011, 12:34:54 AM » |
|
Interesting. Does the nut seem to interfere with sliding the battery pack/obsidian board out for battery recharge? The reason I ask is I have a couple of smaller sabers (as well as the raven) that I would like to put a covertec wheel on.
Instead of going the nut and bolt route on the smaller sabers I would recommend tapping the hole to use a set screw that you can then cut to length so it doesn't protrude into the inside of the hilt itself. I believe TCSS suggests doing it this way on the page for their wheels. If you were worried about it coming loose, you could always use a little loktite to glue it in. |
|
|
|
|
Logged
|
-=Growing Arsenal=-
Dark Std Issue V2 AB Perditio
Bellicose BR / AS unnamed
Dark Initiate V2 VA Incipio
Gifted
Aeon v2 AS Purgatrix
Dominix V2 BR Profanitrix
|
|
|
|
|
|
|
« Reply #6 on: November 14, 2011, 01:02:36 AM » |
|
Thanks Darth LP, TS; since writing by last post I decided to try drilling and tapping after reviewing the drill and tap post, and going on-line to see how to do it. I would go get the required stuff tomorrow but have to wait for my US shippment to arrive first.
|
|
|
|
|
Logged
|
=====================================================================
Zartom Socerer (Healer) Qui-Tom Sage (Healer)
Trenok Bounty Hunter (Powertech) Vartom Knight (Sentinel)
=====================================================================
|
|
|
|
|
|
|
« Reply #7 on: November 14, 2011, 02:03:16 AM » |
|
Thanks Darth LP, TS; since writing by last post I decided to try drilling and tapping after reviewing the drill and tap post, and going on-line to see how to do it. I would go get the required stuff tomorrow but have to wait for my US shippment to arrive first.
Drilling and tapping aluminum is surprisingly easy, just need to make sure you've got sharp bits. |
|
|
|
|
Logged
|
-=Growing Arsenal=-
Dark Std Issue V2 AB Perditio
Bellicose BR / AS unnamed
Dark Initiate V2 VA Incipio
Gifted
Aeon v2 AS Purgatrix
Dominix V2 BR Profanitrix
|
|
|
|
TheChosenOne
Knight Lance Corporal
Force Alignment: -10
Posts: 58
|
|
« Reply #8 on: November 14, 2011, 04:44:28 AM » |
|
Interesting. Does the nut seem to interfere with sliding the battery pack/obsidian board out for battery recharge? The reason I ask is I have a couple of smaller sabers (as well as the raven) that I would like to put a covertec wheel on.
No, I used a very very short screw and a tiny nut, there's plenty of clearance for the soundboard and battery pack. - Another Suggestion I have for you Qui-Tom is to drill a hole, put the wheel in place then put in a rivet. It's a semi-permanent solution as you can not unscrew a rivet you have to destroy it. But it will do the same job as a screw and will save a lot of space in the hilt. This was originally my idea but I decided to go with the bolt instead as the plastic wheel is not my permanent solution. I will be riveting the metal one when I receive it from Ultra. |
|
|
|
« Last Edit: November 14, 2011, 04:48:15 AM by TheChosenOne »
|
Logged
|
|
|
|
|
|
|
|
« Reply #9 on: November 15, 2011, 12:50:05 AM » |
|
I've been itching to try the drill and tap method for about two months now. I'm going to get a peice of aluminum pipe to practice on. I'm also going to use the same pipe and try the "dip it" rubber stuff to see if it will work as well, and see how it works and wears.
|
|
|
|
|
Logged
|
=====================================================================
Zartom Socerer (Healer) Qui-Tom Sage (Healer)
Trenok Bounty Hunter (Powertech) Vartom Knight (Sentinel)
=====================================================================
|
|
|
|
TheChosenOne
Knight Lance Corporal
Force Alignment: -10
Posts: 58
|
|
« Reply #10 on: November 26, 2011, 09:53:04 AM » |
|
UPDATE! This is the clip I brought.  As Darth Raze suggested in another topic. I had to modify the clip to compensate for the size difference in the metal wheel from Ultra. I just used a stanly knife and now she clicks in fine! REMEMBER Make smaller cuts, you can cut away more but once it's gone it's gone so do little bits, stop and check and go again if you need to.  If you do get this clip you'll need to undo these four screws to cut it up properly. Note that the two top screws are a different size to the two bottom ones do you may need a different sized Phillips head.  Also please note that the wheel does NOT completely for the Raven 100% there's a few mm's difference between the rings on the hilt so I had to file it down as you can see. AGAIN REMEMBER start small, you can always file away more but you can't file it back.  Fits perfectly!  I'm very happy with the end result.  May the force be with you in your own attempt at a DIY Covertec Installation. |
|
|
|
|
Logged
|
|
|
|
|
|
|
|
« Reply #11 on: December 12, 2011, 11:43:09 PM » |
|
This looked like the best place to post this. I wouldn't want clips on my own saber staff, since I want to be able to move my hands freely up and down the hilt, but I thought of this a few days ago. Since saber staffs can come apart to make two sabers, each separate hilt would have its own clip. Having two clips keeps the saber from turning, making this drop-leg type design possible, which I opted for to compensate for the greater length of a staff. 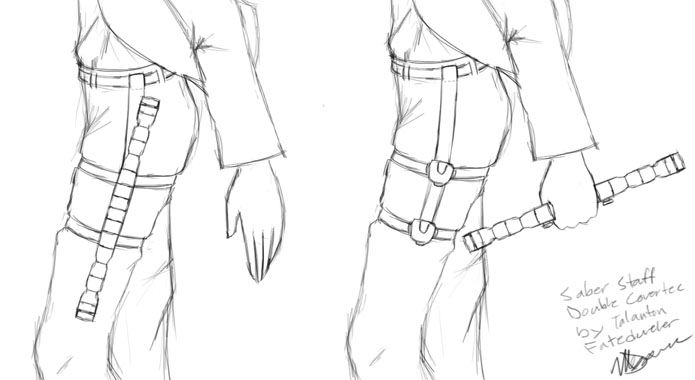 Put a bit too much detail into this, but I needed practice drawing cloth. |
|
|
|
|
Logged
|
|
|
|
|
Manroon
Protector of Abused Dungeon Rancors
Knight Commander

Force Alignment: 832
Posts: 8289
Nova Six, two lit and in the green.
|
|
« Reply #12 on: December 13, 2011, 12:07:44 AM » |
|
Firstly: Awesome sketch!
Secondly: I think I'd like to try this on one of my hilts eventually. No idea which one. But I love the idea and had thought about it before, but I never thought of a good practical way to make a 'low slung' saber rig. Bravo!
|
|
|
|
|
Logged
|
I am not a color...  A Knight can serve only one Master. |
|
|
|
Master Artorius Vidnyl
Resident Master
Forum Elder
Knight Commander

Force Alignment: 759
Posts: 2156
Suns of the Force
|
|
« Reply #13 on: December 13, 2011, 12:56:46 AM » |
|
This looked like the best place to post this. I wouldn't want clips on my own saber staff, since I want to be able to move my hands freely up and down the hilt, but I thought of this a few days ago. Since saber staffs can come apart to make two sabers, each separate hilt would have its own clip. Having two clips keeps the saber from turning, making this drop-leg type design possible, which I opted for to compensate for the greater length of a staff. Put a bit too much detail into this, but I needed practice drawing cloth. I love the thigh mount concept. If you get it working let me know. One flaw: the covertec clips actually CLIP the knobs into place. So you'd have to have two hands squeezing the clips to release the knobs and a third hand removing the hilt. If you can find a way around this let me know and I'll be sending you a check to make me one of these bad boys. |
|
|
|
|
Logged
|
|
|
|
|
Manroon
Protector of Abused Dungeon Rancors
Knight Commander
Force Alignment: 832
Posts: 8289
Nova Six, two lit and in the green.
|
|
« Reply #14 on: December 13, 2011, 01:06:10 AM » |
|
In theory, some sort of hard framework to keep them connected would make it function properly. IE: One strip of metal connecting the two thigh ties with the clips on them, so the metal keeps the clips lined up straight constantly, and then you would just need two rods or something of some sort to connect the squeeze parts of the clips. Then you could squeeze the two rods in the approximate middle of the hilt, depressing all four release buttons at once, and pull the hilt off!
I just wish I had the leather and metal work experience to try this myself! MAN it's a great idea!
|
|
|
|
|
Logged
|
I am not a color... A Knight can serve only one Master. |
|
|
|
|


