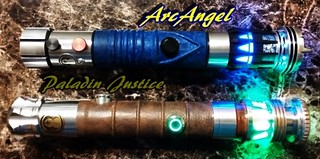
Shield madien
Knight Lance Corporal

Force Alignment: 21
Posts: 63
" Luke I said No" Han will get mad
|
 |
« Reply #60 on: March 27, 2016, 09:07:44 PM » |
|
This entire thread is customLishious if that's such a word lol. Very interesting starting from the beginning reading this
|
|
|
|
|
 Logged
|
Own
Graflex CE Emerald
Shock LE Guardian Blue
|
|
|
|
RevanReborn
Technomancer of the Graflex Order
Knight Commander

Force Alignment: -1086
Posts: 1121
|
|
« Reply #61 on: March 27, 2016, 10:17:07 PM » |
|
|
|
|
|
|
Logged
|
|
|
|
|
Hansrad
Knight Commander
Force Alignment: -670
Posts: 748
Jedi? Sith? I'm the one with the lightsaber.
|
|
« Reply #62 on: March 28, 2016, 03:14:38 AM » |
|
This just keeps getting better and better.
|
|
|
|
|
Logged
|
Own: Emerald Overlord, BHManticore, BR Renegade,FO Dominix LE V4 (stunt), CG Dominix LE V4 (stunt), GB Apprentice LE(stunt),BR Dark Initiate LE V4 (stunt), AS Apprentice LE V4 (stunt), CG Dominix V3 (stunt), SRD Darkish Liberator (stunt) Emerald Lost Grey.
|
|
|
|
GregG124
Knight Commander
Force Alignment: 436
Posts: 1479
There is only The Force.

|
|
« Reply #63 on: March 28, 2016, 03:37:40 AM » |
|
So then, no activation box?
|
|
|
|
|
Logged
|
Sabers I Own:
Dominix LE V4 (Obsidian V3) - Consular Green
Arbiter (Obsidian Lite) - Consular Green
Liberator V3 (Stunt) - Guardian Blue
Light Side Points Appreciated
|
|
|
|
RevanReborn
Technomancer of the Graflex Order
Knight Commander
Force Alignment: -1086
Posts: 1121
|
|
« Reply #64 on: March 28, 2016, 05:06:45 AM » |
|
So then, no activation box?
O no worries Greg, that box isn't going anywhere lol! I'm quite fond of it  . This is on the exact opposite side of the saber as the activation box. It's pretty much the same size and shape as the base of the act box, more or less located in same area of grip section, and they both have that circuit card pattern so there's a sort of symmetry to the grip section now... Maybe symmetry not right word, but it looks nice and balanced now . At work ATM so can't throw up a pic, but I will in morning when get home for sure- I'll still be working on these pieces some more anyway. The wire that runs outta the act box will end up going down into this window. O and thanks Hansrad! Appreciate . Keep you posted . |
|
|
|
« Last Edit: March 28, 2016, 05:10:58 AM by RevanReborn »
|
Logged
|
|
|
|
|
Joshie-Wahh
Knight Lance Corporal
Force Alignment: 21
Posts: 41
|
|
« Reply #65 on: March 28, 2016, 12:32:44 PM » |
|
Revan My Friend, you are doing such a great job on this hilt, wow man, it looks amazing!!! The Force is definitely Strong with you!! Point for you!! |
|
|
|
|
Logged
|
|
|
|
|
Bulvoy
Knight Commander
Force Alignment: 500
Posts: 547
~Sipra Gehaz~ Rebel Legion "Ghost Base"
|
|
« Reply #66 on: March 28, 2016, 02:24:34 PM » |
|
Fitting in nicely . And agreed on the outer box it's a keeper.if not we'll have to remove some of your pts. Lol. Seriously though alot times the best mod ideas are discovered on the fly as you start with the original plan, and of course the " Oh wait lets try this " kicks in.. hehe.
I understand with project time. Real life gets in the way. Finally got the ideas i want laid out and some time to start the Menace Project this week keep an eye out.
|
|
|
|
|
Logged
|
 UltraSaber's UltraSaber's by bulvoy, on Flickr Menace - Emerald V4s- RavenSS pommel Manticore V4s-CG- S /FOC-Renegade small pommel Crimson Scorpion- V4s-BR- O/FOC Dominix V3s-SRD Initiate V4 Lite- VA "Im here to chew bubblegum & kick ass, and I'm all outta bubblegum"... |
|
|
|
JediXIX
Alchemist of the Sentinel Order
Knight Commander
Force Alignment: 1172
Posts: 2190
|
|
« Reply #67 on: March 29, 2016, 12:51:23 AM » |
|
Good stuff Rev, another point . . . . I've been meaning to chime in on your last questions, lol, some time soon . . . but have a new question for you, how'd you go with the latching switch ? |
|
|
|
|
Logged
|
Remember... The Force will be with you... Always . . . (Just let it in)
|
|
|
|
RevanReborn
Technomancer of the Graflex Order
Knight Commander
Force Alignment: -1086
Posts: 1121
|
|
« Reply #68 on: March 29, 2016, 06:01:13 AM » |
|
Thanks a million guys!! Really appreciate everyone's encouragement . Will do, Bulvoy- look forward to seeing!! Hey Jed, well, I'm not 100% on the switch yet- but it's looking like the choke won't be an option for location- I seriously think I could have bent/ rigged the pins of the switch to fit if it wasn't for the USB adapter and wiring from the bank sticking up into the choke area. I don't think I could get the switch connections bent far enough apart to allow the wiring/ USB plug to clear through/ between them, if you can picture? They'd likely break- bit too much of bend required. But things are looking hopefull IMO, we'll see how plays out. I haven't had a ton of time to play with, but the regular sentinel solid pommel is quite deep- looks like I could fit almost 2/3 of the switch inside it- it could easily be bored/ drilled to house the switch. The little bit of the switch and connections that would end up sticking out past the back of the pommel into the area of the power bank JUST might fit. The bank takes up MOST of the room in the grips, but there is a tiny, tiny bit left over. If I end up needing a little more room for the pommel switch location it wouldn't be much- so I could either just make a little bezel for the switch which gives me that extra little bit of clearance- or, what I'm leaning towards ATM, pick up a little 1/2" or 3/4" mhs extension. Then I'd have tons of room to mount the switch in pommel. Even before I considered moving the switch to pommel I wondered about extension, since I take a pretty wide grip, so I'm thinking that might be best, not to mention one of the easiest, solutions? Of course, as Sedsti suggested, I could always just grab another, smaller latching switch too . Added a tiny bit more detail to circuit card in cut away this morning- gold solder tab, to which I soldered a little gold capped/ plug, pcb type wire:  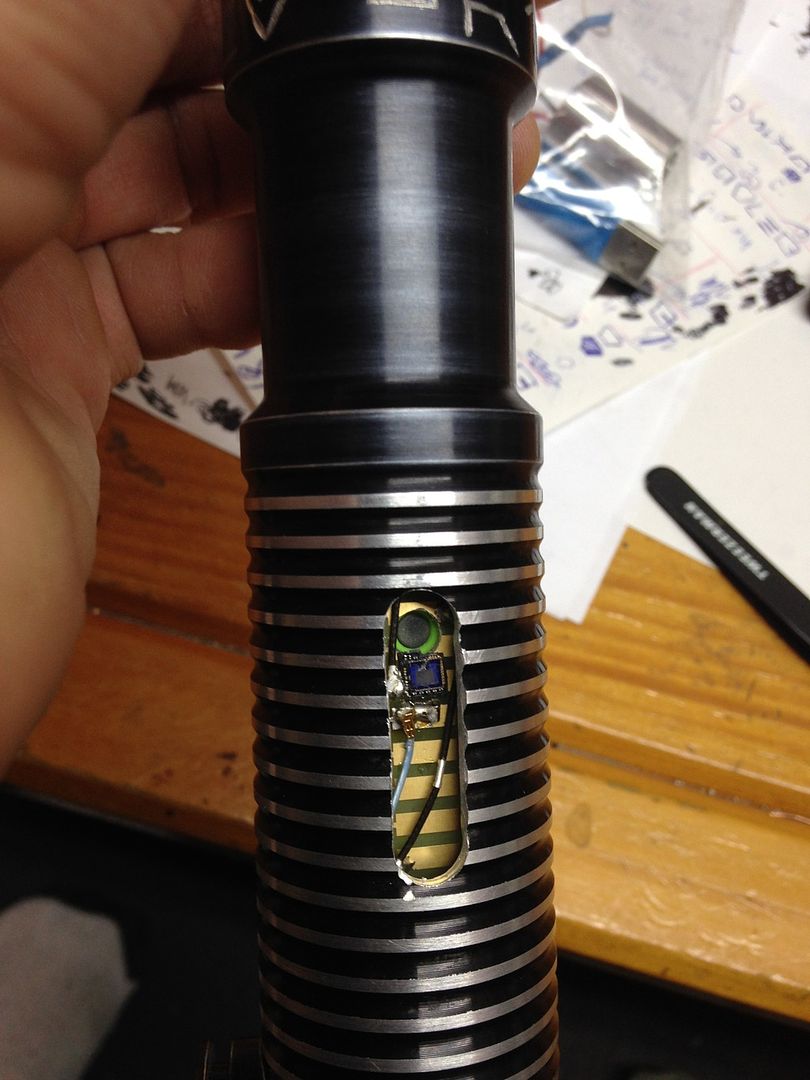 Here's that view I promised for Greg, so can see relative positions of box and cut away: 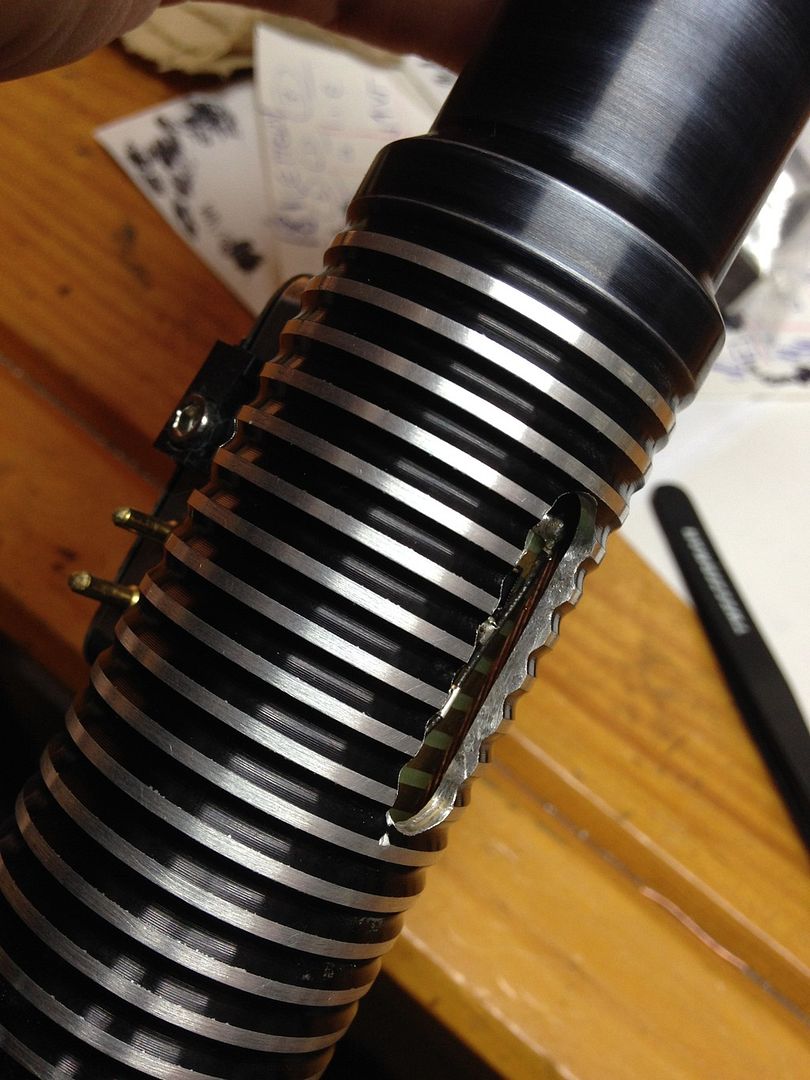 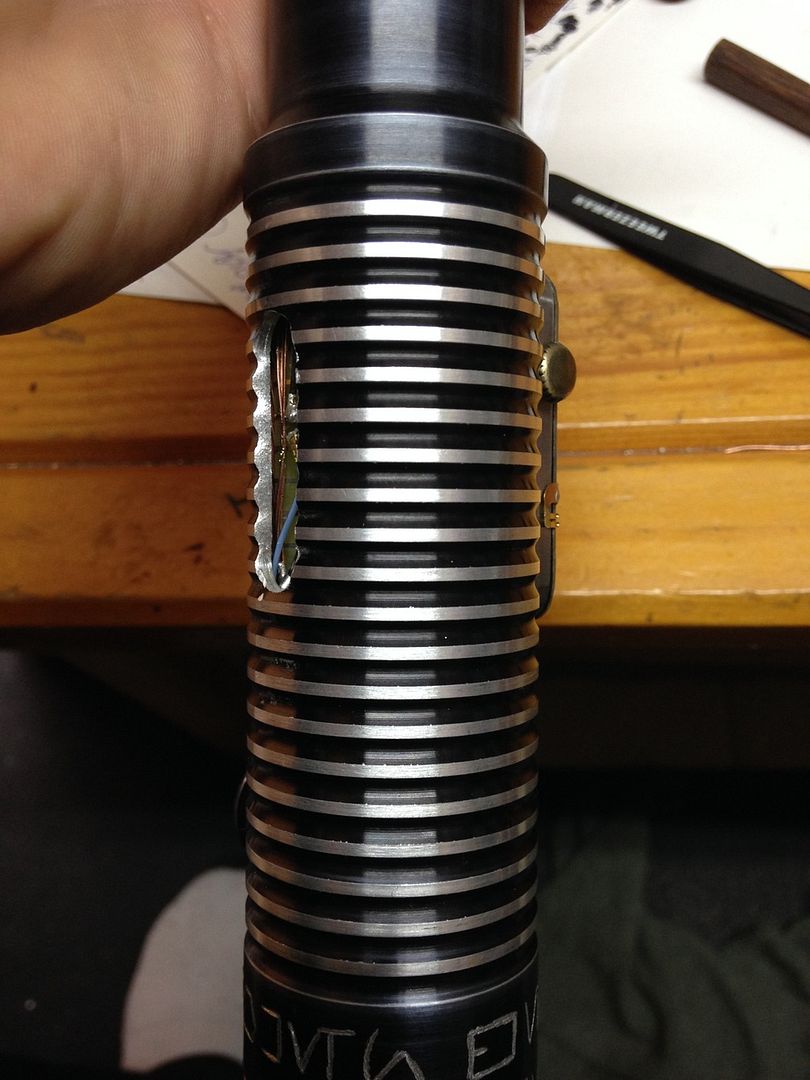 If you look close, in both pics you can just start to see some of the copper wire around the edges of bank. Keep you posted- and I'm really looking forward to seeing your guys latest projects/ updates!! |
|
|
|
|
Logged
|
|
|
|
|
GregG124
Knight Commander
Force Alignment: 436
Posts: 1479
There is only The Force.
|
|
« Reply #69 on: March 29, 2016, 06:09:09 AM » |
|
Simply amazing!
|
|
|
|
|
Logged
|
Sabers I Own:
Dominix LE V4 (Obsidian V3) - Consular Green
Arbiter (Obsidian Lite) - Consular Green
Liberator V3 (Stunt) - Guardian Blue
Light Side Points Appreciated
|
|
|
|
RevanReborn
Technomancer of the Graflex Order
Knight Commander
Force Alignment: -1086
Posts: 1121
|
|
« Reply #70 on: March 30, 2016, 10:17:37 PM » |
|
Thanks Greg . Jed got me ta think'n about the switch location more, and from a few simple decisions that had to be made in regards to that, I pretty much arrived at my entire wiring setup lol . So thanks Jed! I'm really excited about this- gonna be a blast to do, and there's gonna be a few twists n turns along this path to completion! Here's the basics though I'm gonna save some of the exact details as surprises for along the way. Sorry about the rough drawings- I don't actually know how to do proper diagrams lol, and plus after brainstorming all day this came to me while I was at work so I scribbled it down lol. 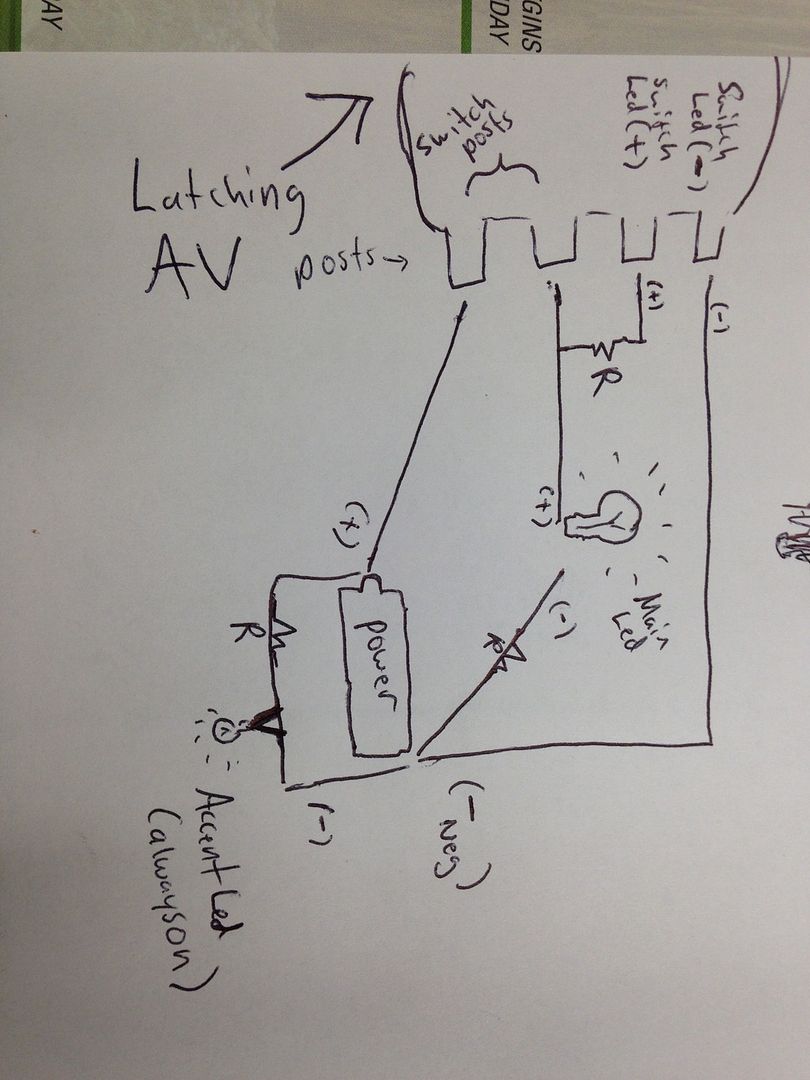 The squiggly's with R are appropriate resistors, and that big thing was just my attempt at illustrating the latching switch and its posts lol. Now here's the addition of the kill key accent switch: 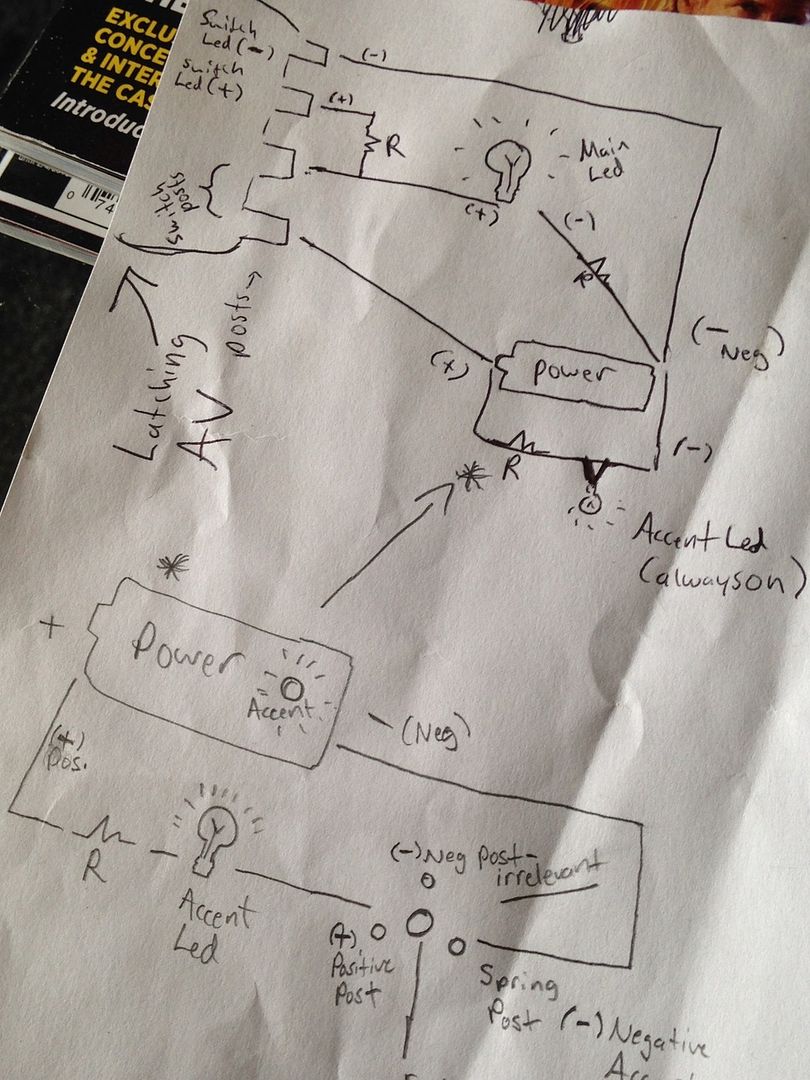 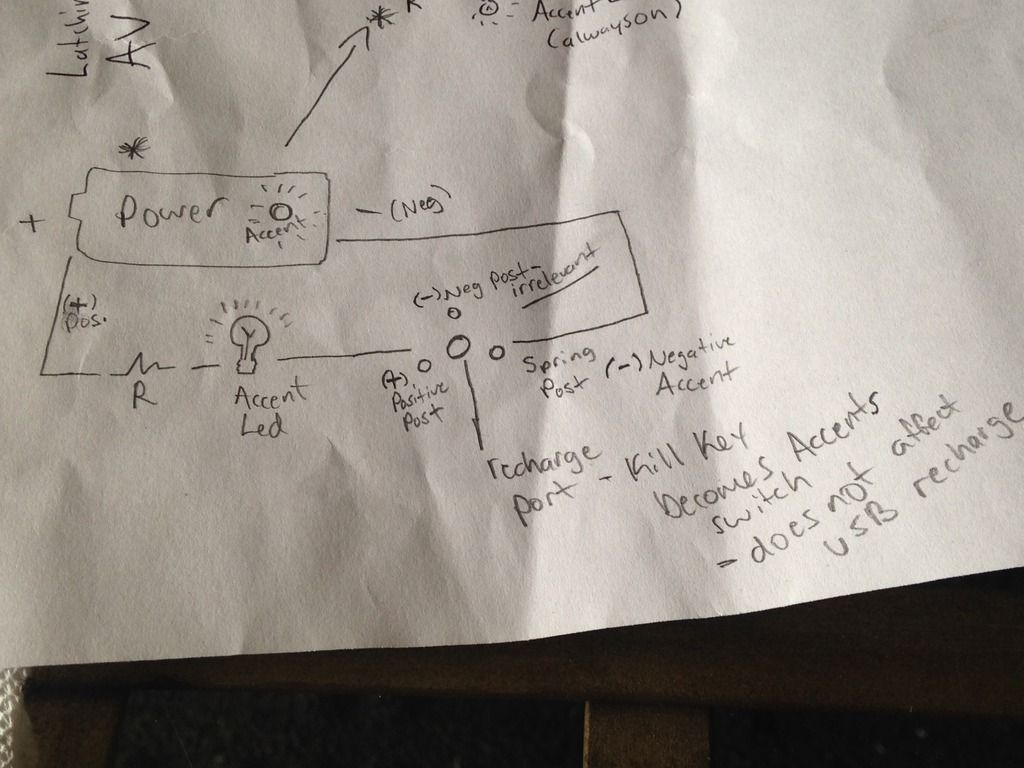 Wiring design has officially been approved by the masters lol! Special thanks to all of you, you know who you are, especially Kouri, for your knowledge and time . My understanding of these small electronics etc. would still be laughable if it wasn't for your coaching. I was actually kind of proud of myself lol, I jotted this down, my best guess/ gut instinct about how to design the internals, and it was actually right!! Another big help, aside from kouri's patience over the last few weeks as I did my homework and relentlessly shot him questions lol, were some books recommended by the one and only erv. Forrest Mims III's "electronic formulas, symbols, and circuits", and also the Forret Mims circuit scrapbook- SUPER helpful to anyone looking to get into working with and understanding small electronics. So big thanks to erv as well! It's gonna be sweet- going to use a red illuminated latching AV mounted in pommel- switch light in parallel with main led in typical fashion, with an accent led wired direct/ always on and a recharge port cut into that circuit and wired in such a way that it won't be for recharging, but will instead act as a switch for the two accent led's. I just realized it'd be cool to be able to shut the standby light off sometimes (like say during or right after charging, or like say your on way to a con, and you want to preserve as much power as you can till you arrive etc). With the always on accent, as cool as it looks IMO, that's not possible- an inconvenient side effect. But this 'switch' will give me best of both worlds- can have the accents shining away on my deactivated saber to really intensify / sell its look/ realism- but will be able to pop in a kill key and shut them off whenever. Since the blue led in the bank will come on whenever there's a draw, and the accent led's constantly being fed, there would be 2 optional always on accents- one red one blue. Recharge ports have three pins, a positive, a negative (irrelevant in this application), and a spring loaded pin that disconnects when the recharge plug/ kill key is inserted. In a normal port, these work together to allow power to be channeled to battery without sending power to board/ rest of internals. By simply wiring my positive lead to the positive pin, ignoring the negative pin and wiring my negative lead to the spring loaded pin, the kill key becomes that accent switch. Got a choke on the way that matches the sentinel style chokes, which I'll be using as a 2.5" extension at the pommel end, to give me plenty of clearance for the pommel mounted switch, and also my USB recharge port and kill key accent switch. I'm excited about gaining those couple inches I've always wanted to feel down there... (LOL!!!) and also about how dramatically will change the look- will really exaggerate the segmented look of the sentinel- will be very exaggerated emitter/ body/ grip/ and pommel sections . Keep you posted- MTFBWY. |
|
|
|
|
Logged
|
|
|
|
|
RevanReborn
Technomancer of the Graflex Order
Knight Commander
Force Alignment: -1086
Posts: 1121
|
|
« Reply #71 on: April 02, 2016, 06:44:22 AM » |
|
Well lol... anyone else spot the GIGANTIC GLARINGLY OBVIOUS ERROR in my little makeshift diagram? Hint: it's so obvious it's hard to spot... It's in the accent circuit. For whatever reason, maybe because this is an unusual way to use the port, when I cooked it up originally I had the negative from the accent going to the positive post on the port (pin), which i wish I would have realized hours ago lol, before I checked and eventually redid everything a few times haha! O well, live and learn. It's funny how even staring at the wiring and following it I just looked right past that for so long. Turned out exactly like I was hoping though, so totally worth it . Now I'll scoop a knurled kill key, and a greebly I can place almost anywhere within reason becomes a functioning switch for the accents. I'll have some pics of more progress up soon, but I better get to bed for the moment. Here's just a super quick, down and dirty vid of how it turned out- I just grabbed that bit of wiring and strew it out on the table for the sake of showing... apologies for the poor quality, and the fact that I can barely speak lol, it was a long day, capped off with a hard fought but rewarding/ necessary battle. I'll show more proper update soon- keep you posted, MTFBWY. https://youtu.be/qFNi_TbSrB8(Edit): o I forgot to mention a couple big things to put this all in perspective- it's a 5000mA bank, and the accents (switch etc.) are all parallel with main led- so all sharing the full voltage of the power source. So if you think about those accents, 20mA, 20mA (switch led), and probably about 10mA for the blue one in the bank, it's not like you'd really have to sweat it that much . BUT, it's still cool to be able to kill them for sure. |
|
|
|
« Last Edit: April 02, 2016, 07:19:47 AM by RevanReborn »
|
Logged
|
|
|
|
|
Joshie-Wahh
Knight Lance Corporal
Force Alignment: 21
Posts: 41
|
|
« Reply #72 on: April 02, 2016, 11:46:20 AM » |
|
Awesome job Rev, that's bada$$ keep up the good work, MTFBWY, point for you my friend
|
|
|
|
|
Logged
|
|
|
|
|
RevanReborn
Technomancer of the Graflex Order
Knight Commander
Force Alignment: -1086
Posts: 1121
|
|
« Reply #73 on: April 02, 2016, 03:48:54 PM » |
|
Thanks so much Joshie-Wahh! Can't wait till your transistors come in- excited to see your stunts transformation as well , gonna be epic! Point back at you. |
|
|
|
|
Logged
|
|
|
|
|
RevanReborn
Technomancer of the Graflex Order
Knight Commander
Force Alignment: -1086
Posts: 1121
|
|
« Reply #74 on: April 02, 2016, 06:52:22 PM » |
|
Ok, here's a better look at it lol- again, sorry about the vid - I was so tired i could barely even think, let alone string a sentence together. 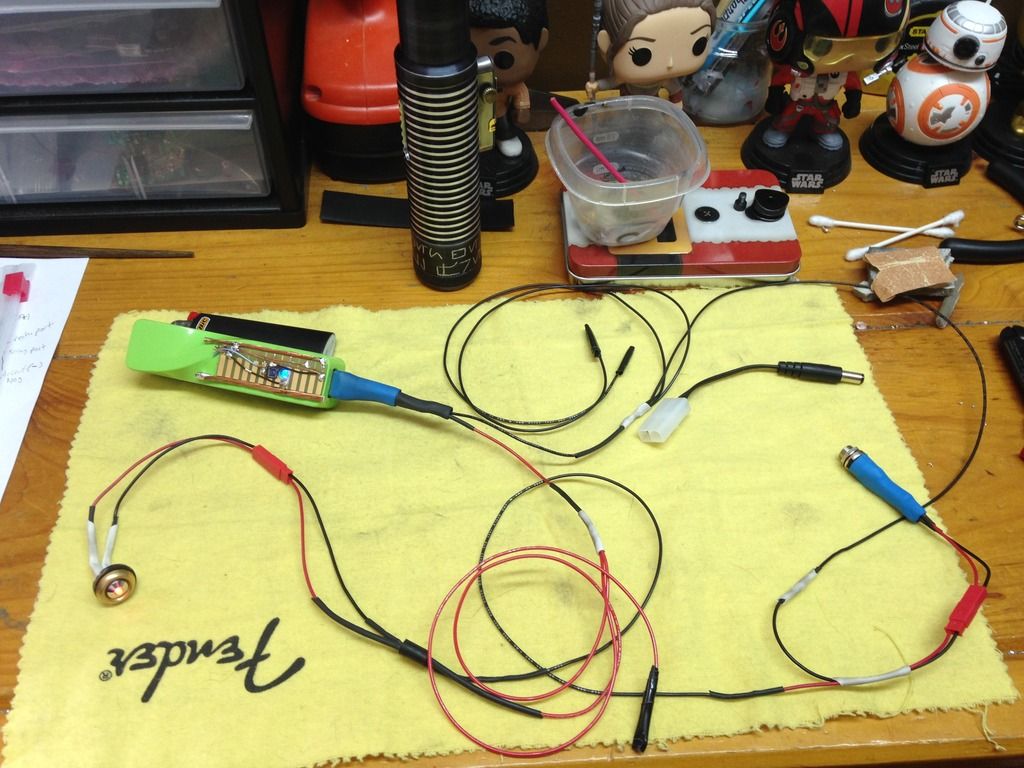 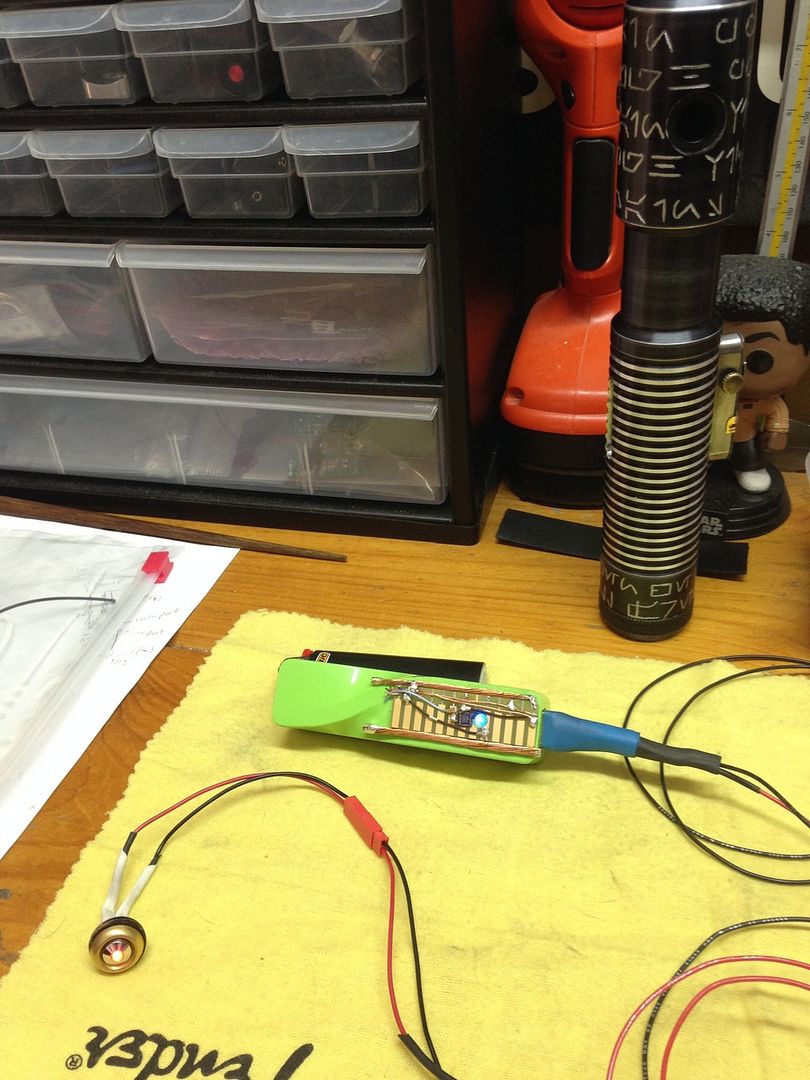 Those other ends are where my switch and led come in. Put quick connects on accent and port for convenience during installing/ testing etc., except at the USB because it's already pretty convenient popping in and out as is. I don't have a 2.1mm knurled kill key yet so just using an empty/ unhooked charger plug for time being. Keep you posted, MTFBWY . |
|
|
|
|
Logged
|
|
|
|
|
|


